Image Map

Monday, March 20, 2017

Cranberry Bars

It may be the first day of Spring today, but there is still snow on the ground outside. As much as I want to eat local asparagus and new potatoes, my farmer's market only have onions and pickles for sale. Instead of being sad about there being no spring produce, I have decided to embrace the end of winter.


There may be no strawberries, but I still have a half bag of frozen cranberries in the freezer! You may think of cranberry and orange as more of a holiday flavor combination, but I really needed these last week when there was snow and hail piling up on my tulips.

The snow is slowly melting and I'm crossing my fingers that my bulbs weathered the storm. Until the snow is all gone, I'm enjoying the last of my favorite winter treats - hearty soups, root vegetables and cranberries.

If you are already enjoying jacket-free days, I'm really jealous of you. You can enjoy all of your fresh springtime produce and I'll finish eating this pan of bars.

One Year Ago: Peanut Butter Fudge
Two Years Ago: Homemade Marshmallow Peeps
Three Years Ago: Potato, Spinach & Asparagus Quiche
Four Years Ago: Momofuku Confetti Cookies
Five Years Ago: Fish with Mango Salsa
Six Years Ago: Filled Meringue Coffee Cake

Wednesday, March 15, 2017

Cookie Dough Egg Truffles

Even though winter just served up another pile of snow for the East Coast, spring is right around the corner! I can't wait! You know who else can't wait for spring? My poor tulips that are now buried under a foot of snow. #PrayfortheFlowers


With spring comes Easter and so much candy! It's my favorite time of year to break out the chocolate and candy thermometer. I also have been eyeing up these egg truffles on Pinterest for a while and decided it was time to make them for myself! These truffles came together really quickly...


...and I ate them all. Seriously. I ate every single one of them.


You should totally make these, but maybe share with your friends. You don't want to be like me.

Though, now that they're gone, I find myself wanting to make another batch. Maybe with a different type of cookie dough...  Someone save me from myself!

One Year Ago: Salted Toffee with Toasted Almonds
Two Years Ago: Raspberry & Cheesecake Mousse Entremet
Three Years Ago: Portuguese Bread
Four Years Ago: Chicken Florentine Pasta
Five Years Ago: Peach Macarons
Six Years Ago: Chocolate Buttercream Truffles

Tuesday, February 14, 2017

Sweet Break up

Happy Valentine's Day! Or Happy February 14th? However you are spending today, I'm happy to bring you another delicious recipe. Personally, I am spending this evening on my own because I am traveling for work. Bad timing for meetings this week mean that I had Chipotle for dinner, by myself in my hotel room. So romantic!

Though this isn't terribly different from how the boyfriend and I have spent many of our thirteen Valentine's Days. Eight of those years were spent as a long distance couple. We didn't even see each other for this holiday until four years ago. Needless to say, Valentine's Day isn't a big holiday for us!

One holiday that I didn't know was a thing? February 13th - National Break-Up Day! 


Apparently the reasoning behind National Break-Up day is this - You've made it through the winter holidays (Thanksgiving, Christmas, New Years) and have made your parents happy by showing them that you aren't going to die alone. But here's the reality - you hate this person you're dating! In order to keep from wasting money on a Valentine's gift/dinner there is only one option - Break it off!


I haven't taken part in National Break-up day. I just broke up with boyfriends on random days for all the normal reasons - he showed up drunk to a high school football game, or he didn't support my plan to go to grad school, he didn't realize he was gay. You know, the normal reasons.

In honor of National Break-Up Day, Perry's Ice Cream has developed a new flavor - Bad Breakup. Sea salt caramel chocolate ice cream with fudge swirls and caramel-filled chocolate hearts. I'm so glad that it only comes in pint sizes. because I could seriously eat an entire quart of this stuff. If you haven't tried Perry's yet, hop in your car or get on a plane and fly to Western New York to get some.

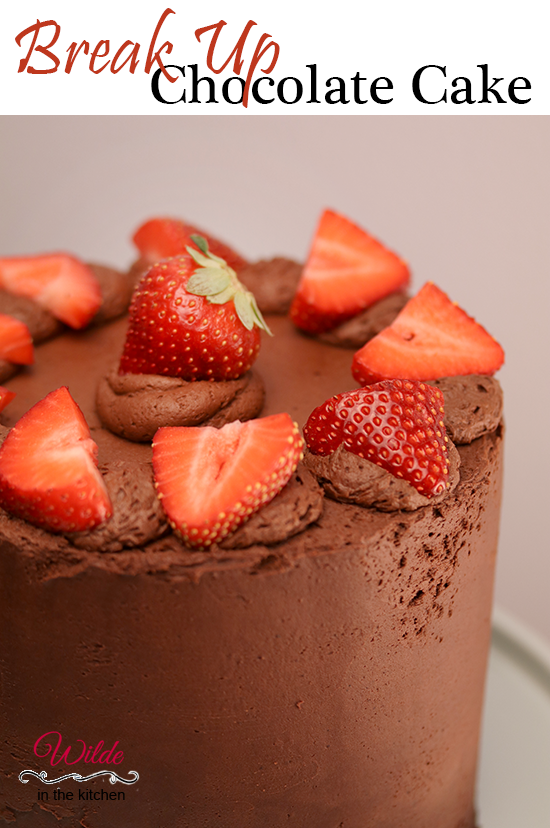
Since every breakup needs lots of chocolate, I decided to make a chocolate and strawberry cake to enjoy alongside. Chocolate and strawberries has too long belonged to the lovers on February 14th. This chocolate and strawberry cake is for all the single ladies (and gentlemen!) who just want to indulge!


You don't have to be newly single to enjoy a big slab of chocolate cake and heaping serving of Bad Breakup Ice cream. I cleaned this plate while sitting on the couch with the boyfriend!


No matter your current situation, if you are in need of a little cake and ice cream I'm going to recommend this combination! The recipe is for a 6-inch cake, just enough for a little dinner party or a week's worth of cake for a singleton. My recommendation though? Bring it to the office and butter up your coworkers! They'll complain, but be really happy at the end of the day.

One Year Ago: Homemade Moon Pies
Two Years Ago: Homemade Girl Scout Samoas
Three Years Ago: Whole Wheat Pasta with Sausage and Leeks
Four Years Ago: Chipotle CopyCat Recipes
Five Years Ago: Chocolate-Peppermint Marshmallows
Six Years Ago: Homemade Butterfinger Bars

Friday, February 3, 2017

Strawberry Shortcake Mallomars


I'm so sorry for these lackluster photos. Especially because these cookies were so amazing! Recently I was feeling the winter blues and decided to bring out some springtime flavors. Obviously I don't have any freshly picked spring strawberries, but I do have freshly picked, frozen strawberries!

Now you know that I'm a huge fan of making marshmallows. I could probably make them in my sleep now. I can't believe that I never used strawberries to make a strawberry marshmallow! By simply swapping out the water for pureed strawberries, you too can have these fluffy marshmallows in your life! This is also the perfect time of year to make marshmallows, cool temperatures and low humidity are a candy makers dream conditions!

Not only are these cookies a reminder that spring is only a few weeks away (no matter what that silly groundhog has to say!), but they are perfect for February and Valentine's Day! A mixture of red, pink and white sanding sugar really amps up the holiday theme. I'd recommend topping them with a candy heart and giving them to your favorite person.

One Year Ago: J@H - Fauxritos
Two Years Ago: Parmesan Fries
Three Years Ago: Magnolia's Banana Pudding
Four Years Ago: Homemade Granola
Five Years Ago: Homemade Fondant
Six Years Ago: Brown Sugar Glazed Carrots

Saturday, December 10, 2016

Candy Cane Cake

 Happy Holidays Everyone! I've been crazy busy with my new job and haven't had a lot of time to blog recently. With the holiday season upon us, I knew that I had to do some baking and bring you a few seasonal recipes.

Luckily, my department at my new job holds a holiday party each year! My department is so multi-national and multi-cultural, our holiday pot luck was a diverse array of curries, perogies and fried chicken. The entire office floor smelled amazing all day long! I decided to bring in a dessert that looked really fancy, but took no time at all to create.


The striped peppermint frosting hides three layers of rich chocolate cake and chocolate frosting. I went with a homemade chocolate cake recipe, but you can definitely save time and use a box mix. Just be prepared to use a lot of butter when you decorate this cake! There is a lot of buttercream on this bad boy. If you have the right tools, you can get this look in less than ten minutes. Just have a piping bag, turntable and bench scraper on hand and you can have a stripey cake too!


Sorry there is no inside view of this cake. I didn't want to cut it before I took it to the office because I wanted it to look pristine for the party. I also wanted to see how long it would take for someone to cut into it! 

Unfortunately I set the baking bar pretty high with my new coworkers. They are going to be expecting some pretty impressive treats in the future...


One Year Ago: Cherry Cordial Mallomars
Two Years Ago: Candy Cane Mallomars
Three Years Ago: Christmas Fudge
Four Years Ago: Acorn & Sausage Bake
Five Years Ago: Peppermint Mallomars
Six Years Ago: Banana Whoopie Pies


Saturday, November 5, 2016

Oreo Brownies

Are you ready for more recipes? I've been crazy busy over the past two months and haven't had a moment to make my own dinner, never mind making fun treats for WITK. What has I been doing? First, the boyfriend and I trained for and ran a half marathon! Second, I started a new job! 

The new job is along the same lines of what I was doing at my last company, but with much less international travel. I'll miss the monthly opportunities that I had to visit the far reaches of the planet, but I look forward to the new challenges associated with my new job!

One of the important things about my new job is that my office is so much larger. My previous company was only seven people in an office. Pretty small when you want to bake a cake and feed the leftovers to your coworkers. These days I have so many happy coworkers to feed, I can't wait to ply them with sugary sweets. How else do you make new friends at work?


I made these brownies a few months ago and fed them to myself. Luckily the recipe makes a smallish batch of brownie cookies and they store pretty well.  You can make a batch of these on Sunday and enjoy them all week long! 

With my new coworkers to feed, watch out for new recipes here in the kitchen! I'm ready for the holiday season and can't wait to get back to blogging.

One Year Ago: Brownie Donuts with peanut butter glaze
Two Years Ago: Loaded Potato Soup
Three Years Ago: Apple-Cranberry Crumble
Four Years Ago: Pumpkin cookies with Chocolate chunks & How to roast a sugar pumpkin
Five Years Ago: Honey-Roasted Peanut Butter Cookies
Six Years Ago: French Toast Cupcakes


Thursday, September 29, 2016

J@H - Homemade Cherry Cola

Sorry to have been so sporadic posting here recently, I have been crazy busy with lots of things happening in my non-internet life. Many changes have occurred over the past four weeks and I'm hoping they mean that I will have more time for cooking, blogging and life!

The big news? I quit my job,! Then I took off two and a half weeks before I started a new job! I'll miss the people at my old job, the international travel and the unique business model. What I won't miss? The 2 hour and 15 minute commute.  Each way.  

In addition to my new job, I also got myself a car! I haven't owned a car in almost six years. Since I lived in Connecticut, I got around on my own two feet or via public transportation. Trains, trams, buses, I've learned the tri-state area system pretty well over the past five years. Need to know how to get anywhere via NJ Transit? I can get you there. Now I just need to learn how to drive in New Jersey. Trust me, it's a whole different game from driving anywhere else!

With these changes, I've added so much more time to my life. I finally have the time to finish my Junk at Home Challenge! I decided to get going on it right away and try my hand at cherry cola.  


I've made a few recipes from the Homemade Soda cookbook by Andrew Schloss, but I've always shied away from making this recipe. It requires a lot of ingredients. Most of the ingredients are pretty common, but I had quite the grocery list and had to visit a specialty grocer to pick up dried bitter orange peel.


The recipe itself comes together very quickly. Once the cherry cola concentrate is finished, you just have to let it cool and you can be enjoying floats in no time! This cherry cola definitely tastes like cherry cola, but it doesn't taste like something that you would buy in the store. The flavors are much more complex and pair really well with vanilla ice cream!

Let's see if I can finish my 2015 challenge by the end of 2016!

One Year Ago: Pumpkin Mallomars
Two Year Ago: Rigatoni with Pepperoni, Mozzarella and Arugula
Three Years Ago: Peanut Butter Banana Bread
Four Years Ago: Sun-dried Tomato Ravioli with Basil Cream Sauce
Five Years Ago: Pumpkin Pie Mallomars
Six Years Ago: Chocolate Crisps

Friday, September 16, 2016

Pumpkin Whoopie Pies with Dulce De Leche Filling

Welcome to Autumn! This morning I had my first hot apple cider, which is what makes the season a reality for me. Apples, pumpkin, cinnamon, cranberries. They all scream Fall to me! I'm sure you've noticed that your Pinterest board is full of pumpkin-flavored recipes. I'm about to add another one to the pile.

Today I'm happy to partner with Dorie Greenspan and OXO to bring you my first Fall-related recipe of the year! Dorie Greenspan is set to release her first ever cookie cookbook this October and several bloggers across the internet are working together to Bake a Difference for Cookies for Kids' Cancer. For each blog post, OXO is donating $100 to the Cookies for Kids' Cancer Foundation, with a possible donation of $100,000!

Today I'm featuring Dorie's Pumpkin whoopie pies with dulce de leche filling. The recipe came together super fast with a few new OXO additions to my kitchen. I used the new On Illuminating Digital Hand Mixer from OXO to make the cookie dough. I haven't owned a hand mixer in probably six years, but this one is so cool! The controls are digital and the mixer has its own light, you can make cookies in the dark! Additionally, the mixer comes with its own on-board storage system for the beaters and the cord wraps neatly around the base. A quick turn of the dough with a spatula and the dough was ready to go.

I quickly scooped out the perfect amount of cookie dough with the 2-tablespoon (medium) cookie scoop. Using a cookie scoop ensures that all of your cookies are the same size and that they bake evenly. I have all three sizes! Side note - the large size is perfect for making cupcakes. The cookie dough for these whoopie pies is a little loose, so using a muffin pan to bake the cookies is the perfect solution. OXO sent along their non-stick Pro 12 Cup Muffin Pan to bake the cookies. This is the most heavy duty muffin pan that I have even owned! It's ceramic-reinforced, two-layer construction with a commercial-grade coating. The cookies popped right out!


With the cookies baked, the dulce de leche filling was incredibly easy to whip up. Just five ingredients and you've got tasty filling in under five minutes. After filling the cookies with the frosting, I may have eaten a good portion of the leftover frosting...


If you too want to get into the Autumnal spirit, head to the store and pickup some pumpkin puree and frozen cranberries. Your house will be smelling of cinnamon in no time! Get yourself a pumpkin spice latte, throw on your fuzzy pants and get ready for the cooler temperatures!

Monday, September 12, 2016

Tailgate Time! - Football Celebration Cake

Today I woke up to chilly temperatures and a definite Fall-like feel to the morning. While the days still feel like summer, the mornings and evenings are beginning to take a turn toward Autumn. In the US, nothing says Fall more clearly than the start of football season. 

This past weekend was the opening of regular season football. Last week I created a few recipes for your tailgating party, today I bring you something to get you ready for the end of the season! It's time to think big for your team and plan your playoff celebration cake!  Being a Buffalo girl I find it a little difficult to even think about calling this a playoff celebration cake, but you can always dream!


I made this cake to celebrate the Buffalo Bills. The layering of colors in this cake is reminiscent of the team logo, with a red stripe slashing across a blue buffalo. If you call yourself a fan of another football team, just swap out the colors for your own team colors! I made a custom blend of red, white and blue sprinkles from three bottles of single colors that I bought at a local cake supply shop. You can pick up your team colors at Michaels Arts & Crafts or online at Amazon.


The cake toppers are also super easy to make! I found a clipart image of a football and traced it onto wax paper. Melting some chocolate chips and transferring them to a zip-top bag with a small piping tip, I was able to draw out the chocolate football and endzone upright.


To keep the local spirit going, you should pair your celebration cake with a local brand of ice cream! Perry's is the local brand of choice in Western New York and I have paired my celebration cake with the "Sundae at the Ralph" flavor. The red and blue sprinkles in the ice cream go right along with my team color theme!

Go ahead and plan for the best, buy your sprinkles and food coloring and get ready to celebrate!  Or just enjoy practicing your layer cake skills and eating the delicious results.

One Year Ago: Pumpkin Mallomars
Two Years Ago: S'mores Cupcakes
Three Years Ago: Cookies Dough Stuffed French Toast
Four Years Ago: Southwest Chicken Burger
Five Years Ago: Baked Pears & Salad
Six Years Ago: White Chicken Chili

Friday, September 9, 2016

Tailgating Time! - Ice Cream Cookie Dip

The chilly days of tailgating are coming! Probably not this weekend, (it's going to be in the mid-80's this weekend in the tri-state area) but soon we'll be bundling up in layers and heading out to the game with thermoses of hot drinks.  If you are a football fan in the northern part of the country, this is your reality. There are approximately three weeks of comfortable football weather before the too chilly temperatures take over and make it impossible to enjoy a game without bringing a blanket. During these crisp Fall weeks, I think you should bring this to your outdoor tailgating party...


Yes! Ice Cream Cookie Dip! I'm sure you've seen the different types cookie dip floating around the internet. Most of these dips use cream cheese as a base and are all perfectly delicious. This cookie dip uses your favorite ice cream as a base! Basically, this is an excuse to eat a bunch of ice cream with an edible spoon.


The reason I suggest this recipe only to those in the northern states is because it will melt rather quickly at temperatures higher than 50 degrees! I used a bit of gelatin in this recipe to stabilize the dip, but it still is mostly ice cream and will turn into a pool of delicious melted ice cream if you sit it in the blistering sun. I suggest keeping this in a cooler until you are ready for dessert, then eat up! Unless you are in Buffalo, NY. You will have no problem setting this out on your tailgate in a few weeks! Winter is coming...

Continuing to celebrate my hometown and all things Buffalo Bills, I used the new Perry's Ice Cream - Sundae at the Ralph - to make my ice cream cookie dip. The ice cream has little peanut butter-filled footballs mixed in. These were a special bonus when scooping into the dip!

After working with this ice cream on several recipes, I find myself wanting to put on my old Zubaz pants. Unfortunately I haven't owned a pair of Zubaz since 1994. I think that either a. my mom has since donated them or b. I won't fit into my 13-year old self's pants. Disappointing.


Wait, I just checked... Zubaz still exists!  Time to go buy some and bring back the trend...

Four Years Ago: Ramen Vegetable Soup
Five Years Ago: French Croissants

Tuesday, September 6, 2016

Tailgating Time! - Ice Cream Pizza

Are you ready for some TAILGATING!?!???!!  Personally, I'm not really a football fan. I'm pretty sure my apathetic feelings for football come from being a child in Buffalo during the 1990's. While I don't really care for the sport, I'm all about tailgating. Actually, you can convince me to attend any sporting event as long as you promise me food.

Want me to attend a baseball game? Buy me a salty soft pretzel. Your favorite team playing a hockey game tonight? Get me some nachos and I'll watch happily. Football? Invite me to your tailgate party and I'll dress in your team colors.


Over the next two weeks I am teaming up with Perry's Ice Cream to celebrate the beginning of football season with ice cream and tailgating treats! While ice cream might not be the most common tailgating treat, Buffalo fans are used to freezing temperatures and snow! Perry's created their newest flavor - Sundae at the Ralph - with vanilla ice cream, peanut butter footballs, chocolate swirls and red and blue sprinkles! It's so Buffalo.


Watching the game from home? You can prepare this ice cream pizza for your friends and let them choose their own toppings. Not in the WNY region and can't get your hands on Perry's? Simply use your favorite brand of vanilla ice cream and sprinkle on some candies in your teams colors.


Not a Buffalonian and wondering why it's called "Sundae at the Ralph"? Well, The Ralph is our football stadium! Or at least it was until about a week ago, when it turned into New Era Field. I don't know how I feel about the change...


Disclaimer - As a member of Perry's Ice Cream "Inside Scoopers" team, I receive samples of seasonal ice cream flavors. I receive no other compensation for recipe development and posts. I only work with brands that I love and as a hometown Buffalo girl, Perry's is in my blood!

One Year Ago: Homemade Snickers Bars
Two Years Ago: Watermelon Mallomars
Three Years Ago: Faux Fudge Rounds
Four Years Ago: Homemade Coconut milk & chili sauce
Five Years Ago: Congo Bars
Six Years Ago: Peanut Butter Pancakes

Friday, July 8, 2016

Happy 6th Anniversary WITK!

It's that time of year to celebrate here at WITK! It's been six years since I first opened up a blogger account and put my fingers to the keyboard to write. Over the years I've gone through pounds and pounds of sugar, butter and flour. I've tested out recipes from Thailand, Spain, Italy, China, Vietnam and countless other countries. I've deep fried, sauteed, crystallized, baked, but most of all, I've had so much fun.


The best part of blogging over the years is being inspired by the other bloggers out there in the world. I'm constantly amazed at the creativity of the bakers and home cooks living in the blogosphere. Reading through my Bloglovin' feed tempts me to try new things and motivates me to up my game.

However, recently I've been feeling decidedly uncreative. My time has been taken up by work, travel and life and I haven't been able to spend as much time as I would like here at WITK. This is the reason why my anniversary cake for 2016 is more than a little inspired by Sweetapolita. This cake is directly pulled from her 2015 cookbook. The colors were so cheerful and vibrant, the sprinkles so happy and bright, I decided not to deviate from the original design.


Thankfully, I have a few life changes planned in the next few months. These upcoming changes will hopefully bring me more time for creativity and baking! I have a massive desire to finish my 2015 and 2016 challenges and bring you all more candy than your teeth can handle. Until that time, please enjoy this beautiful cake. It is not only stunning, it is super delicious. Major kudos go to Rosie from Sweetapolita. She is such a talented baker and businesswoman. I want to buy all of her sprinkles!


Thank you all for coming along on this journey with me!

One Year Ago: Strawberry Cake
Two Years Ago: Neapolitan Cake
Three Years Ago: Milky Way Cake
Four Years Ago: Buffalo Sponge Candy Cake
Five Years Ago: Banana Coconut Muffins
Six Years Ago: Chocolate Cupcakes (with high altitude recipe)


Yum, Sprinkles!

Monday, June 20, 2016

Celebration Cupcakes

I'm constantly on the hunt for the perfect chocolate cupcake recipe. I think this one comes pretty close to perfect! The cake is soft and fluffy. The flavor is rich, with the perfect combination of chocolate and coffee. They bake up round and don't fall when cooling. I think I've found my new favorite chocolate cake!


I've called them celebration cupcakes simply because they make me so happy! The fluffy, white marshmallow frosting paired with the shiny chocolate drizzle and colorful sprinkles make this cupcake the perfect one to bring to any special event. Even though they look like they took all day long, each component of the cupcakes comes together really fast! 

I made the cupcakes while my lunch was heating up in the microwave. The frosting requires a bit of attention to heat the eggs, but then you toss it in the stand mixer and walk away. The chocolate glaze is as simple and melt, mix and drizzle.  Trust me, you can make these treats in under two hours. If you have helpers, you can probably knock them out in an hour!


I don't really have anything special to celebrate right now, so I'm sending these cupcakes to work with the boyfriend! Otherwise, I'll eat the entire batch. Maybe in a few weeks we'll have something to celebrate in the Wilde household. Until then, I'll try to eat healthy this summer and keep my cupcake consumption down to one per day!

One year ago: Celebration Sprinkle Cake
Two years ago: Neapolitan Cake
Three years ago: Momofuku Celebration Cake
Four years ago: PB&J Mallomars
Five years ago: Chocolate Cupcakes with Strawberry Buttercream

Sunday, June 12, 2016

Brownie Ice Cream Sandwiches

Summer has unofficially arrived! I had planned to post these treats a week ago, but silly work got in the way. I was off in Chicago for a conference and completely neglected to share these before I left. Thankfully photos don't go bad and these ice cream sandwiches will be amazing all summer long.


I made something similar last year, but with a different brownie recipe. This recipe (inspired by Cookies & Cups) worked so much better for this purpose! The thin brownies are soft and chewy and perfect to eat right out of the freezer. No need to wait before diving in with your face! 

As per usual, I only celebrate summer with Perry's Ice cream. These brownie ice cream sandwiches were made with the new summer flavor - Deep Sea Treasure. It's caramel ice cream with salted caramel swirls and chocolate bits and paired really well with the sweet and chocolaty brownies. If you aren't in the Perry's Ice Cream shipping zone (Western NY & PA), you can fill these brownies with your favorite flavor. I can't imagine a flavor of ice cream that wouldn't pair well in this recipe. 


I cut the recipe into six ice cream sandwiches and thought they were a little bit big. You might want to cut the slab of browniewich into eight bars when making these yourself. If you want an even thinner layer of brownie, try making them in a 10x15-inch sheet pan! 


You can personalize these browniewiches in so many ways. Add chocolate chips to the brownies! Dunk them in chocolate magic shell! Roll the edges in chocolate sprinkles! Make them your own and then share them with your favorite people. 


Disclaimer - As a part of Perry's Ice Cream Inside Scooper team, I received several pints of the new summer ice cream flavors. I have been a fan of Perry's ever since I was a kid in school. I only work with brands that I love and enjoy and all opinions are my own. Other than free ice cream, I receive no compensation for posting.

One Year Ago: Grasshopper Pie Ice Cream Sandwiches
Three Years Ago: Momofuku Celebration Cake
Four Years Ago: Cinnamon Roll Cupcakes (These are amazing, you should make these too!)
Five Years Ago: Coconut Joys

Monday, May 30, 2016

Raspberry-Lemon Soda Floats

With the unofficial start of summer here, it's time to celebrate all things ice cream! All this week we will be enjoying ice cream-based recipes to help keep you cool all summer.


Today we start with a classic summertime recipe - the ice cream float. I remember drinking many floats during my summer vacations. I think they consisted of cherry Crush poured over vanilla Perry's Ice Cream. For ice cream week 2016, I decided to amp up my ice cream float with a homemade soda and a new Perry's flavor.


The ice cream featured in my raspberry-lemon soda floats is called Lemon Chillo. It's a lemon ice cream with cookie swirls. If you don't have access to Perry's Ice Cream (i.e. you live outside of the WNY area) you can go ahead and use a lemon ice cream or sorbet.

The raspberry soda comes together really quickly too. The only ingredients you need are raspberries and sugar! I carbonated my soda with a siphon, but you can use bottled, plain seltzer water if you haven't bought a siphon yet!


What are you waiting for? Stop making boring ice cream floats. Mix up your flavors and toss chocolate ice cream into cream soda. Pour coconut seltzer over pineapple ice cream. Don't limit yourself to just plain vanilla! (And let me know what unique flavor combinations you come up with!)

Disclaimer - As a member of Perry's Ice Cream Inside Scoopers team, I received the new summer ice cream flavors to test out. I've been enjoying Perry's Ice Cream since I was a kid and I'm so happy to be able to support a locally owned and produced (and delicious) product. Other than free ice cream, I have not received any compensation for this post. All opinions are my own and I totally ate all of the ice cream they sent me. All by myself.

One Year Ago: French Toast Ice Cream Crepes
Two Years Ago: Quiche with Sweet Peppers & Sausage
Three Years ago: Funfetti Mallomars
Four Years Ago: Tarragon Chicken & Pesto Potatoes
Five Years Ago: French Baguettes

Friday, April 15, 2016

Eggs for Dinner - Shakshuka

I may be strange, but I do not like to eat eggs for breakfast. I prefer sweets in the am. I'm all about French toast, donuts and cinnamon rolls for starting my mornings. I like to reserve eggs for the evening hours. 

And why not? Who ever said that you need to eat eggs only for breakfast? You eat chicken for dinner, so why not eggs? Especially when they are in such a savory dish as this shakshuka.


I have seen this recipe around the internet for a while now and I even say it on a few menus while visiting Istanbul last year. I only recently got around to trying it out and I'm so mad at myself for not trying it earlier. I imagine that it would have been amazing in Istanbul, with fresh feta and vegetables.

Even though I didn't get the feta a eggs from my local farmer, this meal was still absolutely amazing. We had it for dinner one night and I ate the remaining portions for lunch for the rest of the week. Once you prepare all of the vegetables, the dish comes together very quickly, with very little fuss. In about thirty minutes you can have this amazing and flavorful meal prepared, perfect for a weeknight meal.

Don't let the strange name scare you off from trying this dish. And definitely have it for dinner!

One Year Ago: Spring Risotto
Two Years Ago: Peanut Butter Macaroon Brownies
Three Years Ago: Rosemary Chicken & Potato Pizza
Four Years Ago: Potato & Choriquo Gratin
Five Years Ago: Mango Shrimp Curry


Sunday, April 10, 2016

Vegan Sponge Candy

I have been meaning to test out a vegan sponge candy for years. Many friends and family are either vegetarian or vegan and cannot enjoy the deliciousness of sponge candy. Most candies out there don't have this problem, but my version of sponge candy requires gelatin for proper aeration. It took a few tries to get the candy close to the original. I have a few tweaks left to try, but I wanted to share this first success with you.


The bubbles in this vegan sponge candy are a little larger than in my traditional sponge candy. I am still doing a bit of scientific research into the difference in the protein structures of agar agar and gelatin, but it seems that the agar agar protein is not a strong as the gelatin protein. The bubbles in the vegan version are more akin to that of a Violet Crumble or Crunchie candy bar. It's still delicious, just not quite as smooth!

To make this GMO-free, I used French glucose that was prepared from wheat (This brand). Generally, all corn syrup that is produced in the US is made using GMO corn. As a chemist, I have no problem using GMO-derived corn syrup. Chemically, the corn syrup from GMO or non-GMO corn is exactly the same. The DNA of the corn will have no effect on the corn syrup product. However, if you do not want to support GMOs, use the wheat glucose! It's definitely more expensive, but glucose has so many uses in candy-making and baking.


Since this is a vegan version, I decided to coat my candy in orange chocolate! I melted a package of semi-sweet chocolate chips, added 1 tablespoon vegetable oil and 1 teaspoon orange extract. This is a small batch of sponge candy, just the perfect amount to be able to make and eat it in less than 1 week. Keeping the candy around for any longer is tricky in high humidity. Sponge candy tends to melt when it meets too much water.  

Full disclosure - Since I coated the candy in semi-sweet chocolate, it wasn't completely vegan. There was milk in the chocolate! Vegan friends, you know your options when it comes to vegan chocolate. Simply go with a vegan chocolate for the coating.

All my vegan and vegetarian friends, you can now enjoy some traditional Buffalo Sponge Candy!


Once Year Ago: Homemade Oreo Cookies
Two Years Ago: Potato, Spinach & Asparagus Quiche with Cumin
Three Years Ago: Granola Cookie Wedges
Four Years Ago: Gorgonzola Soup
Five Years Ago: Banana Mallow Cups

Thursday, April 7, 2016

Cream of Broccoli & Leek Soup

Spring has finally arrived here in New Jersey. I know that usually means that we usually pack away the soup pots for the summer, but I wasn't ready to let go! Spring trips to the farmers market brings new potatoes, asparagus and leeks! Spring leeks have the mildest flavor and pair perfectly with the broccoli in this soup.


I decided to keep this soup on the heartier side. Since it getting warmer, you can decide whether you want to add heavy cream or not. I went with the cream for this particular batch, then we went out for ice cream. It's all about balance!

One Year Ago: Jell-O Peeps (Easter must have been later last year!)
Three Years Ago: Perry's Ice Cream Factory Tour
Four Years Ago: Grilled Chicken & Potatoes
Five Years Ago: Rosemary Foccacia

Thursday, March 31, 2016

J@H - Tootsie Roll Pops

I have been putting off this recipe for long enough. I knew how to make all of the components, it was just getting up the nerve to put them all together! Now that I've made these bad boys, I am so upset with myself for procrastinating!

With no further delay, please enjoy...


That's right. Tootsie roll pops! Chocolate taffy shrouded in a thick coating of hard candy. Did you ever think that you could make these at home?

I'm not going to say that this is the easiest thing to make at home. You definitely need to block some time and set aside any fear you have of boiling sugar. This is actually two recipes that need to be combined into one - chocolate taffy and grape hard candy. You can get fancy and buy a lollipop mold, but I decided to go a little more free form with my candies. That is why they are flat on one side.

The candy to taffy ratio is a little different with my lollipops - there is a lot more taffy in these than in a store-bought Tootsie pop. I recommend using high quality baker's chocolate and highly concentrated candy oil. With those two ingredients you will get the most richly flavored candies possible. 

How do these compare to the originals? Personally, I think they're way better. Give them a try! With all of the flavor possibilities of taffy and hard candy, I'm thinking of making a summertime version of these - Cherry lollipops with vanilla taffy anyone?

Four Years Ago: Cookie Dough Fudge
Five Years Ago:  Cookie Dough Eggrolls


Thursday, March 24, 2016

Peanut Butter Fudge

I love making candy, but I really hate making fudge. Traditional, stove-top fudge that is. The quick and easy fudge that you make with marshmallow fluff and chocolate is no problem. That stuff I can whip up with no problems. Starting with sugar and corn syrup is a little trickier. I either wind up with a sticky mess or a dry and crumbly block of sugar.

By making my way through the CIA candy cookbook, I am hoping that I will hone my fudge making skills.  There are eight fudge recipes in the book (I made one years ago) and I think my results are getting better with each attempt.

While this peanut butter fudge was not my favorite, in terms of flavor, the texture came out really well. Like all other candy recipes that I make, I couldn't eat more than a single piece. This stuff is really sweet! If you aren't a fan of molasses, you might want to find another peanut butter fudge recipe. The flavor is mild, but definitely noticeable.


To keep myself from eating it all and avoid having to spend my entire weekend at the gym, I sent the rest of the fudge to work with the boyfriend. It took his coworkers about three days to finish the batch. Share the wealth (and the calories) most people will be happy to help out!

One Year Ago: Homemade Marshmallow Peeps
Two Years Ago: Portuguese Sweet Bread
Three Years Ago: Momofuku Confetti Cookies
Four Years Ago: Homemade Buffalo Sauce
Five Years Ago: Balsamic BBQ Chicken

Related Posts with Thumbnails