Image Map
Showing posts with label marshmallow. Show all posts

Friday, February 3, 2017

Strawberry Shortcake Mallomars


I'm so sorry for these lackluster photos. Especially because these cookies were so amazing! Recently I was feeling the winter blues and decided to bring out some springtime flavors. Obviously I don't have any freshly picked spring strawberries, but I do have freshly picked, frozen strawberries!

Now you know that I'm a huge fan of making marshmallows. I could probably make them in my sleep now. I can't believe that I never used strawberries to make a strawberry marshmallow! By simply swapping out the water for pureed strawberries, you too can have these fluffy marshmallows in your life! This is also the perfect time of year to make marshmallows, cool temperatures and low humidity are a candy makers dream conditions!

Not only are these cookies a reminder that spring is only a few weeks away (no matter what that silly groundhog has to say!), but they are perfect for February and Valentine's Day! A mixture of red, pink and white sanding sugar really amps up the holiday theme. I'd recommend topping them with a candy heart and giving them to your favorite person.

One Year Ago: J@H - Fauxritos
Two Years Ago: Parmesan Fries
Three Years Ago: Magnolia's Banana Pudding
Four Years Ago: Homemade Granola
Five Years Ago: Homemade Fondant
Six Years Ago: Brown Sugar Glazed Carrots

Sunday, February 21, 2016

J@H - Moon Pies

Continuing with my quest to finish my 2015 challenge, I bring you Homemade Moon Pies!


Now, I'm not really sure what part of the country you find moon pies. I feel like they are not a nationwide snack. I managed to locate one at my local Foodtown and was able to taste test the original.


What Did I think? Blech, not terribly impressive. To be perfectly honest, it wasn't at all what I was expecting. The only version of the Moon Pie that I could locate was a vanilla, double-decker version. Thankfully I only bought one, rather than an entire box, because they would have all gone to waste.


Making a homemade version of this treat was going to be easy. Bake some graham cracker rounds, fill them with marshmallow and cover them in chocolate. That was right up my alley, I'm old hat at making marshmallows and I love coating things in chocolate. I went to my favorite vanilla marshmallow recipe and made a small change to my graham cracker recipe. The whole thing came together pretty quickly.


These homemade Moon Pies were so much tastier than the store-bought version. The recipe made about 24 sandwich cookies. I ate about half of them without the chocolate coating and shared the completed cookies with my friends. They were amazing both ways! You should definitely think about making your own moon pies before picking them up at the store.


One Year Ago: Girl Scout Samoa Cookies
Two Years Ago: Cookie Dough Stuffed Chocolate Cupcakes
Three Years Ago: Cherry Kuchen Bars
Four Years Ago: Cherry-Coconut Bagels
Five Years Ago: Cherry Turkish Taffy


Wednesday, December 16, 2015

Great Food Blogger Cookie Swap 2015


It's been a busy year around the Wilde household. I've barely had enough time to cook real food, with next to no time to spend in the kitchen making something fun. I made sure to make time this season to participate in the annual Great Food Blogger Cookie Swap.

 The Great Food Blogger Cookie Swap 2015

This year I decided to make a classic Christmas treat in mallomar form! Each year for Christmas, my mom buys my dad a box of cherry cordials. I always sneak one (or two) from the box and they always remind me of the holidays. 


Cherry-vanilla marshmallow sits on top of a crisp chocolate cookie. Covered in milk chocolate and topped with a candied cherry, these cookies taste just like the cordial candy, but without the liquid candy center. This recipe may sound daunting, but it's actually very straightforward. If you've never made marshmallow before, don't worry, it's much easier than it looks. The most difficult thing is piping the marshmallow onto the cookies. It takes a few practice pipes before you get the right technique.


If you are looking for one more cookie to add to your tray or bring to a cookie swap, give these a try! They look really impressive and taste even better!

One Year Ago: Candy Cane Mallomars
Two Years Ago: Gingerbread Mallomen
Three Years Ago: Pinata Cookies
Four Years Ago: Peppermint Mallomars
Five Years Ago: Browned Butter Spritz Cookies

Wednesday, September 23, 2015

Pumpkin Mallomars

With the return of the fall weather, something else is returning to our lives - Mallomars! Mallomars are too delicate and meltable to ship to grocery stores in the summer, so we always see the return of these sweet treats right around Labor day. Seeing them on the grocery store shelves made me want to whip up another batch myself.


If you've been a long time reader of WITK, you may remember that I made pumpkin mallomars several years ago. I think it was three years ago... Feel free to go back into the archives and check those out too, they're totally different from these pumpkin mallomars. The old recipe has a pumpkin marshmallo, vanilla cookie and they're coated in white chocolate.


Rather than getting fancy with the marshmallow, I stayed super traditional with a vanilla marshmallow. Where the pumpkin comes in is the cookie! A pumpkin cut-out cookie? How did I not think of this years ago? Adding pumpkin to a cookie recipe is so much easier than trying to balance the flavors and texture of a candy. These cookies came out of the oven smelling like Fall and so delectable, even without the marshmallow topping.


The marshmallow on top really brings these cookies to a whole new level. Actually, they taste just like pumpkin pie. Seriously! The delicate flavors of the pumpkin cookie and vanilla marshmallow taste just like you popped some vanilla whipped cream on top of your pumpkin pie.


Of course these aren't exactly like a traditional mallomar. Most importantly, they aren't covered in chocolate. I coated my first few mallomar recipes in chocolate. I came to realize that the chocolate flavor was covering up the mild flavors I was infusing into the marshmallow or cookie. Therefore, we will call these "Naked Mallomars" from here on out.

Also, don't let the homemade marshmallow scare you off. Personally I've made marshmallows at least two dozen times. It gets easier and easier each time you put a batch together. This vanilla recipe is simple, quick and takes no more than 15-20 minutes to go from ingredients to piping bag. Have marshmallow questions? Leave them in the comment section and I'll try to be of assistance!

One Year Ago: Watermelon Mallomars
Two Years Ago: Pumpkin-frosted, caramel-filled, vanilla cupcakes
Three Years Ago:Ramen Vegetable Soup
Four Years Ago: Pomegranate Ice Cream
Five Years Ago: Apple cake with Brown sugar icing

Monday, June 22, 2015

J@H - Homemade Snoballs

I'm a few challenges behind on my Junk at Home 2015 challenge, due to travel and work, so I thought I should get back to it with a bang! This week I was scheduled to make my own version of Hostess coconut snowballs and I decided to make it all from scratch.


Even though I had to made four different things for this recipe, it all came together pretty quickly. Aside from the shredded coconut, you probably already have all of the ingredients in your pantry. Well, as long as you're a baker, if you don't bake a lot you may need to head to the grocery story for a few things (unsweetened chocolate, marshmallow creme, Greek yogurt).


While you can get Snoballs at the store once again, you should definitely try making them at home. It's so much fun! Look at these adorable little purple puffs! The colored coconut is so easy to make. Simply place a bag of sweetened, shredded coconut into a large zip top bag. Add a drop of gel food coloring and squish it around until the coconut is evenly colored. Alternatively, you can add the coconut and food coloring to a food processor and pulse until the color is even and the coconut is slightly smaller.


The big question - do they taste like the original? With the combination of marshmallow, coconut and chocolate, there is no way for these to taste like anything else! This was definitely a winner in my book.

Two Years Ago: Strawberry Bacon Pizza
Three Years Ago: Pesto-Yogurt Chicken
Four Years Ago: Baked Pasta Casserole

Thursday, March 26, 2015

Honey Marshmallow Peeps

I was supposed to be bringing you jelly beans for Easter this week. Unfortunately the jelly bean molds that I ordered a month ago haven't yet arrived. I thought giving Amazon a full month to deliver my order would be enough. Apparently I was wrong...

In order to keep up the holiday cheer and bring you all something sweet and Easter related, I picked up another mold at my local craft store. Instead of jelly beans, today we are making Peeps!!!


I've seen several recipes for homemade peeps around the internet. A bunch of people even being patient enough to hand pipe their peeps (just like how they were made at the Just Born factory in the beginning!). I gave hand piping a try...


It didn't work out. I fairly certain that the marshmallow recipe I used wasn't the right one for this particular method. The high amount of corn syrup in the marshmallow syrup lead to a softer final product. While the marshmallow batter wasn't appropriate for hand piping, it was perfect for filling molds!


Two molds, three jars of sprinkles, a box of sugar eyes and a few hours later, my own peeps were born.


And they are so adorable!


The honey flavor in this recipe is fairly mild and is seems to mellow as the peeps age.

Two Years Ago: Momofuku Confetti Cookies
Three Years Ago: Tarragon Chicken and Pesto Potatoes
Four Years Ago: Mango Lime Muffins

Vanilla-Honey Marshmallow Peeps
From Chocolates and Confections

I chose to go with the classic pink, yellow and blue colors, rather than going too crazy with orange or silver. I also used black sugar pearls instead of piping on chocolate eyes. The store bought peeps actually have eyes that are made out of carnuba, an edible wax. Rather than locating some wax and ruining my pans, I thought the sugar pearls were a good alternative!

3 tablespoons powdered gelatin (3 Knox envelopes)
1/2 cup cold water

1 1/2 cups sugar
3/4 cup light corn syrup (light not lite)
1/4 cup honey
1/2 cup water
1 tablespoon vanilla extract

Variety of colored sprinkles
Small black sugar beads

Lightly spray 2 Wilton Peep molds with cooking spray. Wipe out some of the oil with a paper towel.

Whisk gelatin into cold water and set aside while you prepare the sugar syrup.

Combine sugar, corn syrup, honey and water in a 2-quart pot. Bring to a boil over medium-high heat and clip on a candy thermometer. Allow the sugar syrup to boil undisturbed until it reaches 250 °F.

When syrup reaches 250 °F, pour into the bowl of a stand mixer and let sit until the temperature drops to 210 °F.  While the sugar cools, melt the gelatin in a hot water bath (or the microwave). Pour melted gelatin into the sugar syrup and start whipping on high with the whisk attachment.  Whip marshmallow batter for about 6 minutes, until white and fluffy. Add vanilla and whip to incorporate.

Transfer half of the mixture to a large piping bag, fit with a 1-cm round tip. Fill the peep and bunny molds to the top with marshmallow batter. Sprinkle the exposed bottoms of the marshmallows with different colors of sprinkles. Allow marshmallow to set for 3 hours.

Pop marshmallows out of the molds. Add sugar eyes. Coat marshmallows in colored sprinkles and let set for 1-2 hours before serving.

** Alternatively to using the peep molds, you can pour the marshmallow batter into a greased 9x13-inch pan. Stamp out marshmallows with these peep cookie cutters.


Monday, December 15, 2014

Candy Cane Mallomars

It's that time of year again!


I have had very little time to bake cookies this year. In addition to moving house recently, the oven in said new house keeps breaking. Basically, we need a new controller board for the oven. The oven keeps powering off at random times. For that reason, I wound up sending my cookies out two days late. Sorry cookie matches!!!


I held strong to tradition and made a holiday mallomar for the cookie swap. This year I went with the classic flavor of candy canes and added a little visual flair with some red and white. Not only is there peppermint flavoring in the marshmallow, I crushed up a whole box of candy canes and added them to the marshmallow. Sweet and crunchy!


Many thanks go out to Lindsay and Julie for organizing the Great Food Blogger Cookie Swap. Not only were there packages of cookies flying all over the world, we also partnered with Cookies for Kid's Cancer and raised money for a good cause.


Since I wasn't able to cook a ton of cookies for the holidays this year, I don't have a bunch of fun new cookie recipes for you. I'm very, very sad about this. Luckily, you can drop by the GFBCS round-ups and see an amazing selection of cookies. Or, you can give these mallomars a try!

One Year Ago: Gingerbread Mallomen
Two Years Ago: Triple Peanut butter and chocolate cookies
Three Years Ago: Peppermint & Chocolate Mallomars
Four Years Ago: Banana Whoopie Pies

Tuesday, September 2, 2014

Watermelon Mallow Cookies

I can't believe that it's September! I totally meant to post these cookies weeks and weeks ago. Why? Watermelon screams summer. Watermelon does not say "pumpkin spice latte," "cozy sweaters" or "chilly evenings." Sorry, I have a good reason! I'll be sharing more on that later. For now...

Check out these cute cookies!  So adorable!


I had this image in my mind at the beginning of the summer. I was dreaming of a watermelon mallomar with cute black seeds and bright green cookie. After two weeks of searching for candy coated seeds, I gave up and stopped by my favorite NYC baking shop and picked up these black sugar pearls. And hot pink sanding sugar. So Pink!


These cookies are just a new take on my traditional mallomar cookie. Now, I know they aren't a true mallomar, since they aren't coated in chocolate (FYI, I can't wait until the classic mallomars hit the grocery shelves soon!!!). I decided last year that I didn't like to coat my flavored cookies in chocolate. Why? They just taste like chocolate! The flavor of the marshmallow is so subtle, the chocolate flavor just overpowers the marshmallowy flavor.


So, if you aren't sick of summer yet (if you are... seriously? Summer is awesome), give these cookies a try! You will most likely need to pick up some things at the store or online (i.e. - Watermelon candy oil, pink sanding sugar, bright green food coloring & black sugar pearls). Have fun making these, they're super fun!


Once Year Ago: Sour Apple Fruit Chews
Two Years Ago: Homemade Coconut milk & Thai Chili Sauce
Three Years Ago: Italian Sweet & Sour Chicken
Four Years Ago: Chilled Asparagus Salad

Watermelon Mallomars
A Wilde Original

Warning, these cookies will make your entire house smell like watermelon. But not real watermelon. Candy watermelon! If you don't like the flavor of a watermelon Jolly Rancher, these cookies might not be for you. I was toying with the idea of making the marshmallow out of watermelon juice, but didn't think the flavor would be powerful enough to shine through the sugar. Maybe that's a plan for next summer!

Almond Cookies

I used the French almond sugar cookie recipe that I always use for mallomars. Follow the recipe in this link and just add some green food coloring at the end of the dough mixing. Roll it out just like in that recipe and you're good to go! Let the cookies cool before adding the marshmallow and decorating.

Watermelon marshmallow
Adapted from Marshmallows

For the gelatin bloom
1/2 cups plus 2 tablespoons cold water
1 dram watermelon candy oil (Use the concentrated stuff)
3 tablespoons unflavored gelatin (I use Knox powdered gelatin)

For the sugar syrup
3/4 cup water
1 1/4 cups corn syrup
pinch kosher salt
1 1/2 cups granulated sugar

For the mallomars
1 cup small hot pink sanding sugar

In a small bowl, whisk together water and birthday cake flavoring.  Add gelatin and whisk until smooth.  Let sit while you prepare the sugar syrup.

In a 4-quart pot, combine all four ingredients for the sugar syrup.  Bring to a boil and cover with a lid.  Let boil for 2 minutes (this will wash down any sugar crystals from the walls of the pot).  Uncover the pot and clip on your candy thermometer.  Heat to 250 F.  Remove from heat and add bloomed gelatin.  Whisk until the gelatin is incorporated.

Pour mixture into the bowl of your stand mixer and turn it up!  Beat the sugar mixture on high for 10 minutes, until bright white and fluffy.  Transfer marshmallow batter to a piping bag with a 1-cm tip.

Pipe blobs of marshmallow onto the cooled cookie rounds.  Let marshmallow set for 30 minutes. Add three or four black sugar pearls and dunk in sanding sugar.  Be sure all the marshmallow is coated in sugar, this will keep them from sticking to each other.  Revel in your work, they are so adorable!!!

Thursday, August 14, 2014

CTB 2014 - Marshmallow Madness!

I hate to admit this, but I haven't sat by a campfire in 4 years. The last time I sat with friends and toasted marshmallows was the summer of 2010. Weeks away from picking up once again and moving from Boulder, Colorado to New Haven, Connecticut, I just spent the day on the reservoir with my fitness family.


With the sun setting over the Rocky mountains, we settled into foldout chairs with fuzzy blankets and bags of marshmallows, graham crackers and Hershey bars. I learned that the best way to enjoy a s'more is to stuff a Milk Dud into the center of a marshmallow before toasting it. Chocolate, caramel and marshmallow. So amazing.


Since moving from Boulder to the East coast, I haven't found myself in the presence of a campfire. You aren't really allowed to start fires in an apartment building. In order to fully enjoy this summer, I wanted to recreate a summertime treat in my kitchen. No fire required.


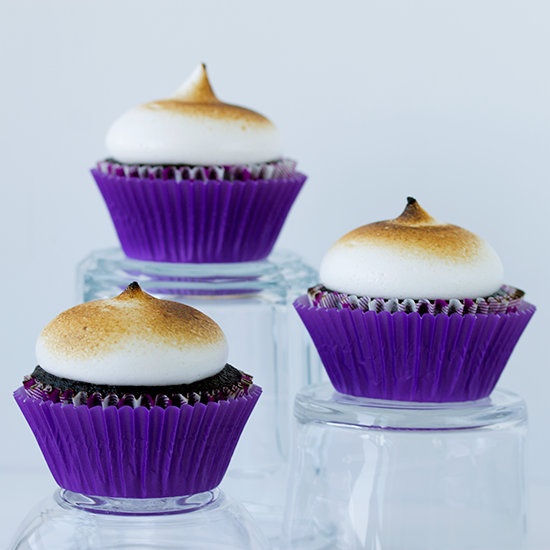
This s'mores cupcakes was the perfect way to reminisce, without setting fire to my kitchen. Though I'm not going to lie, there totally was a series of small fires when I made these beauties. Did you know that cupcake liners are flammable? When toasting the marshmallow frosting, be careful not to light the actual cupcake on fire!

Friday, January 31, 2014

Loganberry Mallomars

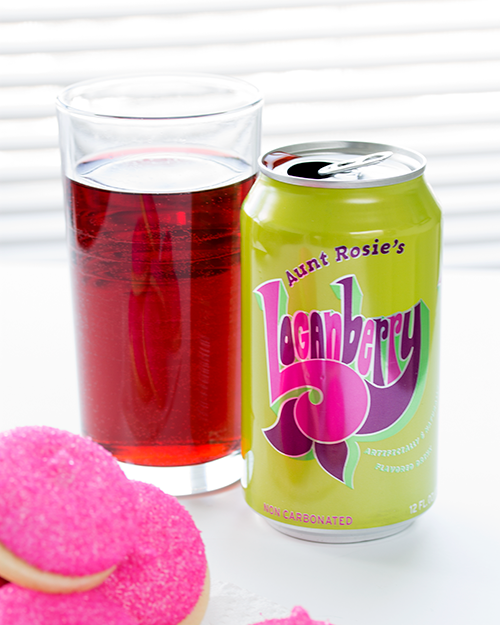
It's time for more marshmallow fun!  This time it's a Buffalo-themed marshmallow.  Don't worry, I'm not making you chicken wing flavored marshmallow, that might be a little weird.  Today I'm introducing you to Loganberry!


I have lived in several different places around the United States and have only ever seen Loganberry in Western New York.  Is it a unique item to the Buffalo region?  Do you have Loganberry soda in your town?  When I asked some of my coworkers, they asked if it was the stuff you can get at Ikea.  No, that's lingonberry. Surprisingly, this soda is bottled by PepsiCo.  Though since it's a WNY drink, I suppose I should call it "pop".


Loganberry soda is a completely impossible flavor to explain.  It's incredibly sweet and tastes like some sort of berry.  According to the smidge of internet research I did, a loganberry is an actual berry that was cultivated in California in the 1880's.  It's a cross between a raspberry and a blackberry.  Californians hated it, but it found success as a soda at the Crystal Beach resort in Buffalo. I visited Crystal Beach as a child and have a photograph of my mom and I riding these umbrella gondolas over the beach.  Crystal Beach closed years ago, but loganberry lives on.


I wanted to celebrate my hometown and create a mallomar that incorporates one of it's most unique flavors. In one of my BuffaloFoods.com purchases, I bought a case of Loganberry soda (along with so many of my favorite hometown foods!). I wasn't sure what I was going to do with the soda, I just knew I wasn't going to be drinking it.  It's sooooo sweet!

To use the Loganberry soda, I poured six cans of the soda into a wide pan and boiled it, for about thirty minutes, until I had 2 cups of syrup.  I used the syrup as the flavor base for my marshmallows.  The finished marshmallows have that distinct Loganberry flavor that I wanted.  My only problem with these?  The Loganberry is made with high fructose corn syrup.  These marshmallows are a combination of sucrose, glucose and fructose.  But seriously, they are sugar bombs any way you make them.  I ate a whole bunch and didn't regret a single pink marshmallow!

One Year AgoYogurt Protein Smoothie
Two Years AgoTart au Chocolate au Lait
Three Years AgoButtermilk Cornbread

Almond Cookies
A Wilde Original

1 stick butter, room temperature
3/4 cup powdered sugar
1/4 tsp salt
1/4 cup almond flour
1/2 tsp vanilla
1 egg
1 3/4 cups all-purpose flour

In a large bowl, beat together butter, powdered sugar and salt until smooth.  Add almond flour and vanilla and beat until combined.  Using a rubber spatula, scrape down the edges.  Add egg and combine.  Finally, add flour slowly until completely mixed.

Scrape batter out of the bowl and onto a large piece of plastic wrap.  Fold over plastic wrap and press dough out a little.  Using a rolling pin, roll out dough to 1/8-inch thickness.  Place dough sheet on a baking sheet and set in the fridge to chill for 1 hour.

Remove dough sheet from the fridge and peel back the top layer of plastic wrap. Stamp out 2-inch circles with a cookie or biscuit cutter.  Place dough circles on a baking sheet and chill for 30 minutes.  Collect dough scraps and re-roll between the plastic wrap.  Chill if necessary and continue stamping out 2-inch circles.

Preheat oven to 350 F and bake cookies for 10 minutes.  Remove from the oven and allow to cool for 5 minutes on the cookie sheet on a wire rack.  Remove from the baking sheet and allow cookies to cool completely before adding marshmallow.

Loganberry Marshmallows
A Wilde Original

6 cans loganberry soda

4 tablespoons powdered gelatin

1/2 cup water
3/4 cup corn syrup
1 1/2 cups sugar

Pour loganberry soda into a large skillet and heat over medium-high heat.  Bring to a boil and cook until reduced to 2 cups.

Combine gelatin with 1 1/4 cups loganberry concentrate in the bowl of your stand mixer.  Let bloom while you prepare the marshmallow syrup.

Combine 3/4 cup loganberry concentrate, water, corn syrup and sugar in a 4-quart pot.  Clip on candy thermometer and bring to a boil over medium-high heat.  Do not stir the sugar solution while it boils.  Let the temperature rise to 250 ºF.  Remove from the heat.

Using the whip attachment, turn on the stand mixer to low speed.  Slowly stream in sugar syrup.  Once all of the syrup is added, increase the speed to medium-high and beat for 5 minutes.  Increase speed to high and whip for another 5 minutes.  The marshmallow batter should be fluffy, shiny and pink.  If your marshmallow batter has reached soft peak stage, transfer some of the batter to a piping bag (or ziploc bag).

To Assemble Mallomars

Almond cookie rounds
Loganberry marshmallow in a piping bag with a 1-cm round tip
Pink sanding sugar

Pipe blogs of marshmallow on top of your cookie rounds.  Let set for 15 minutes.  Pour sanding sugar into a bowl.  Dip marshmallow topped cookies into sanding sugar, coat all of the marshmallow so it's not sticky anymore!  Enjoy!

Wednesday, December 11, 2013

Cookie Week - Gingerbread Mallomen

Happy Holidays! It's time once again for the Great Food Blogger Cookie swap! The cookie swap is organized by Lindsay, of Love & Olive Oil, and Julie, of The Little Kitchen and gives food bloggers a chance to swap cookies, share stories and help out. I'm so lucky to be a part of this little food blogging community of ours. 


Monday, December 2, 2013

Cherry-Lemonade Marshmallows

Sometimes it's fun to give and receive handmade gifts and nothing is more fun to make and give than marshmallows! I've made a long list of different varieties here at WITK, including peppermint, blueberry and birthday cake. These marshmallows are a little different because they contain no corn syrup!


That's right, these marshmallows are actually made using chemistry! The main ingredients for these fluffy pillows are sugar, water and cream of tartar.  Cream of tartar is actually the mild acid - potassium bitartrate. By adding this acid to the sugar solution and introducing heat, the cream of tartar actually catalyzes the breakdown of the sugar (sucrose) molecules into its components - glucose and fructose.  Do you know what is in corn syrup? It's glucose and fructose! We just made our own corn syrup, in situ! (thought I would throw in a little more sciencey verbage for you there.)


So if you aren't a fan of using corn syrup, you should give this recipe a try! The combination of cherry and lemon makes these more of a summer flavor than a winter one, but who doesn't want to be reminded of those warmer days? Whip up a huge batch of these and hand them out to your friends this holiday season! You can even use organically grown sugar and organic cream of tartar (I'm thinking it's collected from organically grown grapes?) and make organic marshmallows!

One Year Ago: Apricot-garlic Pork Tenderloin and Potatoes and Fennel
Two Years Ago: Coconut Brownies
Three Years Ago: Salted Caramel & Chocolate Crostata

Cherry-Lemonade Marshmallows
Adapted from Sweet Confections

These marshmallows came out a little airier and stickier than my usual recipe. This makes a lot of marshmallow, the recipe is easily halved if you don't want two full pans of marshmallows!

For the Lemon Layer
1/4 cup cold water
1/2 cup freshly squeezed lemon juice
3 tablespoons powdered gelatin
1 cup water
3 1/4 cups granulated sugar
1/2 teaspoon cream of tartar
1/8 teaspoon kosher salt
1 teaspoon lemon zest

For the Cherry Layer
3/4 cup pureed cherries
3 tablespoons powdered gelatin
1 cup water
3 1/4 cups granulated sugar
1/2 teaspoon cream of tartar
1/8 teaspoon kosher salt

For the marshmallow coating
2 cups cornstarch
1 cup powdered sugar

Lightly coat two 9x13-inch pans with cooking spray. Gently wipe out the excess with a paper towel.

In a small bowl, whisk together cold water, lemon juice and powdered gelatin. Set next to the stove and allow to bloom.  In a 4-quart pot, combine water, sugar, cream of tartar and salt. Bring to a boil over medium heat. Clip on candy thermometer and cook until sugar dissolves and temperature reaches 250ºF.  Remove from the heat and let cool for 5 minutes.  Add bloomed gelatin and whisk until dissolved.

Pour marshmallow syrup into the bowl of your stand mixer.  Whip with the whisk attachment on high for about 10 minutes.  Add lemon zest and whip for another minute, or until batter is shiny, fluffy and almost completely cool.  Pour into the prepared pans, half in each pan.

Clean out all your equipment and make cherry marshmallow layer!

In a small bowl, whisk together pureed cherries and powdered gelatin. Set next to the stove and allow gelatin to bloom.  In a 4-quart pot, combine water, sugar, cream of tartar and salt. Bring to a boil over medium heat and clip on your candy thermometer. Boil until the sugar dissolves and the temperature reaches 250ºF.  Remove from the heat and let cool for 5 minutes.  Add gelatin and whisk until dissolved.

Pour marshmallow syrup into the bowl of your stand mixer and whip on high for 10-12 minutes, until shiny, fluffy and almost cooled.  Add some red food coloring if you want a darker color. Pour cherry marshmallow batter on top of the lemon layer.  Let marshmallow sit for 4 hours to solidify.

Mix Cornstarch and powdered sugar and place in a large bowl.  Set a mesh sieve over a bowl and get a storage container ready.  Dust your countertop with some of the cornstarch mixture and remove the marshmallow slab from the pan. Dust the top and sides with the cornstarch mixture. Using either a pizza cutter or a chefs knife, cut marshmallow into 1-inch strips. Cut the strips into 1-inch cubes.  Toss the cubes into the bowl of cornstarch and powdered sugar.  Toss to coat.  Transfer marshmallows to the mesh sieve and shake off excess powder.  Transfer to the storage container.

Marshmallows will keep for 2 weeks in an air-tight container.

Monday, November 25, 2013

Cranberry-Orange Mallomars

Happy Thanksgiving week! I'm so ready for the holiday season. During my unemployed hours I've been preparing lots and lots of recipes for you! I'm most excited to share this first cookie recipe of the season with you. This cranberry-orange mallomar is sweet and tart and tastes just like christmas!


Tuesday, October 29, 2013

Happy Halloween!

Halloween week is upon us and I'm so excited!  Halloween was always my favorite holiday of the year.  Getting dressed up, trick or treating, eating all those tiny candy bars.  So much fun.  I'm pretty sure I went trick or treating all the way into high school.  Well, I went until I shot up six inches and couldn't pull off "cute" anymore. Nobody wants to give a five foot nine girl candy.

I decided to make one final Halloween treat for all of us.  After Christine shared with me what good candy corn is supposed to taste like (vanilla and sugar), I decided to make my own version of candy corn.  

Candy corn mallomars!


Using my favorite almond sugar cookie and simple vanilla marshmallow recipes, these mallomars came together quickly.  I also was sure to use high quality sanding sugars (because cheap-o ones taste a little bitter) to give a little sparkle and shine to these treats.


Now I think I'll go and hand these out to the people that work around my apartment building.  We don't get trick-or-treaters, so I'll just have to make my own fun!  


One Year Ago: Hurricane Sandy! & Butternut Squash Cake
Two Years Ago: Pumpkin Raisin Muffins
Three Years Ago: Butternut Squash Soup

Candy Corn Mallomars
A Wilde Original

For the Cookies

1 stick butter, room temperature
3/4 cup powdered sugar
1/4 tsp salt
1/4 cup almond flour
1/2 tsp vanilla
1 egg
1 3/4 cup all-purpose flour
Yellow food coloring

In a large bowl, beat together butter, powdered sugar and salt until smooth.  Add almond flour and vanilla and beat until combined.  Using a rubber spatula, scrape down the edges.  Add egg and combine.  Finally, add flour slowly until completely mixed.  Add enough yellow food coloring to give a bright yellow dough, mix until evenly colored.

Scrape batter out of the bowl and onto a large piece of plastic wrap.  Place dough on a large piece of plastic wrap and fold over.  Gently press dough flat with your hands.  Using a rolling pin, roll out dough to 1/4-inch thickness.  Place dough on a baking sheet and put in the fridge for 30 minutes.

Lightly dust work surface with flour and unwrap chilled dough.  Stamp out dough with a 2-inch round cookie cutter and place cut dough onto a parchment lined baking sheet.  Place this baking sheet in the fridge for 30 minutes.  Collect dough scraps and roll into a ball and re-chill and cut until you use all of the dough.

Preheat oven to 350 F while the cookie dough shapes are chilling.  Take cut dough straight from the fridge and place in the oven.  Bake for 10-12 minutes, or until the edges are just starting to turn golden brown.  Remove from the oven and let cool, on the baking sheet, on a wire rack for 1 minute.  Remove cookies from the sheet and let cool completely before decorating.

For the Marshmallow

1/4 cup plus 1 tablespoon cold water
2 teaspoons vanilla extract
1 1/2 tablespoons powdered gelatin

1/4 cup plus 2 tablespoons water
1/2 cup plus 2 tablespoons light corn syrup
Pinch kosher salt
3/4 cup granulated sugar

Orange food coloring
Orange sanding sugar or sprinkles
White sanding sugar

In a small bowl, whisk together 1/4 cup plus 1 tablespoon water and vanilla.  Add powdered gelatin and whisk until no more lumps are present.  Set near the stove.

In a 2-quart pan, combine 1/4 cup plus 2 tablespoons water, corn syrup, salt and sugar.  Clip on a candy thermometer and bring to a boil over medium heat.  Allow the sugar to dissolve undisturbed and let the temperature rise until it reaches 250 ºF.  Remove sugar syrup from the heat and whisk in bloomed gelatin.

Pour syrup into the bowl of your stand mixer with whisk attachment.  Turn it up to high speed and whip for 8- 10 minutes.  Once the mixture is white, glossy and fluffy, transfer about 1 1/2 cups into a piping bag.  Add orange food coloring to remaining marshmallow in the bowl and beat until the color is even and bright.  Transfer orange marshmallow to a second piping bag.

Pipe rounds of orange marshmallow on top of the cookies.  Top with a dollop of white marshmallow.  Let marshmallow set for 30 minutes.  Dip white marshmallow tops in white sanding sugar.  Sprinkle orange marshmallow with orange sanding sugar.  Pretty!

Tuesday, May 7, 2013

Wilde day in Brooklyn

This weekend I spent my Saturday in Brooklyn with a whole bunch of NYC area food bloggers!  It was the NYC bake sale for No Kid Hungry and the delicious treats were out in full effect.  For some reason I only took one photo, I must have been distracted by all the sweets.  


The crowds were great, thanks to the beautiful sunshine, and once people learned it was all for charity, they really opened up their pocketbooks.  With a plethora of sweet options from over twenty local bloggers and bakeries, along with some fun raffles and tote bags to promote big purchases!  I picked up a few treats for myself too!

Image via Tasty Pursuits
Meet @, @, me, @, and @
Last week I told you about the birthday cake mallomars that I brought to the bake sale.  I also made some raspberry macarons and these Gluten-Free Cookies & Cream Mallomars!  Lillian had suggested I give a gluten-free mallomar a try and I had to agree that was a great idea!


I took one of my classic dark chocolate cut out cookies and swapped out the traditional all-purpose wheat flour with Bob's Red Mill gluten-free flour and some xantham gum.  Along with these cookies being gluten-free, they were made with the support of Divine Chocolate!


Divine Chocolates was one of the sponsors of the NYC bake sale and donated several baking kits to the bloggers to help make some seriously chocolatey treats.  These mallomars wound up super chocolatey because they contained the Divine 70% dark chocolate bars and dark cocoa powder.  The rich chocolate offset the sweet vanilla marshmallow perfectly.


In addition to being able to bake with the Divine Chocolate, the actual farmers (and owners) of Divine were in town this weekend.  I got to meet with and share my mallomars with two of the Ghana farmers.  I'm fairly certain they thought they were a bit too sweet, which means they were perfect for the American palate!  Give them a try!

Disclaimer - I received a package of Divine chocolate for use in this post.  All opinions are my own.

Tuesday, April 30, 2013

NYC Food Blogger Bake Sale

Are you going to be in New York City this weekend?  If you are, you should come out and see me in Brooklyn!  I'm so excited to be in town and free to participate in the NYC Bake Sale for No Kid Hungry.  I was out of the country last year, so I made sure to plan my spring vacation after I found out when the bake sale was!

But it's not just me!  I'll be joining 35 other NYC area bloggers at the Brooklyn Flea with homemade treats from our kitchens.  I've spent the past few weeks trying to decide what to make for the bake sale.  I wanted something that would just scream WITK.  I came up with - Mallomars.


I've made many different varieties of mallomars here at WITK.  From simple flavors like key lime and blueberry flavors to holiday flavors like peppermint and pumpkin.  For the NYC bake sale, I decided to give everyone what they want - Funfetti!


I used my classic almond sugar cookie base and swapped out the vanilla extract for cake batter flavoring (I got it at my local gourmet food shop) and added a copious amount of rainbow sprinkles.  My classic vanilla marshmallow was also pumped up with the cake batter flavoring.  The marshmallow batter smelled Ah-mazing.  I was seriously licking it off the spoon (after I was done piping the cookies).  The whole shebang was topped off with a coating of rainbow sprinkles.


If you can make it to the city this weekend, come visit me and taste test these bad boys!  If you can't make it out/across the country for the bake sale, I included the recipe for you to try at home.  Be sure to buy this cake batter flavoring, you can also add it to milkshakes and ice cream (which I totally plan on doing this summer).


Don't worry, even if you can't come out and visit us at the Brooklyn Flea this weekend, you can still take part in the NYC bake sale for No Kid Hungry.  You can enter to win a whole bunch of different raffles!  From Divine chocolate to Le Creuset stoneware, amazing cookbooks to sweet gift boxes.  You can win these without even being in New York City!  Enter them all!

Related Posts with Thumbnails