Image Map
Showing posts with label easter. Show all posts

Saturday, April 4, 2015

Homemade Easter Candy

Looking for something to do this weekend? Try your hand at some of these fun and adorable Easter treats from around the internets!

Dress up some peeps...

Tuxedo Bunny Peeps - such a cute and easy way to make Peeps a little fancier! | from candy.about.com
Tuxedo Bunnies

Treat the nutella lover in your life...  (aka, me. Please make these for me!)

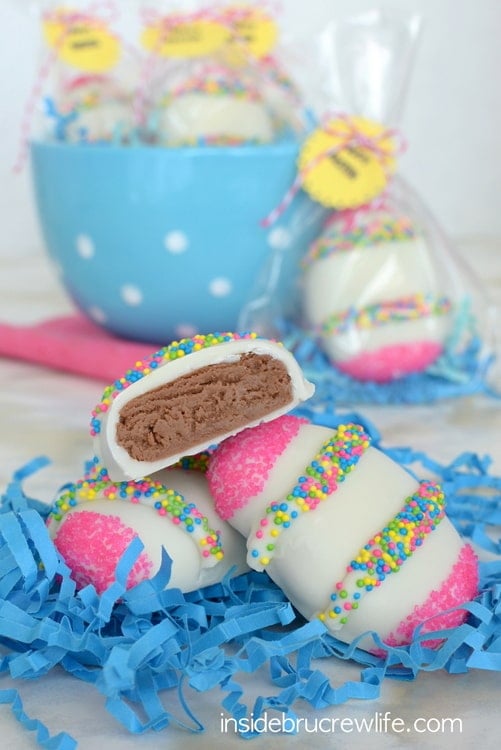
These fun Nutella cream eggs are dipped in white chocolate and decorated with sprinkles.  They make an adorable treat for Easter baskets.
Nutella Cream Eggs

Find the perfect use for sugar googly eyes...

Homemade Marshmallow Chicks
Marshmallow Chicks
Keep it simple and use up a whole bunch of that extra Easter candy...

Easter Candy Bunny Tail Mix
Bunny Tail Mix
Feeling extra ambitious? How about a fancy cake...

Easter Polka Dot Cake | SugarHero.com
Easter Polka Dot Cake

I'll be making these little cookie dough treats with my boyfriend tomorrow!
Easter Sunday Craft and Bunny
<<via>>

Jell-O Peeps Jigglers

Ready for some more Peep-shaped treats? How about the easiest of all things to make? 

Jell-O!


Honestly, I happened to have four packages of Jell-O in my cupboard (because I know someone who works at Kraft Foods) and thought this would be the perfect reason to use them! Of all the Peep-shaped treats, these came out truest to the mold form.


This was also the easiest recipe to make. Boil two cups of water, add two packages of Jell-O (any flavor), pour into the molds, put in the fridge. Done.  And look... They jiggle...


Have yourselves a fun weekend! I'll be busy trying to figure out what else I can make in peep shapes with these molds!

Friday, April 3, 2015

Chocolate Peep Cakes

We're just a few days before Easter and I really wanted to use that Peep mold again! I decided to try out a few more recipes to see just what would work. Also, I wanted everything to be peep shaped after I made those peeps last week!

Today I present... Chocolate Peep Cakes!!!


Aren't they cute!


The chocolate cake recipe that I used was a simple one. In fact I wasn't really impressed with the one I chose, so I won't be sharing the cake recipe today. You could probably even use a store bought cake mix., if you are low on time! What makes these cakes come together even faster is the frosting.


These cakes are very similar to petit fours because I used a poured fondant frosting. It took two layers of frosting to completely cover the chocolate, but it retained all the details of the peep cakes! The addition of some sprinkles and black sugar pearls and we have ourselves some cute little cakes!


They are the perfect treat to finish off your Easter holiday! These cakes were also very fun to make, I think I'll try my hand at real petit fours in the future.

Two Years Ago: Perry's Ice Cream Factory Tour
Three Years Ago: Grilled Chicken and Potatoes
Four Years Ago: Tortellini Soup

Thursday, March 26, 2015

Honey Marshmallow Peeps

I was supposed to be bringing you jelly beans for Easter this week. Unfortunately the jelly bean molds that I ordered a month ago haven't yet arrived. I thought giving Amazon a full month to deliver my order would be enough. Apparently I was wrong...

In order to keep up the holiday cheer and bring you all something sweet and Easter related, I picked up another mold at my local craft store. Instead of jelly beans, today we are making Peeps!!!


I've seen several recipes for homemade peeps around the internet. A bunch of people even being patient enough to hand pipe their peeps (just like how they were made at the Just Born factory in the beginning!). I gave hand piping a try...


It didn't work out. I fairly certain that the marshmallow recipe I used wasn't the right one for this particular method. The high amount of corn syrup in the marshmallow syrup lead to a softer final product. While the marshmallow batter wasn't appropriate for hand piping, it was perfect for filling molds!


Two molds, three jars of sprinkles, a box of sugar eyes and a few hours later, my own peeps were born.


And they are so adorable!


The honey flavor in this recipe is fairly mild and is seems to mellow as the peeps age.

Two Years Ago: Momofuku Confetti Cookies
Three Years Ago: Tarragon Chicken and Pesto Potatoes
Four Years Ago: Mango Lime Muffins

Vanilla-Honey Marshmallow Peeps
From Chocolates and Confections

I chose to go with the classic pink, yellow and blue colors, rather than going too crazy with orange or silver. I also used black sugar pearls instead of piping on chocolate eyes. The store bought peeps actually have eyes that are made out of carnuba, an edible wax. Rather than locating some wax and ruining my pans, I thought the sugar pearls were a good alternative!

3 tablespoons powdered gelatin (3 Knox envelopes)
1/2 cup cold water

1 1/2 cups sugar
3/4 cup light corn syrup (light not lite)
1/4 cup honey
1/2 cup water
1 tablespoon vanilla extract

Variety of colored sprinkles
Small black sugar beads

Lightly spray 2 Wilton Peep molds with cooking spray. Wipe out some of the oil with a paper towel.

Whisk gelatin into cold water and set aside while you prepare the sugar syrup.

Combine sugar, corn syrup, honey and water in a 2-quart pot. Bring to a boil over medium-high heat and clip on a candy thermometer. Allow the sugar syrup to boil undisturbed until it reaches 250 °F.

When syrup reaches 250 °F, pour into the bowl of a stand mixer and let sit until the temperature drops to 210 °F.  While the sugar cools, melt the gelatin in a hot water bath (or the microwave). Pour melted gelatin into the sugar syrup and start whipping on high with the whisk attachment.  Whip marshmallow batter for about 6 minutes, until white and fluffy. Add vanilla and whip to incorporate.

Transfer half of the mixture to a large piping bag, fit with a 1-cm round tip. Fill the peep and bunny molds to the top with marshmallow batter. Sprinkle the exposed bottoms of the marshmallows with different colors of sprinkles. Allow marshmallow to set for 3 hours.

Pop marshmallows out of the molds. Add sugar eyes. Coat marshmallows in colored sprinkles and let set for 1-2 hours before serving.

** Alternatively to using the peep molds, you can pour the marshmallow batter into a greased 9x13-inch pan. Stamp out marshmallows with these peep cookie cutters.


Friday, March 13, 2015

J@H 2015 - Cadbury Creme Eggs

It's post-Mardi Gras, which means that we are in Easter season! I chose two classic and fun Easter treats to try and replicate for my Junk @ Home challenges this month. We're starting out with a controversial one, the Cadbury Creme Egg!


Why is it controversial? If you have missed out on the news this year, Cadbury Creme Eggs (in the UK) had their recipe tweaked this year. The chocolate shell chocolate was swapped from the original Dairy Milk chocolate to a Cadbury milk chocolate. Apparently they also decreased the number of eggs in a package and kept the price the same. Candy inflation!

Making these chocolates at home, you can choose whatever type of chocolate you want! Desire a dark chocolate creme egg? No problem. White chocolate and peanut butter shell? Why not!

I started off trying to make the creme egg in the traditional way. You create the two halves of the egg and then join them together. This proved to be pretty tricky and a bit of a mess...


Attempt number one was a bit of a fail. The two half shells didn't melt together and the creme filling oozed everywhere! The candies got stuck in the molds and took a few good whacks to remove. There was creme filling all over the place. I decided to change my game plan and create half-shell creme eggs. Besides, a store-bought creme egg is a mouthful.  Half a serving is really the way to go! (That's what I'm telling myself at least)


Creating these half-shell creme eggs was super easy and they're so cute! I went with a rich milk chocolate for the shell and a vanilla-flavored creme filling. Just a few short steps and you can also have some homemade creme eggs for Easter!


Step 1. Fill the candy molds completely with melted chocolate. Wait five minutes and pour out chocolate. (You can pour it back into the bowl with the melted chocolate, or onto a silpat).

Step 2. Add a drop of yellow-tinted filling.


Step 3. Fill with white-colored creme, until just below the top of the mold.

Step 4. Cover creme filling with melted chocolate. Level off bottoms with an offset spatula.

Set the candies by putting the candy molds in the fridge for 30 minutes. Flex the molds and pop the candies out. Share with your friends!


One Year Ago: Portuguese Sweet Bread
Two Years Ago: Red Lobster Cheddar Bay Biscuits & Cajun Chicken
Three Years Ago: Sponge Candy Cupcakes
Four Years Ago: Green Velvet Cupcakes

Cadbury Creme Eggs
Majorly adapted from This Website

I adapted this recipe from the original to remove all concern over corn products and GMO foods. I source my glucose syrup from a place in Manhattan, you can get the same stuff from Amazon! This glucose syrup is made from non-GMO wheat and will set any fears to rest. If you don't have concerns with using corn syrup (I use it all the time too), feel free to substitute corn syrup for glucose.

Egg candy molds (I got mine from Michaels)

12 ounces Milk chocolate, melted and tempered

1/4 cup glucose syrup (85g)
2 tablespoons unsalted butter, room temperature
1 1/4 cups powdered sugar (160g)
1/2 teaspoon vanilla extract
1/8 teaspoon salt
1 tablespoon water
Yellow food coloring

Beat together glucose syrup and butter. Sift in powdered sugar and beat to combine. Add vanilla extract and salt, mix until combined. Add tablespoon of water and beat until creamy and smooth. Scoop out 1/4 cup of creme and tint with yellow food coloring.

You can load the two creme colors into piping bags or zip top bags. It is easier to pipe the filling into the candy shells, rather than trying to scoop it in with a spoon.

Fill candy molds all the way to the top with melted chocolate. Wait 5 minutes. Pour out chocolate and let the molds drip for 1 minute. Flip back over and let set for 30 minutes.

Pipe a "yolk" into the bottom center of the candy shell with the yellow creme. Cover with white creme, filling almost all the way to the top.

Cover with more melted chocolate. Use a knife or offset spatula to even out the tops of the candies.

Pop the molds into the fridge for about 20-30 minutes, or until the chocolate is set. Remove from the fridge and flex the molds to release the candies. Happy Easter!

Related Posts with Thumbnails