Image Map
Showing posts with label JAH2015. Show all posts

Thursday, September 29, 2016

J@H - Homemade Cherry Cola

Sorry to have been so sporadic posting here recently, I have been crazy busy with lots of things happening in my non-internet life. Many changes have occurred over the past four weeks and I'm hoping they mean that I will have more time for cooking, blogging and life!

The big news? I quit my job,! Then I took off two and a half weeks before I started a new job! I'll miss the people at my old job, the international travel and the unique business model. What I won't miss? The 2 hour and 15 minute commute.  Each way.  

In addition to my new job, I also got myself a car! I haven't owned a car in almost six years. Since I lived in Connecticut, I got around on my own two feet or via public transportation. Trains, trams, buses, I've learned the tri-state area system pretty well over the past five years. Need to know how to get anywhere via NJ Transit? I can get you there. Now I just need to learn how to drive in New Jersey. Trust me, it's a whole different game from driving anywhere else!

With these changes, I've added so much more time to my life. I finally have the time to finish my Junk at Home Challenge! I decided to get going on it right away and try my hand at cherry cola.  


I've made a few recipes from the Homemade Soda cookbook by Andrew Schloss, but I've always shied away from making this recipe. It requires a lot of ingredients. Most of the ingredients are pretty common, but I had quite the grocery list and had to visit a specialty grocer to pick up dried bitter orange peel.


The recipe itself comes together very quickly. Once the cherry cola concentrate is finished, you just have to let it cool and you can be enjoying floats in no time! This cherry cola definitely tastes like cherry cola, but it doesn't taste like something that you would buy in the store. The flavors are much more complex and pair really well with vanilla ice cream!

Let's see if I can finish my 2015 challenge by the end of 2016!

One Year Ago: Pumpkin Mallomars
Two Year Ago: Rigatoni with Pepperoni, Mozzarella and Arugula
Three Years Ago: Peanut Butter Banana Bread
Four Years Ago: Sun-dried Tomato Ravioli with Basil Cream Sauce
Five Years Ago: Pumpkin Pie Mallomars
Six Years Ago: Chocolate Crisps

Thursday, March 31, 2016

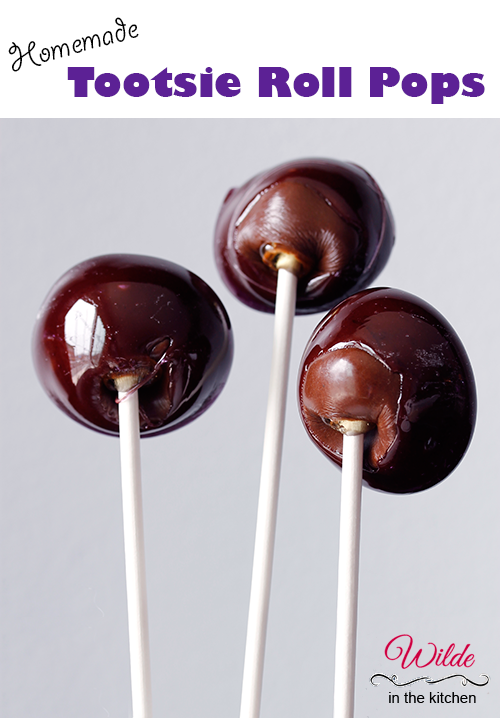
J@H - Tootsie Roll Pops

I have been putting off this recipe for long enough. I knew how to make all of the components, it was just getting up the nerve to put them all together! Now that I've made these bad boys, I am so upset with myself for procrastinating!

With no further delay, please enjoy...


That's right. Tootsie roll pops! Chocolate taffy shrouded in a thick coating of hard candy. Did you ever think that you could make these at home?

I'm not going to say that this is the easiest thing to make at home. You definitely need to block some time and set aside any fear you have of boiling sugar. This is actually two recipes that need to be combined into one - chocolate taffy and grape hard candy. You can get fancy and buy a lollipop mold, but I decided to go a little more free form with my candies. That is why they are flat on one side.

The candy to taffy ratio is a little different with my lollipops - there is a lot more taffy in these than in a store-bought Tootsie pop. I recommend using high quality baker's chocolate and highly concentrated candy oil. With those two ingredients you will get the most richly flavored candies possible. 

How do these compare to the originals? Personally, I think they're way better. Give them a try! With all of the flavor possibilities of taffy and hard candy, I'm thinking of making a summertime version of these - Cherry lollipops with vanilla taffy anyone?

Four Years Ago: Cookie Dough Fudge
Five Years Ago:  Cookie Dough Eggrolls


Sunday, February 21, 2016

J@H - Moon Pies

Continuing with my quest to finish my 2015 challenge, I bring you Homemade Moon Pies!


Now, I'm not really sure what part of the country you find moon pies. I feel like they are not a nationwide snack. I managed to locate one at my local Foodtown and was able to taste test the original.


What Did I think? Blech, not terribly impressive. To be perfectly honest, it wasn't at all what I was expecting. The only version of the Moon Pie that I could locate was a vanilla, double-decker version. Thankfully I only bought one, rather than an entire box, because they would have all gone to waste.


Making a homemade version of this treat was going to be easy. Bake some graham cracker rounds, fill them with marshmallow and cover them in chocolate. That was right up my alley, I'm old hat at making marshmallows and I love coating things in chocolate. I went to my favorite vanilla marshmallow recipe and made a small change to my graham cracker recipe. The whole thing came together pretty quickly.


These homemade Moon Pies were so much tastier than the store-bought version. The recipe made about 24 sandwich cookies. I ate about half of them without the chocolate coating and shared the completed cookies with my friends. They were amazing both ways! You should definitely think about making your own moon pies before picking them up at the store.


One Year Ago: Girl Scout Samoa Cookies
Two Years Ago: Cookie Dough Stuffed Chocolate Cupcakes
Three Years Ago: Cherry Kuchen Bars
Four Years Ago: Cherry-Coconut Bagels
Five Years Ago: Cherry Turkish Taffy


Sunday, November 1, 2015

J@H - Brownie Donuts with Peanut Butter Glaze

I have been looking forward to making my own donuts all year. Yes, I realize that I could have made donuts at any time, but it's been a crazy year and I haven't made breakfast once this year. I really need to make myself some French Toast this weekend.

A few years ago, I made a classic fried donut. This time I decided to go with a healthier cooking option and baked them. Rather than going completely healthy, I packed these with chocolate and covered them in peanut butter.


These donuts are dense and chocolatey, I can't responsibly tell you to eat these for breakfast.  I would suggest that you should make these and have them for dessert under a big scoop of vanilla ice cream.


I think that I need to make another batch of donuts. Something that is a little lighter and more breakfast appropriate. Maybe something packed with oranges or bananas?


Who am I kidding? These are delicious and probably just as good for you as having Pop Tarts for breakfast! The peanut butter frosting is the perfect topping to these dense brownie donuts. Get yourself a whole bunch of chocolate and butter and make these donuts! Then bring them to work and make all your coworkers happy (and fat).

One Year Ago: Loaded Potato Soup
Two Years Ago: Halloween Mallomars
Three Years Ago: Butternut Squash Cake
Four Years Ago: Pumpkin Raisin Muffins
Five Years Ago: Pear Cake with Pine Nuts

Thursday, July 16, 2015

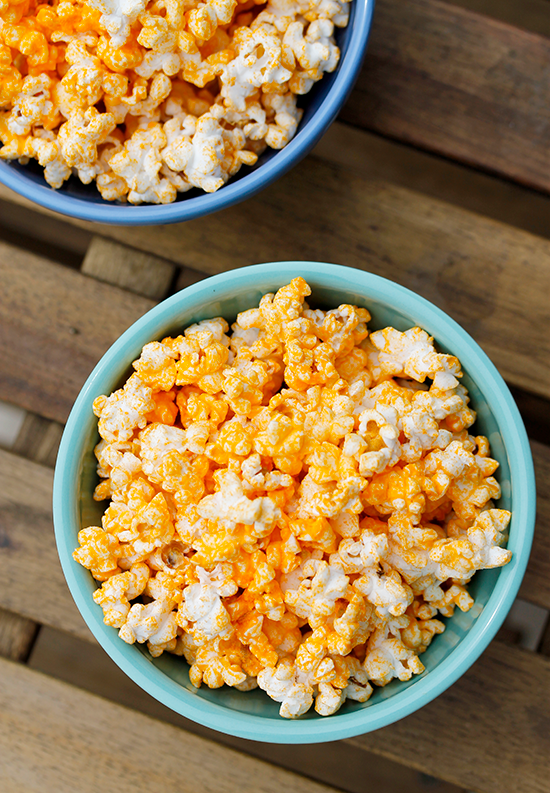
J@H - Cheesey Popcorn

Making cheesey popcorn is almost as easy as buying it! Well, once you locate the necessary ingredients, but that's what Amazon is for! Go there now and place your order for cheese powder, buttermilk powder and popcorn kernels. You'll be making your own cheesey popcorn in no time!


Also, I have to mention that I did all of this without a microwave. We are still renovating our new house and haven't gotten to the kitchen yet. There are grand plans to install an over-oven microwave, but that hasn't happened yet. I tried a few different methods until I came upon this popcorn popping procedure. It pops all the kernels and doesn't burn the finished popcorn.


You may be asking if this cheese popcorn is "better" for you than the store-bought variety. The popcorn itself is so easy, it's worth ditching the microwave stuff. Sadly, if you're for all-natural everything, the cheese powder may be outside of your comfort zone. The yellow cheese powder contains yellow #5, a food safe synthetic dye. Want something a little less yellow? Try this white cheddar powder.

Natural or not, I ate the entire bag of popcorn in one evening. So good.

One Year Ago: Peanut Butter Bar Ice Cream Sandwiches
Two Years Ago: Nutella Thumbprints
Three Years Ago: Strawberry-Lemon Preserves & Ginger-Pear Preserves
Four Years Ago: Peanut Butter Chocolate Chip Ice Cream
Five Years Ago: Crunchy French Toast

Monday, June 22, 2015

J@H - Homemade Snoballs

I'm a few challenges behind on my Junk at Home 2015 challenge, due to travel and work, so I thought I should get back to it with a bang! This week I was scheduled to make my own version of Hostess coconut snowballs and I decided to make it all from scratch.


Even though I had to made four different things for this recipe, it all came together pretty quickly. Aside from the shredded coconut, you probably already have all of the ingredients in your pantry. Well, as long as you're a baker, if you don't bake a lot you may need to head to the grocery story for a few things (unsweetened chocolate, marshmallow creme, Greek yogurt).


While you can get Snoballs at the store once again, you should definitely try making them at home. It's so much fun! Look at these adorable little purple puffs! The colored coconut is so easy to make. Simply place a bag of sweetened, shredded coconut into a large zip top bag. Add a drop of gel food coloring and squish it around until the coconut is evenly colored. Alternatively, you can add the coconut and food coloring to a food processor and pulse until the color is even and the coconut is slightly smaller.


The big question - do they taste like the original? With the combination of marshmallow, coconut and chocolate, there is no way for these to taste like anything else! This was definitely a winner in my book.

Two Years Ago: Strawberry Bacon Pizza
Three Years Ago: Pesto-Yogurt Chicken
Four Years Ago: Baked Pasta Casserole

Monday, April 27, 2015

J@H - Oreo Cookies

I'm a little behind on my Junk at Home challenge - I blame going on vacation, followed directly by a work conference. Luckily, I'm coming back with an amazing recipe! Homemade Oreos!!!

Yes, this recipe requires all of those exclamation marks.


I fed a few of these to the boyfriend and he described them as such... "they taste like Oreos, but without that stale, crumbly, crunchy part. The filling is dead on."


I can't take credit for the filling. I looked at a bunch of different recipes for Oreo fillings online and I decided to go with the one that sounded the least healthy and most unnatural. Just because these cookies are homemade, doesn't mean that they are healthy. 

At all.

There is a whole bunch of shortening in these cookies, but there is also Greek yogurt, so you know, it totally evens out. 


Seriously though, you should probably share these cookies with your friends and family. Limit yourself to one, two tops, and enjoy twisting open the cookies and eating the unnaturally white cookie filling.


One Year Ago: Quiche with Sweet Peppers and Sausage
Two Years Ago: Raspberry Macarons
Three Years Ago: Chocolate Malt Marshmallows
Four Years Ago: Maple Mousse

Friday, March 13, 2015

J@H 2015 - Cadbury Creme Eggs

It's post-Mardi Gras, which means that we are in Easter season! I chose two classic and fun Easter treats to try and replicate for my Junk @ Home challenges this month. We're starting out with a controversial one, the Cadbury Creme Egg!


Why is it controversial? If you have missed out on the news this year, Cadbury Creme Eggs (in the UK) had their recipe tweaked this year. The chocolate shell chocolate was swapped from the original Dairy Milk chocolate to a Cadbury milk chocolate. Apparently they also decreased the number of eggs in a package and kept the price the same. Candy inflation!

Making these chocolates at home, you can choose whatever type of chocolate you want! Desire a dark chocolate creme egg? No problem. White chocolate and peanut butter shell? Why not!

I started off trying to make the creme egg in the traditional way. You create the two halves of the egg and then join them together. This proved to be pretty tricky and a bit of a mess...


Attempt number one was a bit of a fail. The two half shells didn't melt together and the creme filling oozed everywhere! The candies got stuck in the molds and took a few good whacks to remove. There was creme filling all over the place. I decided to change my game plan and create half-shell creme eggs. Besides, a store-bought creme egg is a mouthful.  Half a serving is really the way to go! (That's what I'm telling myself at least)


Creating these half-shell creme eggs was super easy and they're so cute! I went with a rich milk chocolate for the shell and a vanilla-flavored creme filling. Just a few short steps and you can also have some homemade creme eggs for Easter!


Step 1. Fill the candy molds completely with melted chocolate. Wait five minutes and pour out chocolate. (You can pour it back into the bowl with the melted chocolate, or onto a silpat).

Step 2. Add a drop of yellow-tinted filling.


Step 3. Fill with white-colored creme, until just below the top of the mold.

Step 4. Cover creme filling with melted chocolate. Level off bottoms with an offset spatula.

Set the candies by putting the candy molds in the fridge for 30 minutes. Flex the molds and pop the candies out. Share with your friends!


One Year Ago: Portuguese Sweet Bread
Two Years Ago: Red Lobster Cheddar Bay Biscuits & Cajun Chicken
Three Years Ago: Sponge Candy Cupcakes
Four Years Ago: Green Velvet Cupcakes

Cadbury Creme Eggs
Majorly adapted from This Website

I adapted this recipe from the original to remove all concern over corn products and GMO foods. I source my glucose syrup from a place in Manhattan, you can get the same stuff from Amazon! This glucose syrup is made from non-GMO wheat and will set any fears to rest. If you don't have concerns with using corn syrup (I use it all the time too), feel free to substitute corn syrup for glucose.

Egg candy molds (I got mine from Michaels)

12 ounces Milk chocolate, melted and tempered

1/4 cup glucose syrup (85g)
2 tablespoons unsalted butter, room temperature
1 1/4 cups powdered sugar (160g)
1/2 teaspoon vanilla extract
1/8 teaspoon salt
1 tablespoon water
Yellow food coloring

Beat together glucose syrup and butter. Sift in powdered sugar and beat to combine. Add vanilla extract and salt, mix until combined. Add tablespoon of water and beat until creamy and smooth. Scoop out 1/4 cup of creme and tint with yellow food coloring.

You can load the two creme colors into piping bags or zip top bags. It is easier to pipe the filling into the candy shells, rather than trying to scoop it in with a spoon.

Fill candy molds all the way to the top with melted chocolate. Wait 5 minutes. Pour out chocolate and let the molds drip for 1 minute. Flip back over and let set for 30 minutes.

Pipe a "yolk" into the bottom center of the candy shell with the yellow creme. Cover with white creme, filling almost all the way to the top.

Cover with more melted chocolate. Use a knife or offset spatula to even out the tops of the candies.

Pop the molds into the fridge for about 20-30 minutes, or until the chocolate is set. Remove from the fridge and flex the molds to release the candies. Happy Easter!


Sunday, March 1, 2015

Junk @ Home 2015 - Twinkies

Coming at you with the fourth Junk @ Home challenge of 2015. I'm a few days late, sorry!  I was out of two weeks ago and I got sick while I was away! Luckily it was just a 7-day cold and I'm nearly back to 100%. Just in time to make some knock-off Twinkies this weekend!


Lots of people have tried their own recipes for this classic snack cake. Two years ago, when Hostess was going out of business, everyone freaked out and developed their own recipe. Not being a Hostess snack cake fan, and knowing that someone would likely buy the patents and start making them again, I never jumped on the bandwagon.


This recipe was requested when I sent out the call for 2015 challenge foods. Rather than trying to replicate the flavor and texture of a classic Twinkie, I decided to create a homemade version with real world flavors. Of course I bought myself a box of snack cakes and did some taste testing. To tell the truth, I have no idea what the flavor is supposed to be. Mystery food. Franken-food.


This recipe is like an inside-out cupcake. Soft yellow cake, filled with fluffy vanilla frosting. It tastes natural, not mysterious, and delicious. This recipe won't save you any calories, but it's completely free of any preservatives. This snack cake won't last through an nuclear winter, better eat them right after they're done!


Save your money, make your own cake molds! Unless you want to make these cakes again and again. I didn't want one more piece of baking equipment to store in our little kitchen.

One Year Ago: Portuguese Sweet Bread
Two Years Ago: Olive Garden Salad Dressing & Chicken alla Carbonara
Three Years Ago: Peach Macarons
Four Years Ago: Chocolate Buttercream Truffles


Saturday, February 14, 2015

Junk @ Home 2015 - Girl Scout Samoas (aka Caramel delights)

Call them Samoas, call them Caramel delights, whatever you choose to call them and wherever you live in America, they are delicious. I just wrote that they are devilious. Yeah, that's totally (not) a real word and it applies to these cookies. Because they make you want to eat the entire box! So devilious...

Anyways...


I added these cookies to my Junk at Home challenge because they were highly requested during my oh-so-official poll in December. People love Girl Scout cookies and they want access to them year round.


I hate to tell people, for fear that they will blame me when they gain forty pounds, but two varieties of Girl Scout cookies are available year round. Thin Mints and Samoas.


The same factory that produces Samoas and Thin Mints, also produces a Keebler-branded version of each cookie - the Grasshopper and the Coconut Dream. They are the exact same cookie. You can buy these any time you want, so long as you are at a grocery store. But if it's Girl Scout cookie season, be sure to buy from those cuties. Yes, even though they cost like $85 a box now. (Price of cookies when little Vicki sold cookies? $2.25/box. True story.)

Since you can buy the legit, original cookie anywhere, anytime, and there are dozens of recipes on other food blogs, I didn't want to make just any Samoa cookie. I made them a little bit more tasty, with more chocolate. And salted caramel. Enjoy.

Four Years Ago: Homemade Butterfinger Bars

Dark Chocolate, Salted Caramel Samoas
A Wilde Original

For the Cookies

1 stick (8 tablespoons) unsalted butter
1/2 cup powdered sugar
1/2 teaspoon vanilla extract
1/3 cup natural cocoa powder
3/4 cup plus 2 tablespoons all-purpose flour

Cream butter with sugar until fluffy. Scrape down the sides of the bowl and add vanilla extract. Beat to combine. Sift in cocoa powder and all-purpose flour. Mix until smooth. Lay out a long sheet of plastic wrap. Pour dough onto plastic wrap and fold over. Roll out dough to 1/4-inch thick. Place on a baking sheet and set in the fridge to chill for 1 hour.

Preheat oven to 350 °F. Take dough from the fridge and stamp out donut-shaped cookies (using either a donut stamp or two circular cookie cutters. Bake cookies for 10-12 minutes. Once baked, remove from the oven and let cool for 2 minutes on the pan. Carefully remove from pan and let cool completely on a wire cookie rack

For the Caramel topping

2 cups caramels, unwrapped (one entire bag of  Kraft Brand Caramels)
3 tablespoons heavy cream
1 teaspoon kosher salt
1 teaspoon vanilla
2 cups shredded coconut

Place caramels, heavy cream, kosher salt and vanilla in a small saucepan over low heat. Stir caramels until they are all melted and the mixture is smooth.  Using a spoon, coat the tops of the cookies with a thin layer of caramel.

Add coconut to the remaining caramel in the saucepan and stir to distribute. Use a spoon (and probably your fingers) spread coconut-caramel mixture over the cookies. Place cookies in the fridge to set up the caramel.

For the chocolate

1 cup dark chocolate chips

While the caramel is setting up in the fridge, melt chocolate using your preferred method. Easiest option is to place chocolate in a microwave safe bowl, pop in the microwave for 30 second intervals, stirring in between each 30 seconds.

Dip the bottoms of the cookies in melted chocolate, place cookies on wax paper. Once cookies are all dunked in chocolate, pour remaining melted chocolate in a squeezey bottle. Pipe stripes over your cookies. Place in the fridge to harden the chocolate.

Share with your friends.

Thursday, January 29, 2015

J@H 2015 - Cheese Whiz

It's Superbowl Time! (Do I have to put the "TM" after the word "Superbowl"? Will the NFL sue me if I don't? Anyways...) It's time for the big game and my Junk food at Home challenge was perfectly timed! You might think that I put this recipe in the challenge line-up on purpose. Nope, I had no idea when the "Big Game" was when I scheduled the challenges.


This challenge took a bit of tinkering before I came out with this final recipe. The first batch I made was a cheese sauce, simply milk and cheese. The sauce separated promptly upon being taken off the fire.


Batch two was slightly more successful. I used the same recipe that I have written below, but I allowed it to cool to room temperature before pouring into the whipper. The sauce solidified upon cooling to room temperature. There was no pouring happening with that batch. It's currently in my fridge, I think I'll try it out as a cheese spread...


The third and final batch is the one you see in this post! The cheese sauce is poured into the whipper immediately after the cheese is melted. The cheese is charged with N2O and is ready to go. I don't think that I have the industrial capacity to exactly replicate the density of Cheese Whiz. My cheese is more of a cheese foam. These first few images are of the still-warm cheese foam.


Once the whipping siphon is cool to the touch, it pipes out cheese foam like the stuff below.


The cooled cheese foam holds its shape a lot better than the warm stuff. I would recommend making this stuff just before your friends arrive. You can't put this in the fridge, as the cheese sauce would solidify in the fridge. Enjoy the entire thing of cheese in one sitting, but be sure to share with your friends. It wouldn't be very good for you to eat it all yourself!


One Year Ago: Loganberry Mallomars
Two Years Ago: Fudgy Waffles
Three Years Ago: Raw Salad & Wagamama Dressing
Four Years Ago: Chocolate and Peanut Butter Mousse Entremet


Friday, January 16, 2015

Junk @ Home 2015 - Wheat Thins


Welcome to the first installment of my 2015 - Junk @ Home Challenge! I decided to start off this something simple and easy to make. Sadly, it turned out to be a little more tricky than I originally expected. I had to experiment with a few different recipes, roll out the dough in a variety of thicknesses and determine the optimal time to bake the crackers.


In the end, I was successful in making Wheat Thin-like crackers but they weren't the shining star of this particular experiment. If anything, I should re-name this post - Homemade parmesan cheese powder. Years ago, Wheat Thins came in a parmesan flavor. The boyfriend loved this particular flavor and was so sad when it disappeared from the shelves. I thought that I would try to recreate them and set about trying to figure out how to make a chemical-free parmesan powder.


After a little internet searching, I found that you can create your own cheese powder by dehydrating a low-moisture cheese. Since I don't own a dehydrator and don't have the space in my kitchen to put sone, I decided to go with the low-fuss, oven-drying method. I left Shredded parmesan in the oven, with the light on, for twenty hours. At the end of that period, I was left with a crumbly, low-oil parmesan cheese. A quick whir in the food processor with some freshly cracked black pepper and I had a flavorful parmesan cheese powder. The crackers were tasty, but it was this cheese powder that will be topping my pastas for the next few weeks!


One Year Ago: Slow Cooker Apple Cinnamon Oatmeal
Two Years Ago: No-Bake Granola Bars
Three Years Ago: Cherry Stripper Cookies
Four Years Ago: Pineapple Chutney & Chicken

Thursday, January 1, 2015

2015 Challenge - Junk at Home!

It's a new year and that means it's time for a new Wilde Challenge! I failed miserably at my 2014 challenge. I only wound up cooking from 19/115 of my cookbooks. And... I bought a few more cookbooks this year. Maybe this will just be an ongoing personal challenge.  

I think my failure was for three reasons. 1. I was traveling for about 1/3 of the year and didn't cook very much during my heavy travel times. 2. We moved house and our kitchen was a huge mess for about a month and a half. 3. This challenge wasn't very exciting! I really enjoyed my Homemade 2012 challenge because I had specific goals and really fun food items to make.

I polled my all of you on Facebook and asked "What are your favorite junk foods?" I decided to go with a similar format as the 2012 challenge this year and have scheduled some pretty fun and tasty junk food challenges for 2015!


January 16 - Wheat Thins - Parmesan Crackers

January 30 - Cheez Whiz - Spray Cheese!

February 13 - Girl Scout Samoas (aka Caramel Delights) - Dark Chocolate - Salted Caramel Samoas

February 27 - Twinkies - Gourmet Snack Cakes

March 13 - Cadbury Creme Eggs - Half-Shell Creme Eggs

March 27 - Jelly Beans - Attempted 3 times! So many failures...

April 10 - Cheese Popcorn

April 24 - Oreos - Classic Oreos

May 22 - Chipwich - Chocolate Cookies with Mint Ice Cream

June 19 - Sno-Balls - Classic Sno-Balls

July 17 - Girl Scout Thin Mints - Thin Mints (From 2013)

July 31 - Snickers with Homemade peanut butter nougat and from-scratch caramel!

September 25 - Donuts - Brownie Donuts with Peanut Butter Frosting

February 4, 2016 - Fritos - Fauxritos

February 18, 2016 - Moon Pies - Classic Vanilla Moon Pies

March 24, 2016 - Tootsie Roll Pops - Chocolate taffy coated in Grape Hard candy

April 14, 2016 - Coca Cola - Cherry Coke

To complete in 2017...

Cherry Poptarts

Nacho Cheese Doritos

Oatmeal Creme Pies

Orange Soda

Little Debbie Cakes

Hostess Apple fruit pie

Combos

Candy Canes
Related Posts with Thumbnails