Image Map
Showing posts with label caramel. Show all posts

Tuesday, March 1, 2016

Salted Toffee with Toasted Almonds

I love making candy. It is surprisingly simple to make and the perfect treat to share. When you bring a cake or a box of cupcakes to the office, people whine about calories and suggest that you are trying to fatten them up. Candy is generally welcomed with open arms (and open mouths) and quickly disappears from the office kitchen.

In my quest to make more candy in 2016, I decided to finally take on a traditional English toffee recipe. After finishing, I have no idea why I didn't make it sooner. The recipe was fast and easy. While you have to babysit the sugar syrup through the whole process, you won't be slaving over the stove for long.


I decided to top the toffee with just flaked sea salt and toasted almonds. Going overly fancy with a toffee recipe seems like a bad idea. The candy is so classic, why trash it up with gummy bears, hot sauce and cotton candy? Just be sure to use toasted almonds to bring out all of their nutty flavor!


This recipe doesn't make a massive amount of candy. Breaking it up into about two dozen pieces gives you a good amount of candy to share with your friends, family or coworkers, without being overwhelmed with a ton of sugar!

What candy should I attempt next? I'm stocking up on granulated sugar with big plans to make it a sweet spring!

One Year Ago: Raspberry & Cheesecake Mousse Entremet
Two Years Ago: Portuguese Sweet Bread
Three Years Ago: Chicken Florentine Pasta
Four Years Ago: Peach Tea Macarons
Five Years Ago: Chocolate Buttercream Truffles

Wednesday, August 12, 2015

J@H - Snickers Bars

Sorry for my lack of posting lately. My kitchen is currently sitting in my living room.


Over the past year, the boyfriend and I have been updating, renovating and decorating our first house. We have been putting off renovating the kitchen because it is the biggest job in the house. We pulled up the old flooring (three layers of tile, Peel & stick tile and linoleum) on Saturday. Re-tiling of the kitchen has taken up the past few days with grout planned for the weekend. We still have to choose a paint color, paint and then install a backsplash. We'll probably be out of the kitchen for another week or so.

Luckily, I had time to put the finishing touches on these bad boys before pulling the appliances out of the kitchen. I've been looking forward to recreating this classic candy in my kitchen. It took a few tries to get the layers right, but the final product is so fantastic!


Rather than coating the entire candy in chocolate, I went with the simpler option and built the candy bar in layers in a 8x8-inch pan. First went in a layer of chocolate. Next I made and pressed in the peanut butter nougat. After setting overnight, I made three different batches of caramel before finally making one that I was happy with. I stirred in the peanuts and poured it over the top. Once the caramel set up, I added the final layer of chocolate.

Do these bars taste exactly like a Snickers Bar? No. But they do taste delicious. They are also a labor of love. There are several other Snickers Bars recipes out there on the internet that are easier to put together. If you want to make everything from scratch and avoid ingredients like marshmallow fluff and store-bought caramels, give this a try!

Though, after all the trouble I had with the caramel layer, I might go with the easy way out next time!

One Year Ago: Hazelnut Cream Cheese Brownies
Two Years Ago: Peach Melba Linzer Bars
Three Years Ago: Gorgonzola & Leek Risotto
Four Years Ago: Orange Cinnamon Bread
Five Years Ago: Spanish Chicken with Mustard-Green Onion Sauce

Saturday, February 14, 2015

Junk @ Home 2015 - Girl Scout Samoas (aka Caramel delights)

Call them Samoas, call them Caramel delights, whatever you choose to call them and wherever you live in America, they are delicious. I just wrote that they are devilious. Yeah, that's totally (not) a real word and it applies to these cookies. Because they make you want to eat the entire box! So devilious...

Anyways...


I added these cookies to my Junk at Home challenge because they were highly requested during my oh-so-official poll in December. People love Girl Scout cookies and they want access to them year round.


I hate to tell people, for fear that they will blame me when they gain forty pounds, but two varieties of Girl Scout cookies are available year round. Thin Mints and Samoas.


The same factory that produces Samoas and Thin Mints, also produces a Keebler-branded version of each cookie - the Grasshopper and the Coconut Dream. They are the exact same cookie. You can buy these any time you want, so long as you are at a grocery store. But if it's Girl Scout cookie season, be sure to buy from those cuties. Yes, even though they cost like $85 a box now. (Price of cookies when little Vicki sold cookies? $2.25/box. True story.)

Since you can buy the legit, original cookie anywhere, anytime, and there are dozens of recipes on other food blogs, I didn't want to make just any Samoa cookie. I made them a little bit more tasty, with more chocolate. And salted caramel. Enjoy.

Four Years Ago: Homemade Butterfinger Bars

Dark Chocolate, Salted Caramel Samoas
A Wilde Original

For the Cookies

1 stick (8 tablespoons) unsalted butter
1/2 cup powdered sugar
1/2 teaspoon vanilla extract
1/3 cup natural cocoa powder
3/4 cup plus 2 tablespoons all-purpose flour

Cream butter with sugar until fluffy. Scrape down the sides of the bowl and add vanilla extract. Beat to combine. Sift in cocoa powder and all-purpose flour. Mix until smooth. Lay out a long sheet of plastic wrap. Pour dough onto plastic wrap and fold over. Roll out dough to 1/4-inch thick. Place on a baking sheet and set in the fridge to chill for 1 hour.

Preheat oven to 350 °F. Take dough from the fridge and stamp out donut-shaped cookies (using either a donut stamp or two circular cookie cutters. Bake cookies for 10-12 minutes. Once baked, remove from the oven and let cool for 2 minutes on the pan. Carefully remove from pan and let cool completely on a wire cookie rack

For the Caramel topping

2 cups caramels, unwrapped (one entire bag of  Kraft Brand Caramels)
3 tablespoons heavy cream
1 teaspoon kosher salt
1 teaspoon vanilla
2 cups shredded coconut

Place caramels, heavy cream, kosher salt and vanilla in a small saucepan over low heat. Stir caramels until they are all melted and the mixture is smooth.  Using a spoon, coat the tops of the cookies with a thin layer of caramel.

Add coconut to the remaining caramel in the saucepan and stir to distribute. Use a spoon (and probably your fingers) spread coconut-caramel mixture over the cookies. Place cookies in the fridge to set up the caramel.

For the chocolate

1 cup dark chocolate chips

While the caramel is setting up in the fridge, melt chocolate using your preferred method. Easiest option is to place chocolate in a microwave safe bowl, pop in the microwave for 30 second intervals, stirring in between each 30 seconds.

Dip the bottoms of the cookies in melted chocolate, place cookies on wax paper. Once cookies are all dunked in chocolate, pour remaining melted chocolate in a squeezey bottle. Pipe stripes over your cookies. Place in the fridge to harden the chocolate.

Share with your friends.

Monday, November 18, 2013

Apple-Cinnamon Dulce de Leche Sweet Rolls

The holiday season is sneaking up on us so quickly! I think it's time to transition to regular everyday recipes and into holiday ones! I'm ready to make snowman cookies, peppermint-chocolate everything and maybe a savory recipe or two. The next two weeks I'm dedicating to Thanksgiving recipes and today we start with breakfast!


Thursday, November 7, 2013

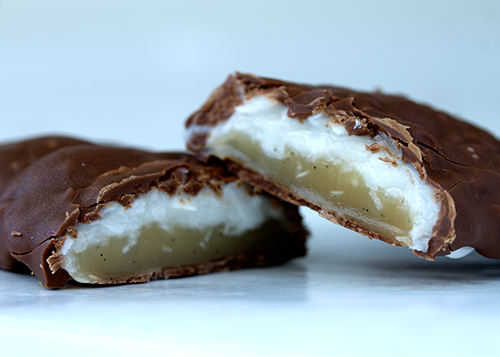
Cocomel Candy Bars

I have been going through a ton of sugar these past few weeks.  I've decided now is a good time of year to get back into candy making since it is the biggest candy eating season of the year! I need to head to the grocery store and stock up on sugar when it goes on sale.


Today we have a combination of two of my favorite candies - caramel and coconut!  These were not a good candy for my braces.  Shh, don't tell my orthodontist!  The coconut is crunchy and fluffy, while the caramel is smooth and sweet.  Just look at those little vanilla seeds dotting the caramel!  So adorable.


PS - these were delicious and totally worth the extra brushing.

One Year Ago: Visiting Montreal
Two Years Ago: Honey Roasted Peanut Butter Cookies
Three Years Ago: New England Cranberry Chutney

Cocomels
Adapted from Chocolate & Confections

For the Coconut layer

1 ounce (2 tablespoons) water
3 ounces (1/4 cup plus 2 tablespoons) sugar
6 ounces (1/2 cup) corn syrup
8 ounces (2 cups) sweetened shredded coconut
1 ounce (1/4 cup) marshmallow creme

For the Caramel layer

1 ounce (2 tablespoons) water
4 ounces (1/2 cup) sugar
1/4 vanilla bean, split and scraped
3.5 ounces (1/3 cup) sweetened condensed milk
3 ounces (1/4 cup) corn syrup
1/5 ounces (3 tablespoons) butter, room temperature

1 pound chocolate

Coat an 8x8-inch pan with cooking spray and line with plastic wrap.

In a small 2-quart saucepan, combine water, sugar and corn syrup and clip on a candy thermometer.  Bring to a boil over medium heat and cook until the temperature reaches 246 ºF.  Remove from the heat and add coconut, stir until completely coated.  Add marshmallow creme and stir with a rubber spatula.  Pour candy mixture into the prepared pan and smooth out with an offset spatula.

Set a bowl of icey water next to the stove along with some spoons. In a 2-quart pot, combine water, sugar, vanilla bean, sweetened condensed milk, corn syrup and butter.  Stir while cooking over medium heat.  Clip on a candy thermometer and cook until temperature reaches 240 ºF.  Dip a spoon in the caramel mixture and plunge into the icey water for 5 seconds.  Test the caramel for hardness.  If it's still very liquidy, continue to cook until temperature reaches 245 ºF. Pour caramel over the coconut layer.  Let set for at least 2 hours.

Temper chocolate in a double boiler.  Once slab of candy is set, remove from the pan by pulling up on the plastic wrap.  Set on the counter, caramel side up.  Pour some of the tempered chocolate on top of the caramel and smooth out with an offset spatula.  Allow chocolate to set.

Flip candy slab over and peel off plastic wrap. Trim the edges so the slab is square.  Cut slab into 12 bars.  Place candy bars on a wire rack.  Pour tempered chocolate over the bars.  Garnish with extra shredded coconut if desired.  Once coated, move to a piece of parchment paper to set.

Thursday, October 10, 2013

Dulce de Leche Cookies

Has fall made an appearance in your neighborhood?  I stepped outside yesterday for my morning run and was shocked by the chill in the air.  It took me about a mile before I wasn't huddled inside of my hoodie.


Tuesday, September 24, 2013

OXO Good Cupcake - Pumpkin & Caramel

First - remember to enter my Fall picnic giveaway!  Last day to enter!!!

With the official start of Fall this past Sunday, I'm ready to break out the apples, pumpkins and fennel.  While at the grocery store this week I decided to stock up on canned pumpkin for the inevitable pumpkin recipes that I want to make.  And believe me, I've got a list of sweets and savories that I want to whip up before everyone gets fed up with pumpkin.  My first pumpkin-filled treat is for the OXO Cookies for Kids' Cancer - Bake a Difference campaign!


Tuesday, July 9, 2013

Happy Birthday WITK!

That's right, it's my birthday!


Actually, to be precise, it's Wilde in the Kitchen's birthday!  Or it was last week.  I'm so terrible with dates.


It's been three whole years since I first put my fingers to the keyboard and typed up my very first post.  It's amazing how many things have changed since June 2010.


In three years I have...

- had four different home addresses
- completed two natural product syntheses
- started and ended my first job in industry
- finally moved in with my long term love
- visited 14 different countries


My cooking and baking skills have improved dramatically since I first decided to join the ranks of the food blogger.  Some things I thought I would never make, but have, include...

- sponge candy
- coconut milk
- Greek yogurt, from scratch
- potato gnocchi
- my own ketchup & mustard


There were so many side effects of starting WITK that I never expected.  Of course I planned on trying my recipes and stretching my culinary skills.  I had hoped my photography skills would improve (something I'm still working on!).  I never thought I would come to know so many great people, make new friends and become part of a larger community.


Thanks so much to everyone out there in the world that has made WITK as fun as it is, for supporting me in my crazy kitchen endeavors and giving me a reason to keep on going.

Have a slice of cake to celebrate WITK turning 3.  I wonder what the next few years will bring?

Thursday, March 15, 2012

Sponge Candy Cupcakes

Boyfriend and I got to have a little fun in the city this Tuesday.

First, I got to buy this new cookbook...


Then, I got to see this lady give a nice powerpoint presentation...


And I got to have a little talk with her!  Ree said boyfriend was a good sport for coming along.

On a side note... can you see my new braces???
Finally, boyfriend and I went and got noodles and pork buns for dinner.  It was an excellent day.

It was only made even better because these little beauties were waiting for me at home.


These cupcakes were actually an idea that came from my mom!  There is a small bakery back home (Hello Cupcake Orchard!) that makes a sponge candy cupcake on a limited basis.  The only thing that would have made mine just as delicious as theirs?  Original Watson's sponge candy crumbled on top.


Tuesday, October 11, 2011

Caramel Brownies

Once upon a time I lived in a cold, frigid land with howling winter winds and a lack of parking in the university center.  The evil professors took all the parking for themselves and left the poor, lowly graduate students to take to public transportation.  In the bright and sunny days of June, July and August, there were none happier than the graduate students as they waited for the busses to come and whisk them to work.  However, as the summer gave way to fall and the trees shed their leaves, the temperatures began to drop as well.

One early winter morning, a bright-eyed first year graduate student bounced out the door in a fire-orange wool jacket, ready for the day ahead.  Only this was not any normal morning, it was the morning of her first Midwestern winter and the graduate student was ill-prepared in her beautiful orange coat.  While her faithful coat protected her from the milder winters of the East coast, it was no match for the winds that tore down the streets. 


The graduate student was no longer bright-eyed, instead she was chilled to the core, red-nosed and buried under layers of sweaters and scarves.  Week after week the winter winds grew stronger, the temperatures plummeted and the graduate student realized that her orange coat would not be enough. 

Armed with her trusty credit card, the graduate student ventured out to find the coat to face all winters.  One that would stand up strong to blustering winds and laugh off snow as it came pelting down.  Searching store after store, the graduate student tried on coat after coat.  Short ones, long ones, puffy ones and sleek ones.  None seemed up to the task of providing her the protection she needed. 

As all hope was dwindling away, the graduate student found it, the perfect coat.  More down-filled comforter than jacket, just the right length and the perfect mocha color.  This coat would allow the graduate student to not only handle the Midwestern winter, but conquer it. 

The blanket jacket protected the graduate student as she waited for her early morning bus and it kept her warm in the evening hours or her return trip home.  The years passed and the jacket provided just the right amount of warmth when the graduate student moved to the milder winters of the Colorado Rockies and it hugged her tight on her long walks home from the lab when she moved back to her beloved East coast.


As the years passed, the blanket jacket became thinner and thinner, yielding its downy filling to the hands of time.  As the graduate student prepared to make her way out into the real world, she realized that it was time to say goodbye to her longtime companion.  The corporate world is no place for a blanket jacket.  Packing it up with loving care, she sent it off to the hands of the Salvation Army, hoping that someone would love it just as much as she had.

Now don't worry, the story doesn't have a sad ending.  While wandering her new hometown, the former graduate student found a new coat.  A beautiful, plum-colored, wool coat, perfect for her new life in the real world.

Monday, August 29, 2011

Ganduja & Caramel Candy Bars

Welcome to a new week everyone!  I hope that everyone is safe and sound from this weekends East Coast hurricane.  I am currently still in Buffalo, since my return flight to New York was cancelled yesterday.  That's okay though, it means I get to spend an extra day with my family and the puppies.  The crazy, lunatic puppies. 


They are currently running around the kitchen with me.  Busy romping around, playing with toys and biting each other.  Generally with one puppy you get used to keeping all of your precious things a few feet off of the ground.  This keeps them from geting little teeth marks all over them.  With two puppies, you have to keep up with the nibbling on things and a constant puppy fight.


These puppies are totally spoiled, with more toys than I had when I was little.  There are even doubles of all the toys, so that they can each have their own.  The problem?  You guessed it.  One puppy wants what the other one has.  They will even taunt each other with toys.  One puppy walking up to the other an waving her toy around until the second puppy leaps at it.  Then it's an all-out puppy war over the toy, then the toy is forgotten and they just bite each other.  Puppy war!


According to the vet, they're just like little kids.  Unless one of them comes to you bleeding, they're just fine.

Friday, May 27, 2011

Hard Candy Caramels

Sometimes things don't turn out exactly the way you had hoped.  Like that pixie haircut I got in college.  Let it be known that I can't pull of a super short look.  I embraced hats while I waited for my hair to grow out.  Then there was the summer that I bought a whole bunch of Bermuda shorts.  Plaid ones and brightly colored ones.  Shorts with animals on them and plain khakis.  I should have scrutinized them in the mirror a little longer, because once I had them at home I realized they were the weirdest lenght ever.  I'm mroe of a capri length kind of girl.


Expectations can be tricky, especially when you think you've got something down.  Maybe you've had batch after batch of perfect macarons, only the have a day of sad, flat, foot-less cookies.  Or maybe you finally got a handle on yeast and you've been making some beautiful breads.  Then one day, your yeast is lazy and your bread comes out flat.  We all have those moments, nobody can be perfect all the time!


I thought I had hit my groove with making candy, I've posted some pretty exciting recipes over the past few months (I'm particularly proud of my sponge candy and 3 Musketeers bars).  Plain sugar candies have thusfar given me trouble.  The salt water taffy wasn't the best it could be, I blame not waiting long enough to pull the sugar.  These caramels just didn't set up the way I wanted, I'm pretty sure my thermometer is to blame.


I was longing to make chewy, soft caramel candies.  I wound up with something more akin to a Sugar Daddy.  I think that if I put these on a stick, then I would have a perfect replica (you should give that a go!)  While completely delicious and very much a caramel, they weren't what I was hoping for.  To achieve a soft and chewy caramel, you want to heat your sugar syrup to 248 degrees F.  A little too late, I realized my thermometer had a bubble in it.  This threw off my temperature reading by 4 degrees, thus giving me a candy somewhere between firm ball and soft crack stage. 

Friday, February 4, 2011

Caramel Thumbprints

As terrible as this past winter storm was, I love what it left behind. Now that the sidewalks are clear and covered in salt, I’m happy to glance at all of the wonder. Sure, Tuesday morning I hid underneath my umbrella as I skated to work. I shook off a layer of ice as I walked into the lab. We all watched from the windows as the rain came down. Wednesday morning came with another harrowing walk to work, a quarter-inch of ice coating every surface. The sidewalks, partially chiseled of their icy coat, were a treat to navigate.


Come Thursday, the city had removed most of the annoying ice and the sun came out. My walk into work Thursday was so much different than the day before. Snow is pretty on its own, but have you ever seen it coated in a sheet of ice? A very thick sheet of ice. Ice that is so thick, you can walk on top of the two feet of snow that are already on the ground. The snow was so shiny and pretty. Everything was covered in a shiny layer of ice, the buildings, the cars and the trees.


Today I’m going to enjoy one more sunny day, until winter weather moves in once again. At least I got a chance to go to the grocery store. I’m planning a major weekend of hunkering down and candy-making. Is it springtime yet?

Saturday, December 4, 2010

Salted Caramel and Chocolate Crostata

Here it is, my third and final crostata. I had so much fun with this particular Daring Bakers’ challenge! And I think that this is the best one yet. I even had a slice for breakfast! There is something about eating a decadent chocolate tart at eight o’clock in the morning. Really fuels you up for the rest of the day!


Looking at the recipe for this dessert you would expect to be in the kitchen for quite some time. In fact, I had this crostata on the plate in two hours. From flour to delicious in the time it takes to watch a movie! Don’t be scared of this recipe. The words caramel and ganache tend to do that to people. I know I was a little concerned when this idea came to my mind. I have never made caramel before. I have never made ganache before. Plus, I would have to blind bake the crust. All together this makes for one fancy-sounding dessert.


I decided to stop being such a pansy about my recipes. We’ve discussed this before, I’m a chemist. I handle chemicals on a daily basis that have the ability to spontaneously light on fire, burn through my $200 jeans or cause damage to my DNA. Making caramel should be a breeze, right? In fact, it was. And you will love it.

Look at that caramel ooze!
 Don’t worry about how fancy it sounds, you can handle it. I know, I had to talk myself into trying this, but you can do it too. Just be sure to read through the recipe before you start. Gather up your courage, put on your big-boy pants and get ready to do some chemistry. Some delicious, delicious chemistry.
Related Posts with Thumbnails