Image Map
Showing posts with label candy. Show all posts

Wednesday, March 15, 2017

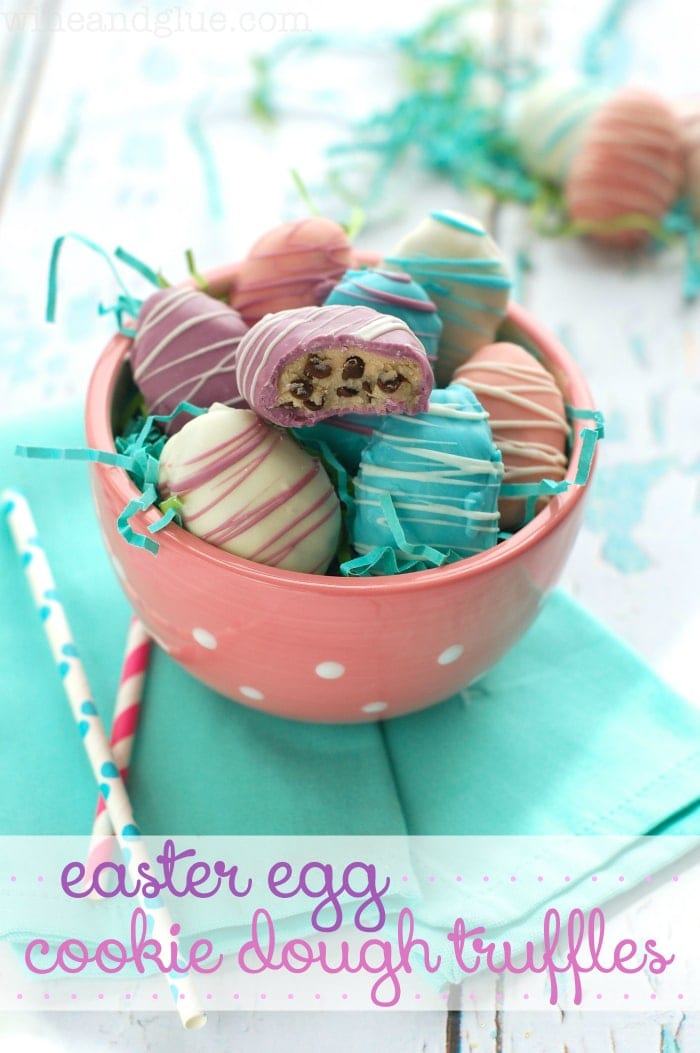
Cookie Dough Egg Truffles

Even though winter just served up another pile of snow for the East Coast, spring is right around the corner! I can't wait! You know who else can't wait for spring? My poor tulips that are now buried under a foot of snow. #PrayfortheFlowers


With spring comes Easter and so much candy! It's my favorite time of year to break out the chocolate and candy thermometer. I also have been eyeing up these egg truffles on Pinterest for a while and decided it was time to make them for myself! These truffles came together really quickly...


...and I ate them all. Seriously. I ate every single one of them.


You should totally make these, but maybe share with your friends. You don't want to be like me.

Though, now that they're gone, I find myself wanting to make another batch. Maybe with a different type of cookie dough...  Someone save me from myself!

One Year Ago: Salted Toffee with Toasted Almonds
Two Years Ago: Raspberry & Cheesecake Mousse Entremet
Three Years Ago: Portuguese Bread
Four Years Ago: Chicken Florentine Pasta
Five Years Ago: Peach Macarons
Six Years Ago: Chocolate Buttercream Truffles

Sunday, April 10, 2016

Vegan Sponge Candy

I have been meaning to test out a vegan sponge candy for years. Many friends and family are either vegetarian or vegan and cannot enjoy the deliciousness of sponge candy. Most candies out there don't have this problem, but my version of sponge candy requires gelatin for proper aeration. It took a few tries to get the candy close to the original. I have a few tweaks left to try, but I wanted to share this first success with you.


The bubbles in this vegan sponge candy are a little larger than in my traditional sponge candy. I am still doing a bit of scientific research into the difference in the protein structures of agar agar and gelatin, but it seems that the agar agar protein is not a strong as the gelatin protein. The bubbles in the vegan version are more akin to that of a Violet Crumble or Crunchie candy bar. It's still delicious, just not quite as smooth!

To make this GMO-free, I used French glucose that was prepared from wheat (This brand). Generally, all corn syrup that is produced in the US is made using GMO corn. As a chemist, I have no problem using GMO-derived corn syrup. Chemically, the corn syrup from GMO or non-GMO corn is exactly the same. The DNA of the corn will have no effect on the corn syrup product. However, if you do not want to support GMOs, use the wheat glucose! It's definitely more expensive, but glucose has so many uses in candy-making and baking.


Since this is a vegan version, I decided to coat my candy in orange chocolate! I melted a package of semi-sweet chocolate chips, added 1 tablespoon vegetable oil and 1 teaspoon orange extract. This is a small batch of sponge candy, just the perfect amount to be able to make and eat it in less than 1 week. Keeping the candy around for any longer is tricky in high humidity. Sponge candy tends to melt when it meets too much water.  

Full disclosure - Since I coated the candy in semi-sweet chocolate, it wasn't completely vegan. There was milk in the chocolate! Vegan friends, you know your options when it comes to vegan chocolate. Simply go with a vegan chocolate for the coating.

All my vegan and vegetarian friends, you can now enjoy some traditional Buffalo Sponge Candy!


Once Year Ago: Homemade Oreo Cookies
Two Years Ago: Potato, Spinach & Asparagus Quiche with Cumin
Three Years Ago: Granola Cookie Wedges
Four Years Ago: Gorgonzola Soup
Five Years Ago: Banana Mallow Cups

Thursday, March 31, 2016

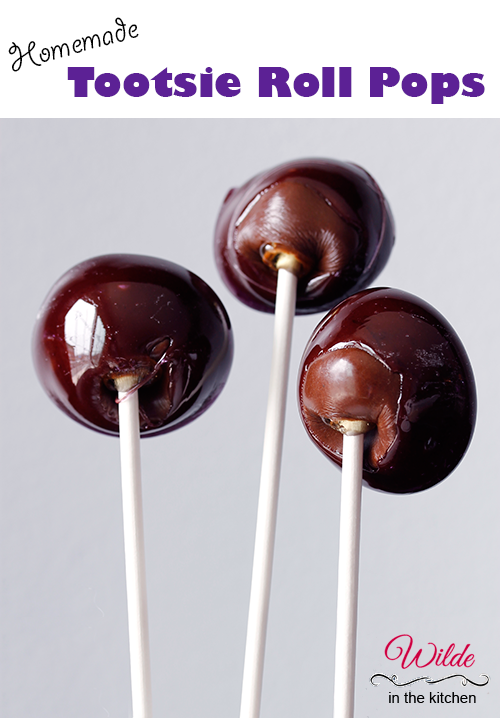
J@H - Tootsie Roll Pops

I have been putting off this recipe for long enough. I knew how to make all of the components, it was just getting up the nerve to put them all together! Now that I've made these bad boys, I am so upset with myself for procrastinating!

With no further delay, please enjoy...


That's right. Tootsie roll pops! Chocolate taffy shrouded in a thick coating of hard candy. Did you ever think that you could make these at home?

I'm not going to say that this is the easiest thing to make at home. You definitely need to block some time and set aside any fear you have of boiling sugar. This is actually two recipes that need to be combined into one - chocolate taffy and grape hard candy. You can get fancy and buy a lollipop mold, but I decided to go a little more free form with my candies. That is why they are flat on one side.

The candy to taffy ratio is a little different with my lollipops - there is a lot more taffy in these than in a store-bought Tootsie pop. I recommend using high quality baker's chocolate and highly concentrated candy oil. With those two ingredients you will get the most richly flavored candies possible. 

How do these compare to the originals? Personally, I think they're way better. Give them a try! With all of the flavor possibilities of taffy and hard candy, I'm thinking of making a summertime version of these - Cherry lollipops with vanilla taffy anyone?

Four Years Ago: Cookie Dough Fudge
Five Years Ago:  Cookie Dough Eggrolls


Thursday, March 24, 2016

Peanut Butter Fudge

I love making candy, but I really hate making fudge. Traditional, stove-top fudge that is. The quick and easy fudge that you make with marshmallow fluff and chocolate is no problem. That stuff I can whip up with no problems. Starting with sugar and corn syrup is a little trickier. I either wind up with a sticky mess or a dry and crumbly block of sugar.

By making my way through the CIA candy cookbook, I am hoping that I will hone my fudge making skills.  There are eight fudge recipes in the book (I made one years ago) and I think my results are getting better with each attempt.

While this peanut butter fudge was not my favorite, in terms of flavor, the texture came out really well. Like all other candy recipes that I make, I couldn't eat more than a single piece. This stuff is really sweet! If you aren't a fan of molasses, you might want to find another peanut butter fudge recipe. The flavor is mild, but definitely noticeable.


To keep myself from eating it all and avoid having to spend my entire weekend at the gym, I sent the rest of the fudge to work with the boyfriend. It took his coworkers about three days to finish the batch. Share the wealth (and the calories) most people will be happy to help out!

One Year Ago: Homemade Marshmallow Peeps
Two Years Ago: Portuguese Sweet Bread
Three Years Ago: Momofuku Confetti Cookies
Four Years Ago: Homemade Buffalo Sauce
Five Years Ago: Balsamic BBQ Chicken

Tuesday, March 1, 2016

Salted Toffee with Toasted Almonds

I love making candy. It is surprisingly simple to make and the perfect treat to share. When you bring a cake or a box of cupcakes to the office, people whine about calories and suggest that you are trying to fatten them up. Candy is generally welcomed with open arms (and open mouths) and quickly disappears from the office kitchen.

In my quest to make more candy in 2016, I decided to finally take on a traditional English toffee recipe. After finishing, I have no idea why I didn't make it sooner. The recipe was fast and easy. While you have to babysit the sugar syrup through the whole process, you won't be slaving over the stove for long.


I decided to top the toffee with just flaked sea salt and toasted almonds. Going overly fancy with a toffee recipe seems like a bad idea. The candy is so classic, why trash it up with gummy bears, hot sauce and cotton candy? Just be sure to use toasted almonds to bring out all of their nutty flavor!


This recipe doesn't make a massive amount of candy. Breaking it up into about two dozen pieces gives you a good amount of candy to share with your friends, family or coworkers, without being overwhelmed with a ton of sugar!

What candy should I attempt next? I'm stocking up on granulated sugar with big plans to make it a sweet spring!

One Year Ago: Raspberry & Cheesecake Mousse Entremet
Two Years Ago: Portuguese Sweet Bread
Three Years Ago: Chicken Florentine Pasta
Four Years Ago: Peach Tea Macarons
Five Years Ago: Chocolate Buttercream Truffles

Tuesday, January 26, 2016

Candy Challenge 2016 - Gianduja Molds


This past weekend I enjoyed the massive East Coast snowstorm from the safety of my kitchen. While I am no stranger to snow, having grown up in Buffalo, NY, absolutely nothing was open and there was no where to go. The majority of shops and restaurants closed in advance of the storm and didn't open until late on Sunday. I decided it was the perfect time to make some chocolates and prepare for Valentine's Day!


I am not a huge fan of making molded candies. They are just too much work in my opinion. I would rather make a truffle or marshmallow, something a little more rustic looking. I always make a giant mess when I make molded candies, this batch was no different. My kitchen counter was covered in chocolate.

While the process was a pain in the butt, the final product was totally worth it. These candies are really good! If you are a chocolate and peanut butter fan, then you should give these candies a try.

Time to mark up one candy on my 2016 challenge list!

One Year Ago: Gingered Chicken Stir Fry
Two Years Ago: Bacony Chicken
Three Years Ago: Fudgy Waffles
Four Years Ago: Soft Pretzels
Five Years Ago: Chocolate & Peanut butter Mousse Entremet

Wednesday, August 12, 2015

J@H - Snickers Bars

Sorry for my lack of posting lately. My kitchen is currently sitting in my living room.


Over the past year, the boyfriend and I have been updating, renovating and decorating our first house. We have been putting off renovating the kitchen because it is the biggest job in the house. We pulled up the old flooring (three layers of tile, Peel & stick tile and linoleum) on Saturday. Re-tiling of the kitchen has taken up the past few days with grout planned for the weekend. We still have to choose a paint color, paint and then install a backsplash. We'll probably be out of the kitchen for another week or so.

Luckily, I had time to put the finishing touches on these bad boys before pulling the appliances out of the kitchen. I've been looking forward to recreating this classic candy in my kitchen. It took a few tries to get the layers right, but the final product is so fantastic!


Rather than coating the entire candy in chocolate, I went with the simpler option and built the candy bar in layers in a 8x8-inch pan. First went in a layer of chocolate. Next I made and pressed in the peanut butter nougat. After setting overnight, I made three different batches of caramel before finally making one that I was happy with. I stirred in the peanuts and poured it over the top. Once the caramel set up, I added the final layer of chocolate.

Do these bars taste exactly like a Snickers Bar? No. But they do taste delicious. They are also a labor of love. There are several other Snickers Bars recipes out there on the internet that are easier to put together. If you want to make everything from scratch and avoid ingredients like marshmallow fluff and store-bought caramels, give this a try!

Though, after all the trouble I had with the caramel layer, I might go with the easy way out next time!

One Year Ago: Hazelnut Cream Cheese Brownies
Two Years Ago: Peach Melba Linzer Bars
Three Years Ago: Gorgonzola & Leek Risotto
Four Years Ago: Orange Cinnamon Bread
Five Years Ago: Spanish Chicken with Mustard-Green Onion Sauce

Thursday, May 7, 2015

Raspberry-Lemonade Jellies

I was working with this recipe a few weeks ago when I was trying to make jelly beans. While the jelly beans didn't work out very well (total fail actually), this recipe was a complete winner!


The original recipe was a plain lemonade recipe, but I've been meaning to try out more of the candy oils that I bought from LorAnn Oils. If you want to go more natural, you can leave out the raspberry candy oil and use just the lemon juice to flavor the candies.


This is actually the second batch of gummies that I made. I tried coloring the first batch with two different kinds of food coloring. Rather than resulting in a pretty pink color, the food coloring pooled up and streaked through the liquid candy mixture. Both liquid and powdered food coloring did absolutely nothing. The moral of the first batch? Don't try to color these candies, it just won't work.


The flavor of these gummies is out of this world! The raspberry candy oil adds the right amount of sweetness to a very tart lemon base. This recipe would probably also work really well with a bunch of different fruit juices. I'm thinking that a watermelon candy would be amazing for the summer!


What kind of gummy candy would you like to see on WITK? This recipe was so quick and easy, I can see making it time and time again.

One Year Ago: I didn't blog at all in May or June last year! Insane!
Two Years Ago: Roquefort Potatoes
Three Years Ago: Thai Chicken Salad
Four Years Ago: 3 Musketeers Bars

Saturday, April 4, 2015

Homemade Easter Candy

Looking for something to do this weekend? Try your hand at some of these fun and adorable Easter treats from around the internets!

Dress up some peeps...

Tuxedo Bunny Peeps - such a cute and easy way to make Peeps a little fancier! | from candy.about.com
Tuxedo Bunnies

Treat the nutella lover in your life...  (aka, me. Please make these for me!)

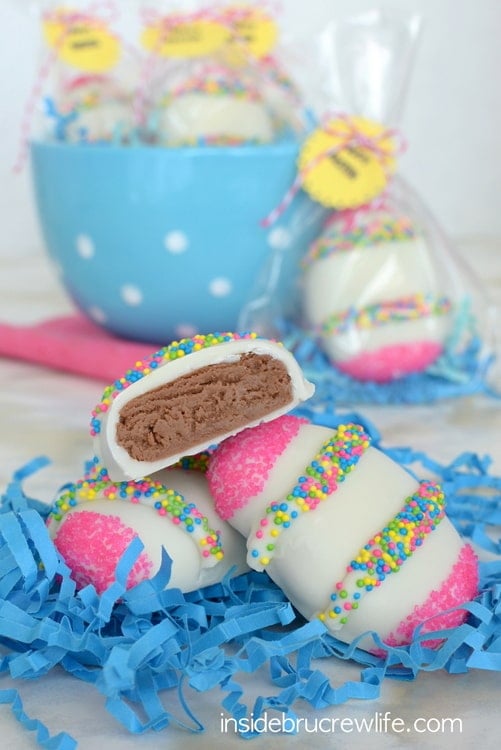
These fun Nutella cream eggs are dipped in white chocolate and decorated with sprinkles.  They make an adorable treat for Easter baskets.
Nutella Cream Eggs

Find the perfect use for sugar googly eyes...

Homemade Marshmallow Chicks
Marshmallow Chicks
Keep it simple and use up a whole bunch of that extra Easter candy...

Easter Candy Bunny Tail Mix
Bunny Tail Mix
Feeling extra ambitious? How about a fancy cake...

Easter Polka Dot Cake | SugarHero.com
Easter Polka Dot Cake

I'll be making these little cookie dough treats with my boyfriend tomorrow!
Easter Sunday Craft and Bunny
<<via>>

Friday, April 3, 2015

Chocolate Peep Cakes

We're just a few days before Easter and I really wanted to use that Peep mold again! I decided to try out a few more recipes to see just what would work. Also, I wanted everything to be peep shaped after I made those peeps last week!

Today I present... Chocolate Peep Cakes!!!


Aren't they cute!


The chocolate cake recipe that I used was a simple one. In fact I wasn't really impressed with the one I chose, so I won't be sharing the cake recipe today. You could probably even use a store bought cake mix., if you are low on time! What makes these cakes come together even faster is the frosting.


These cakes are very similar to petit fours because I used a poured fondant frosting. It took two layers of frosting to completely cover the chocolate, but it retained all the details of the peep cakes! The addition of some sprinkles and black sugar pearls and we have ourselves some cute little cakes!


They are the perfect treat to finish off your Easter holiday! These cakes were also very fun to make, I think I'll try my hand at real petit fours in the future.

Two Years Ago: Perry's Ice Cream Factory Tour
Three Years Ago: Grilled Chicken and Potatoes
Four Years Ago: Tortellini Soup

Thursday, March 26, 2015

Honey Marshmallow Peeps

I was supposed to be bringing you jelly beans for Easter this week. Unfortunately the jelly bean molds that I ordered a month ago haven't yet arrived. I thought giving Amazon a full month to deliver my order would be enough. Apparently I was wrong...

In order to keep up the holiday cheer and bring you all something sweet and Easter related, I picked up another mold at my local craft store. Instead of jelly beans, today we are making Peeps!!!


I've seen several recipes for homemade peeps around the internet. A bunch of people even being patient enough to hand pipe their peeps (just like how they were made at the Just Born factory in the beginning!). I gave hand piping a try...


It didn't work out. I fairly certain that the marshmallow recipe I used wasn't the right one for this particular method. The high amount of corn syrup in the marshmallow syrup lead to a softer final product. While the marshmallow batter wasn't appropriate for hand piping, it was perfect for filling molds!


Two molds, three jars of sprinkles, a box of sugar eyes and a few hours later, my own peeps were born.


And they are so adorable!


The honey flavor in this recipe is fairly mild and is seems to mellow as the peeps age.

Two Years Ago: Momofuku Confetti Cookies
Three Years Ago: Tarragon Chicken and Pesto Potatoes
Four Years Ago: Mango Lime Muffins

Vanilla-Honey Marshmallow Peeps
From Chocolates and Confections

I chose to go with the classic pink, yellow and blue colors, rather than going too crazy with orange or silver. I also used black sugar pearls instead of piping on chocolate eyes. The store bought peeps actually have eyes that are made out of carnuba, an edible wax. Rather than locating some wax and ruining my pans, I thought the sugar pearls were a good alternative!

3 tablespoons powdered gelatin (3 Knox envelopes)
1/2 cup cold water

1 1/2 cups sugar
3/4 cup light corn syrup (light not lite)
1/4 cup honey
1/2 cup water
1 tablespoon vanilla extract

Variety of colored sprinkles
Small black sugar beads

Lightly spray 2 Wilton Peep molds with cooking spray. Wipe out some of the oil with a paper towel.

Whisk gelatin into cold water and set aside while you prepare the sugar syrup.

Combine sugar, corn syrup, honey and water in a 2-quart pot. Bring to a boil over medium-high heat and clip on a candy thermometer. Allow the sugar syrup to boil undisturbed until it reaches 250 °F.

When syrup reaches 250 °F, pour into the bowl of a stand mixer and let sit until the temperature drops to 210 °F.  While the sugar cools, melt the gelatin in a hot water bath (or the microwave). Pour melted gelatin into the sugar syrup and start whipping on high with the whisk attachment.  Whip marshmallow batter for about 6 minutes, until white and fluffy. Add vanilla and whip to incorporate.

Transfer half of the mixture to a large piping bag, fit with a 1-cm round tip. Fill the peep and bunny molds to the top with marshmallow batter. Sprinkle the exposed bottoms of the marshmallows with different colors of sprinkles. Allow marshmallow to set for 3 hours.

Pop marshmallows out of the molds. Add sugar eyes. Coat marshmallows in colored sprinkles and let set for 1-2 hours before serving.

** Alternatively to using the peep molds, you can pour the marshmallow batter into a greased 9x13-inch pan. Stamp out marshmallows with these peep cookie cutters.


Friday, March 13, 2015

Candy Challenge 2015 -- ???

Of all the recipes that I post here at WITK, the ones that I enjoy the most are the candy recipes. Perhaps it's because I'm a scientist at heart and I love playing with boiling sugar. The difference of a few degrees in temperature of your sugar syrup will take you from a soft nougat to a hard caramel. The creative options for candy are endless. Sweet, salty, savory. Everything goes with chocolate.

After taking a break from candy making, I want to start bringing it back to the blog. I think the best way to do this is to challenge myself with a goal. My goal is to complete every single recipe in the cookbook - Chocolates and Confections, by the Culinary Institute of America. It will likely take longer than 1 year, as there are more than 150 recipes in this cookbook. At least I have a head start from the 2011 Candy Challenge, I've already made 12 of the recipes!


Truffles and Chocolates
Black Forest Truffles
White Chocolate Truffles
Sesame-Ginger Truffles
Dark Chocolate Liqueur Truffles
Coffee Truffles
Gianduja Truffles
Coconut-Lime Truffles
Honey-Lavendar Truffles
Green Tea Truffles
Milk Chocolate Liqueur Truffles
Orange Truffles
T'ings
Mint Meltaways
Chocolate-Dipped Anything
Peppermint Bark
Bark

Brittles, Toffees, and Taffies
Hardy Candy
Candy-Coated Fruits
Candy-Coated Apples
Peanut Brittle - Completed - July 27, 2011
Pecan Buttercrunch
English Toffee
Chocolate Taffy - Completed - August 27, 2011
Molasses Taffy
Saltwater Taffy
Peanut Butter Taffy - Completed - February 12, 2013
Soft Caramels
Caramel Apples

Fudge, Fondant, and Pralines
Chocolate Fudge
Vanilla Fudge
Root Beer Float Fudge
Peanut Butter Fudge
Maple Fudge
Penuche
Firefudge
Creamsicle Fudge - DONE
Fondant
Mint Patties
Cherry Cordials
Rock Candy
Pecan Pralines - Completed - July 24, 2012

Marshmallow, Nougat, and Jellies
Marshmallows - Vanilla-Honey Marshmallow - Completed March 26, 2015
Divinity
Chocolate Nougat - Completed - May 6, 2011
Peanut Butter Nougat - Completed - September 16, 2011
Nougat Torrone
Turkish Delight
Sponge Candy - Completed - May 12, 2012
Pectin Jellies
Agar Jellies
Citrus Confit
Chocolate-Coated Confit

Nuts!
Marzipan
Cherry-Almond Marzipan
Tropical Marzipan Squares
Walnut Marzipan
Toasted Hazelnut Squares
Pistachio Squares
Basic Gianduja
Layered Gianduja
Amigos
Buckeyes - Completed - June 6, 2011
Rochers
Almond Dragees
Chili Pecans
Caramel Corn
Coconut Joys - Completed - June 14, 2011
Turtles

Chocolate Molds and Cups
Buttercreams - Completed - April 12, 2011
Molded Cherry Cordials
Peanut Butter Bombs
Belle Helene
Black Pearls
Gianduja Molds
Dish of Dulce
Lattes
Passions

Layers of Flavors
Kitchen Sink Bars - Completed - August 29, 2011
Marshamels
Nutty Bars
PB&J Bars
Peanut Butter Goodness
Cocomels - Completed - November 7, 2013


Here's to mastering candy and chocolate once and for all! Are there any recipes on this list that you would like to see me tackle first?

Anyone want to join me on this journey? I promise to pair it up with an exercise routine, or a fool proof way to pawn off your treats on others!

J@H 2015 - Cadbury Creme Eggs

It's post-Mardi Gras, which means that we are in Easter season! I chose two classic and fun Easter treats to try and replicate for my Junk @ Home challenges this month. We're starting out with a controversial one, the Cadbury Creme Egg!


Why is it controversial? If you have missed out on the news this year, Cadbury Creme Eggs (in the UK) had their recipe tweaked this year. The chocolate shell chocolate was swapped from the original Dairy Milk chocolate to a Cadbury milk chocolate. Apparently they also decreased the number of eggs in a package and kept the price the same. Candy inflation!

Making these chocolates at home, you can choose whatever type of chocolate you want! Desire a dark chocolate creme egg? No problem. White chocolate and peanut butter shell? Why not!

I started off trying to make the creme egg in the traditional way. You create the two halves of the egg and then join them together. This proved to be pretty tricky and a bit of a mess...


Attempt number one was a bit of a fail. The two half shells didn't melt together and the creme filling oozed everywhere! The candies got stuck in the molds and took a few good whacks to remove. There was creme filling all over the place. I decided to change my game plan and create half-shell creme eggs. Besides, a store-bought creme egg is a mouthful.  Half a serving is really the way to go! (That's what I'm telling myself at least)


Creating these half-shell creme eggs was super easy and they're so cute! I went with a rich milk chocolate for the shell and a vanilla-flavored creme filling. Just a few short steps and you can also have some homemade creme eggs for Easter!


Step 1. Fill the candy molds completely with melted chocolate. Wait five minutes and pour out chocolate. (You can pour it back into the bowl with the melted chocolate, or onto a silpat).

Step 2. Add a drop of yellow-tinted filling.


Step 3. Fill with white-colored creme, until just below the top of the mold.

Step 4. Cover creme filling with melted chocolate. Level off bottoms with an offset spatula.

Set the candies by putting the candy molds in the fridge for 30 minutes. Flex the molds and pop the candies out. Share with your friends!


One Year Ago: Portuguese Sweet Bread
Two Years Ago: Red Lobster Cheddar Bay Biscuits & Cajun Chicken
Three Years Ago: Sponge Candy Cupcakes
Four Years Ago: Green Velvet Cupcakes

Cadbury Creme Eggs
Majorly adapted from This Website

I adapted this recipe from the original to remove all concern over corn products and GMO foods. I source my glucose syrup from a place in Manhattan, you can get the same stuff from Amazon! This glucose syrup is made from non-GMO wheat and will set any fears to rest. If you don't have concerns with using corn syrup (I use it all the time too), feel free to substitute corn syrup for glucose.

Egg candy molds (I got mine from Michaels)

12 ounces Milk chocolate, melted and tempered

1/4 cup glucose syrup (85g)
2 tablespoons unsalted butter, room temperature
1 1/4 cups powdered sugar (160g)
1/2 teaspoon vanilla extract
1/8 teaspoon salt
1 tablespoon water
Yellow food coloring

Beat together glucose syrup and butter. Sift in powdered sugar and beat to combine. Add vanilla extract and salt, mix until combined. Add tablespoon of water and beat until creamy and smooth. Scoop out 1/4 cup of creme and tint with yellow food coloring.

You can load the two creme colors into piping bags or zip top bags. It is easier to pipe the filling into the candy shells, rather than trying to scoop it in with a spoon.

Fill candy molds all the way to the top with melted chocolate. Wait 5 minutes. Pour out chocolate and let the molds drip for 1 minute. Flip back over and let set for 30 minutes.

Pipe a "yolk" into the bottom center of the candy shell with the yellow creme. Cover with white creme, filling almost all the way to the top.

Cover with more melted chocolate. Use a knife or offset spatula to even out the tops of the candies.

Pop the molds into the fridge for about 20-30 minutes, or until the chocolate is set. Remove from the fridge and flex the molds to release the candies. Happy Easter!


Monday, December 15, 2014

Candy Cane Mallomars

It's that time of year again!


I have had very little time to bake cookies this year. In addition to moving house recently, the oven in said new house keeps breaking. Basically, we need a new controller board for the oven. The oven keeps powering off at random times. For that reason, I wound up sending my cookies out two days late. Sorry cookie matches!!!


I held strong to tradition and made a holiday mallomar for the cookie swap. This year I went with the classic flavor of candy canes and added a little visual flair with some red and white. Not only is there peppermint flavoring in the marshmallow, I crushed up a whole box of candy canes and added them to the marshmallow. Sweet and crunchy!


Many thanks go out to Lindsay and Julie for organizing the Great Food Blogger Cookie Swap. Not only were there packages of cookies flying all over the world, we also partnered with Cookies for Kid's Cancer and raised money for a good cause.


Since I wasn't able to cook a ton of cookies for the holidays this year, I don't have a bunch of fun new cookie recipes for you. I'm very, very sad about this. Luckily, you can drop by the GFBCS round-ups and see an amazing selection of cookies. Or, you can give these mallomars a try!

One Year Ago: Gingerbread Mallomen
Two Years Ago: Triple Peanut butter and chocolate cookies
Three Years Ago: Peppermint & Chocolate Mallomars
Four Years Ago: Banana Whoopie Pies

Monday, December 16, 2013

Christmas Fudge

We're in the home stretch of the holiday season and it's time to bombard you with a few more festive recipes!  I think we're just about two weeks away from not wanting to see anything peppermint, pumpkin or cranberry related for another year. Until that time comes I'm going to revel in those flavors! Get ready for a holiday countdown of flavor!


Up first is some pretty amazing and easy peppermint and chocolate Christmas fudge.  It's not the holiday season to me until I order my first peppermint hot chocolate from Starbucks.  This fudge is like a condensed, one inch square version of that drink.


I've made a few different varieties of fudge and I think I prefer this method to the classic boiled sugar method. No candy thermometer, no pot and no careful crystallization required. Just microwave, stir and pour. It's incredibly creamy and smooth. I made this batch of fudge for the boyfriends holiday office party and apparently it was gone in no time! I know I had a few pieces for myself.

One Year AgoEggnog Mallomars
Two Years AgoCoconut Brownies
Three Years AgoDark Chocolate Hearts

Easy Christmas Fudge
A Wilde Original

1 (14-oz) can fat-free sweetened condensed milk
3/4 cup semisweet chocolate chips
2 tablespoons cocoa powder
3/4 cup vanilla chips
2 tablespoons powdered sugar
1/2 teaspoon peppermint extract
1/4 cup candy canes, crushed

Line an 8-inch pan with wax paper.

Combine 9 tablespoons (7 ounces) sweetened condensed milk with chocolate chips and cocoa powder.  Microwave on high for 1 minute.  Stir until the chocolate chips are melted and the mixture is smooth.  Pour into the prepared pan and smooth out.  Place in the fridge while you prepare the peppermint  layer.

Combine remaining sweetened condensed milk with vanilla chips.  Microwave for 1 minute, stir until mostly melted.  Add powdered sugar and peppermint extract and stir until smooth.  Pour over chocolate layer and smooth out.  Sprinkle with crushed candy canes and gently press in.  Place in the fridge for 2 hours to harden.

Cut slab of fudge into 25 squares.

Monday, December 2, 2013

Cherry-Lemonade Marshmallows

Sometimes it's fun to give and receive handmade gifts and nothing is more fun to make and give than marshmallows! I've made a long list of different varieties here at WITK, including peppermint, blueberry and birthday cake. These marshmallows are a little different because they contain no corn syrup!


That's right, these marshmallows are actually made using chemistry! The main ingredients for these fluffy pillows are sugar, water and cream of tartar.  Cream of tartar is actually the mild acid - potassium bitartrate. By adding this acid to the sugar solution and introducing heat, the cream of tartar actually catalyzes the breakdown of the sugar (sucrose) molecules into its components - glucose and fructose.  Do you know what is in corn syrup? It's glucose and fructose! We just made our own corn syrup, in situ! (thought I would throw in a little more sciencey verbage for you there.)


So if you aren't a fan of using corn syrup, you should give this recipe a try! The combination of cherry and lemon makes these more of a summer flavor than a winter one, but who doesn't want to be reminded of those warmer days? Whip up a huge batch of these and hand them out to your friends this holiday season! You can even use organically grown sugar and organic cream of tartar (I'm thinking it's collected from organically grown grapes?) and make organic marshmallows!

One Year Ago: Apricot-garlic Pork Tenderloin and Potatoes and Fennel
Two Years Ago: Coconut Brownies
Three Years Ago: Salted Caramel & Chocolate Crostata

Cherry-Lemonade Marshmallows
Adapted from Sweet Confections

These marshmallows came out a little airier and stickier than my usual recipe. This makes a lot of marshmallow, the recipe is easily halved if you don't want two full pans of marshmallows!

For the Lemon Layer
1/4 cup cold water
1/2 cup freshly squeezed lemon juice
3 tablespoons powdered gelatin
1 cup water
3 1/4 cups granulated sugar
1/2 teaspoon cream of tartar
1/8 teaspoon kosher salt
1 teaspoon lemon zest

For the Cherry Layer
3/4 cup pureed cherries
3 tablespoons powdered gelatin
1 cup water
3 1/4 cups granulated sugar
1/2 teaspoon cream of tartar
1/8 teaspoon kosher salt

For the marshmallow coating
2 cups cornstarch
1 cup powdered sugar

Lightly coat two 9x13-inch pans with cooking spray. Gently wipe out the excess with a paper towel.

In a small bowl, whisk together cold water, lemon juice and powdered gelatin. Set next to the stove and allow to bloom.  In a 4-quart pot, combine water, sugar, cream of tartar and salt. Bring to a boil over medium heat. Clip on candy thermometer and cook until sugar dissolves and temperature reaches 250ºF.  Remove from the heat and let cool for 5 minutes.  Add bloomed gelatin and whisk until dissolved.

Pour marshmallow syrup into the bowl of your stand mixer.  Whip with the whisk attachment on high for about 10 minutes.  Add lemon zest and whip for another minute, or until batter is shiny, fluffy and almost completely cool.  Pour into the prepared pans, half in each pan.

Clean out all your equipment and make cherry marshmallow layer!

In a small bowl, whisk together pureed cherries and powdered gelatin. Set next to the stove and allow gelatin to bloom.  In a 4-quart pot, combine water, sugar, cream of tartar and salt. Bring to a boil over medium heat and clip on your candy thermometer. Boil until the sugar dissolves and the temperature reaches 250ºF.  Remove from the heat and let cool for 5 minutes.  Add gelatin and whisk until dissolved.

Pour marshmallow syrup into the bowl of your stand mixer and whip on high for 10-12 minutes, until shiny, fluffy and almost cooled.  Add some red food coloring if you want a darker color. Pour cherry marshmallow batter on top of the lemon layer.  Let marshmallow sit for 4 hours to solidify.

Mix Cornstarch and powdered sugar and place in a large bowl.  Set a mesh sieve over a bowl and get a storage container ready.  Dust your countertop with some of the cornstarch mixture and remove the marshmallow slab from the pan. Dust the top and sides with the cornstarch mixture. Using either a pizza cutter or a chefs knife, cut marshmallow into 1-inch strips. Cut the strips into 1-inch cubes.  Toss the cubes into the bowl of cornstarch and powdered sugar.  Toss to coat.  Transfer marshmallows to the mesh sieve and shake off excess powder.  Transfer to the storage container.

Marshmallows will keep for 2 weeks in an air-tight container.
Related Posts with Thumbnails