Image Map
Showing posts with label basil. Show all posts

Tuesday, March 12, 2013

Thai Chicken Lettuce Cups

Dinner last night was messy.  I blame Shoprite.  It's all because they didn't have the lettuce that I wanted, that Boyfriend and I wound up with sauce all down our wrists.  All I wanted was bibb lettuce, with its nice cup-shaped leaves.  But no, Shoprite had to have romaine, Boston, iceberg, spring mix, everything but bibb lettuce.


Even with all the juices running down our hands, this dinner was delicious.  I always like adding fish sauce into my meals, mostly because it starts out smelling so discusting, but lends such fantastic flavors to my meals.  It's such an amazing transformation!

I wanted a light, yet flavorful dish because I still had three miles to run after dinner.  These lettuce cups were just the perfect dinner to have before hitting the road.


Then I came home and had some chocolate cake.

Tuesday, February 5, 2013

Why Bother? 2012 - Spreadable Flavored Cheese

What a year it has been!  Okay, a year and a month really.  We've finally come to the last week of my year of homemade challenges.  Today I present to you, flavored spreadable cheeses!  This was a fun challenge, I wish I took more pictures during the process of the cheese making.

Boyfriend was perplexed when he opened the fridge and found this.
There were a few ways that I could have gone with the generic term "flavored spreadable cheeses."  Would I make a cracker cheese?  A bagel cheese?  A sandwich cheese?  There are so many soft cheese options!  After reading about cream cheese, queso fresco and other artisan cheeses, I decided to go with a Neufchatel cheese.  This was mostly due to the fact that I didn't need to order and special starters off the Internet.  All you need to prepare Neufchatel is milk, buttermilk and rennet!
I have really grown to love making cheese.  It's a science experiment in your kitchen!  Don't worry though, it isn't an experiment that requires a lot of science know-how.  You just have to heat, stir and wait!  Seriously, the rennet and buttermilk do all of the hard work.  You just have to be patient enough and wait for the cheese to be formed.  I checked on my milk three times before it was actually cheese, it took about 18 hours to reach the desired state.  Cheese making requires a lot of patience.


Science experiment aside, this challenge was seriously fun.  After the buttermilk and rennet formed cheese curds in my milk, I cut the solid slab of curd into 1/2-inch cubes.  Then I shook the pot that the cheese was in.  Rather than the fluid motion of the milk that was in there a day before, there was a geometric pulse of cubes of cheese.  I'm going to have to make more cheese so I can video this weird phenomenon.

After collecting and draining the cheese curds, I was left with a smooth, creamy, white cheese.  Giving it a little taste test, the cheese didn't really remind me of cream cheese.  I didn't go with a cream cheese recipe because it required a mesophilic starter (special bacteria culture), that gives cream cheese its distinctive flavor.  This neufchatel that I had made tasted more like a very strong yogurt.


I totally should have scheduled this challenge for right before or after my bagel challenge (which was just about a year ago now!).  Instead, boyfriend and I headed to our local bagel shop and picked up a half dozen.  We feasted on bagels and neufchatel Sunday morning and hid away from the cold cold temperatures here in New Jersey. 

We weren't just having plain farmers cheese (another name for neufchatel) with our bagels.  Oh no, I divided the cheese into two bowls and flavored them in opposite manners.  One bowl became a sweet treat, with cinnamon and honey.  The second bowl I made into a savory spread with sun-dried tomatoes and fresh basil.  I enjoyed the cinnamon and honey cheese on my whole wheat bagel.  The sun-dried tomato and basil is destined for my turkey sandwiches for lunch this week!


Is it worth it to make your own cheese at home?  Well, I enjoyed this so much for the process of making cheese.  The end product was delicious and it was great to be able to pick my own flavors.  The neufchatel that I made was done with whole milk, though you can definitely make this was a lower fat milk if you want to make a lighter cheese.  I liked the sweet cheese because I was able to control the amount of sweetener in the final product, most sweet cream cheese is full of grams of sugar.

Will making your own bagel topping save you money?  Not a whole lot.  An 8-ounce tub of flavored cream cheese is $2.29 at my local store (about 28 cents per ounce).  This cheese recipe was prepared with 1 gallon of milk ($3.99), 1/4 cup buttermilk (~ $0.25) and 1/4 tablet rennet (~$0.06).  The recipe made 30 ounces of cheese, making it about 14 cents per ounce.  It's about two flavors for the price of one!


I hope that you enjoyed this Why Bother 2012 challenge.  I really had fun making some unusual things in my own kitchen.  Some things I won't be making again (say yes to store bought coconut milk!).  Some recipes were eye-opening (you can make your own organic Greek yogurt!).  A few challenges I've even incorporated into my everyday routine (You know I'm having homemade walnut butter on my waffles every morning!).

Challenge yourself and make something crazy at home!  At some point, everything was homemade (well, except cheese puffs!), you can bring the factory into your kitchen and make everything in a more healthy and economic manner.

Thursday, October 4, 2012

Why Bother? 2012 - Pasta

I've made pasta at home a few times before.  I feel like it is a Fall/Winter activity.  This is because it usually takes a while to make and I don't want to spend my summer hours rolling out pasta dough.  I don't mind cozying up in the kitchen with my helper when the sun goes down before I even get home from work. 


That's right, I said I had a helper!  Making pasta at home tends to be a two person job.  To keep me from making a mess of the ravioli, Boyfriend made a special appearance in the kitchen this weekend to lend a hand.  He only whined about it for a second, then he floured up and dove right in. 


Boyfriends main job was to catch the pasta dough as it made its way through the pasta maker.  If you can rope someone into helping you make pasta, it will make your recipe much easier to prepare.


I'm a big fan of storebought pastas.  These days you can get plain, whole wheat, gluten free, tricolor, herb-infused, the choices are endless.  It also helps that pasta goes on sale for a dollar a box.  When a recipe calls for penne, angel hair or rotini, I'm reaching for the pantry, not the flour bin. 


Where I think the storebought pastas are lacking is in their filled pasta selection.  Sure, you can get cheese tortellini or four cheese ravioli, but unless you want to shell out big bucks for fancy pasta you should think about making your own at home.


For todays recipe I decided to go with a sun-dried tomato ravioli, infusing both the pasta and filling with tomato flavor.  Pasta dough is really easy to make.  All you have to do is pile your flour up, make a well in the center and add your wet ingredients.  Mix your wet ingredients with a fork and slowly start to incorporate the flour.  Once the dough starts to come together, you just knead it with your hands and form it into a disk.  Just like pie dough, you let it sit for a little while and let the flour hydrate.


Once your pasta dough is rested, you get out your flattening tool of choice.  You can use a rolling pin, which was my method of choice for the first few times I made pasta.  You need to have patience and keep rolling and rolling.  The pasta will spring back each time you roll it out, gradually getting flatter. 


After making pasta a few times, I decided to get a pasta maker.  It's heavy duty and clamps onto the countertop.  The pasta maker makes it much easier to roll out the pasta to an even thickness.  I find that the pasta dough springs back less when using a pasta maker.  My machine also came with a spaghetti and linguine cutter.  There are attachments that make thicker or thinner pasta, even a ravioli making attachment.


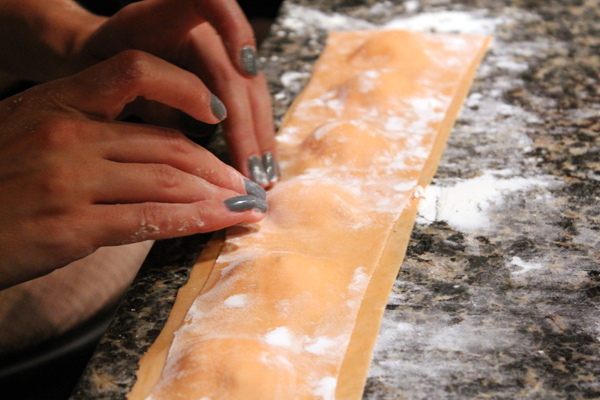
Boyfriend and I made the ravioli by hand after rolling out the pasta.  When it comes to ravioli, I've found that it's best to roll out the pasta to the thinnest option on the machine.  You'll be putting two pieces of pasta on top of each other and the last thing you want is to bite into a thick piece of pasta.


The best thing about homemade pasta is that it takes so little time to cook!  Once the pasta was done, dinner was ready in fifteen minutes.  The sauce took a while to cook down.


One Year Ago: Parmesan Chicken with Thyme Ghocchi
Two Years Ago: Roasted Red Pepper, Leek and Potato Soup

Sun-dried Tomato Ravioli with Basil Cream Sauce
A Wilde Original

Be sure to prepare your pasta dough on a wooden surface or plastic cutting board.  Don't prepare the dough on a granite countertop because it will chill the dough too much and decrease the elasticity of the dough.

Pasta
1 3/4 cups plus 2 tbsp flour
2 eggs
1 tbsp tomato paste
1 tsp olive oil
pinch salt & pepper

Filling
8 ounces ricotta cheese
1/2 cup freshly grated parmesan cheese
3 tbsp chopped sun-dried tomatoes
2 egg yolks (set 2 egg whites aside)

Basil cream sauce
1/4 cup fresh basil leaves
1/3 cup white wine
2 cloves garlic
1 cup heavy cream
Salt and pepper

Pour flour into a mound on your chosen surface.  Make a well in the center of the dough.  Add eggs, tomato paste, salt and pepper to the well.  Using a fork, begin to whisk the eggs with the tomato paste.  Begin to incorporate the flour into the eggs.  As the dough begins to form a shaggy mass, switch to using your hands.  Begin to knead the remaining flour into the dough, pressing with the heel of your hands.  Once all of the flour is incorporated into the dough, form it into a ball and wrap in plastic.  Set dough aside for 1 hour.

Prepare filling by mixing ingredients together in a small bowl.  Set egg whites in another small bowl.

Divide the past dough in half.  Using your desired method, roll out pasta until it is almost paper thin, mine was about 1/8-inch thick.

Flour your work surface and place one sheet of pasta dough on the counter.  Add teaspoons of filling about 1-2 inches apart.  Using a pastry brush, paint around the ricotta filling with the egg whites.  Lay the second sheet of dough on top of the first.  Press the top layer of pasta onto the lower layer, trying to remove any air bubbles from the ravioli.  Cut the ravioli apart using a knife, pizza cutter or pasta cutter.  Let finished pasta rest on a baking sheet dusted with flour for about 1 hour.

Bring a large pot of salted water to a rolling boil.  As the water comes to a boil, prepare the cream sauce.  Combine basil, white wine and garlic in a blender and blend until smooth.  Pour contents of the blender into a saucepan and bring to a boil over medium heat.  Add heavy cream and stir with a whisk.  The sauce will take about 15 minutes to reduce.  Don't be tempted to raise the heat to high, let it reduce slowly.  Once the sauce is close to your desired thickness, give it a taste.  Season with salt and pepper.

As the sauce is reducing, add ravioli to the boiling water.  Don't walk away, it won't take that long to cook the ravioli through.  Once the pasta floats to the top, it is done, this will take about 3-5 minutes.  Fish out pasta with a slotted spoon and set to drain in a colander.  Allow pasta to drain for 1 minute before serving.  Serve ravioli with basil cream sauce.

Tuesday, August 28, 2012

Marinated Tomato Pasta with Gorgonzola

I'm finally back from our weeklong hiatus in the great white north.  No, not Canada.  Alaska!

Boyfriend and I spent a week among the seals, bears and whales, sailing the chilly Pacific on the Celebrity Infinity.  What can I say about Alaska?  It's just plain majestic.  We cruised by, hiked through and flew over some of the most beautiful landscapes that I have ever seen. 


Towering mountains with blue glaciers clinging to their sides.


Green hills, peeking through an early morning layer of clouds.


Huge boulders, floating on a river of flowing blue water and ice.


Our trip through Alaska was also one of the most active vacations we've taken.  Thankfully we had a day at sea to recover from all the activities.

Hiking...


Rock Climbing...


White Water Rafting...


I'm a little tired still.  That's why I went with a simple pasta dish from my new Alaskan cookbook, even though this dish seems like the least Alaskan dish I could find.  No salmon to be found!

But here's a bear...


And here's the pasta!


Thursday, August 23, 2012

Why Bother? 2012 - Sandwich Bread (Part 1)

I really enjoy making bread dough.  I love kneading the dough and the final texture of it.  It's so much fun to play with!  Then there's the science of the yeast and the rising dough.  Making bread is just like a little science experiment in your kitchen.  Just ask any biologist, yeast is very important to science!

The only problem with making bread, I have to find someone to eat it!  I just don't eat that much bread these days.  Since I moved to New Jersey (over a year ago), I have bought one loaf of bread.  Since I got my braces put on (six months ago), I haven't bought a single loaf.  I decided it was too much work to eat sandwiches with the hardware on my teeth.

When it finally came time to the Why Bother? sandwich bread challenge, I decided I had to try something a little different.  You can buy so many different varieties of bread at the local grocery store, farmers market, local bakery or Panera.  I even live equidistant to all four of those places!  I had to make a bread that I would want to eat.


After looking through my five bread-making cookbooks, I settled on two very different loaves.  Today I present to you a pesto swirl bread!  Swirls of freshly made pesto in between airy layers of white bread.  While it came out delicious, I wouldn't suggest using it as a sandwich bread.  The swirls of pesto made the swirls of the bread pop out when the bread was sliced.  Each piece of bread was like a little slinky.


The slinky effect was the exact reason I decided to make a cheese sandwich out of my bread.  The idea came to me in the mid afternoon and I was thinking about it all through my long train ride home.  Two slices of pesto bread, filled with fresh, homemade mozzarella cheese, grilled and melty.  There was no way it couldn't be amazing.  And I was right.

Come back on Sunday for part two of sandwich bread!

Tuesday, June 26, 2012

Pesto-Yogurt Chicken

It's been almost a year.  An entire year at my new job.  A full loop around the sun living with boyfriend.  And it's nearly my anniversary of doing a double-river commute through Manhattan.  Whenever I tell anyone where I live and where I work (my commute being from New Jersey to Long Island) they gasp, wince or give me a look of pain.  Everyone feels sorry for me and my long commute, but I have learned so much in this past year.  I have also read A LOT of books (and cooking magazines!).


What have I learned?  Having the right attitude about being a commuter is half the battle.  Being positive and relaxed about my commute helps to make the days go by easier.  It can also be a lot of fun if you look at it as a casual observer. 

Commuting has the inevitablity of being very predictable.  Here are a few things you can always count on...

~ Someone is always late.  Inevitably, at almost any time of day, there will be someone running through Penn Station to catch a train.

~ That guy next to me is in a hurry.  How can I tell?  As soon as the track number for his train is called, he takes off running.  Usually swearing out loud if it isn't on the track he's standing near. 

~ When I need to be at a 9:00 meeting, the trains will conspire to make me late.  Always.

~ Trains can be late for a wide range of reasons.  Each more ridiculous than the last.  The LIRR is often prone to "rain conditions," "heat conditions," "police activity," "wind conditions," "signal problems," and my favorite "DELAY."

~ The Starbucks near the ACE subway has a shorter line than the one in the center of the station.  Don't tell everyone my secret!

~ People riding peak trains are quieter than those riding off-peak trains.

~ The person who sits down next to me thinks their headphones contain the extremely loud "music" to their earbuds.  The "music" is terrible.

~ If there is only one train line that is delayed, re-routed or cancelled, it will be my line.

Are you a long time commuter or are just starting out your weekly treks to work? What have you learned in your time on public transportation?  Do you find yourself a magnet for talkative types?  Does your train always have a few empty beer cans rolling around?  Does your bus driver think he knows your name?


If you're not a commuter, enjoy the quiet solitude of your car.  And don't pity us commuters, we read a lot of books.  Or take a lot of naps, try doing that in your car!  Wait, don't nap while driving.  It'll be better for everyone.

One Year Ago: Baked Pasta Casserole

Pesto-yogurt sauce
Inspired by Easy Everyday

I always have a container of Greek yogurt sitting in my fridge.  It's useful in so many different recipes and I reccommend getting yourself a container of plain yogurt as well!  This pesto yogurt sauce can be used to marinate chicken or you can toss cooked new potatoes in it for a tangy side dish.
1/4 cup Greek yogurt
2 tbsp basil pesto
1 clove garlic, minced
1/4 tsp kosher salt
1/8 tsp freshly ground black pepper

Combine ingredients and use!

Pesto-yogurt chicken
Inspired by Easy Everyday

This dinner was very fast to put together.  I left boyfriend a note to put chicken in a bag with the sauce an stick it back in the fridge.  That way the chicken was marinated and ready to go in the oven when I got home.  The sides you see on the plate are simple glazed carrots and sauteed spinach.  While I went with chicken legs this time, I would definitely use chicken breasts next time around!

6 Chicken legs
1 batch pesto-yogurt sauce

Toss chicken legs in pesto-yogurt sauce and cover with plastic wrap.  Place in the fridge for 1 hour to marinate. 

Preheat oven to 425 F.  Line a baking sheet with foil, then parchment paper.  Place chicken legs on top, being sure that they aren't touching.  Bake for 30 minutes, turning over halfway through cook time.  You want the meat to reach 165 F.

Monday, July 18, 2011

Pizza Foccacia

Among all of the big changes that have been happening in the Wilde household, the change in living situations is probably one of the biggest.  For the past eight years, boyfriend and I have been a long distance couple.  It did help that we've known each other for the past fifteen years and also that we were both so very busy while we were apart.  Boyfriend was busy building his career and getting a great job, while I spent my time holed up in labs finishing my education.


Now that we are living in one household it's totally different.  Good different!  Not only are the living expenses cut in half (a great bonus), but sometimes I arrive home to discover the laundry I put in the dryer that morning has folded itself up and put itself away!  The dishwasher empties itself and even dinner arrives without me having to lift a finger!

Now, I realize that boyfriend might have a bit to do with the amazing feats of housework and food prep (ordering) because these things never happened when I was living alone!  Food covered dishes would just sit in the sink until I faced the music and put them in the dishwasher.  Laundry would remain in the dryer until I tried to run another load, so that's where those pants were all week...  Dinner would often be a bowl of lettuce that I would call a salad. 


Living with boyfriend definitely has is benefits, most of all being, I get to see him every day.
Related Posts with Thumbnails