


Showing posts with label chocolate. Show all posts
Showing posts with label chocolate. Show all posts
Thursday, December 12, 2013
Cooke Week - Peanut Butter Sandwiches
I can't have a cookie week without including peanut butter and chocolate. It is one of my most favorite flavor combinations ever. When my mom and I made cookies for Christmas, I would inevitably pick at least two or three PB&C recipes for us to make. Then I would promptly eat all of them. I can't make peanut butter blossoms because I will wind up downing the entire batch.
Tuesday, December 10, 2013
Cookie Week - Red Velvet Brownies
Cookie week continues! Hopefully the boyfriends coworkers don't get too sick of cookies. I've been sending him to work with lots and lots of them. Well, most of them, these red velvet brownies didn't leave the house. Call me a sucker for cream cheese frosting, because you couldn't pry these from my hands.

Thursday, November 21, 2013
French Silk Pie
It's apparently Pie Week around the internets. It's this week that everyone in finalizing their thanksgiving menus and dessert is the most important part. At least it's most important in my opinion! It's how you finish off the night and what puts that final nail in the coffin of your food coma.

Personally I love making pies at thanksgiving because it reminds me of my gram. When I was little, we always went over to grams house for thanksgiving dinner. We would walk in the door and the entire house would smell amazing. She had a turkey baking in the kitchen and lamb baking in the basement. Yes, she had a second oven in the basement. I'm not sure exactly how safe the whole situation was, but everyone got something they wanted for dinner.

As gram got older, we moved thanksgiving dinner to my aunts house. The aunts and uncles took over the majority of cooking but my gram still made all the desserts. Cherry pie, pumpkin pie and apple pie all made appearances after dinner. Gram was the dessert queen and made a fierce pie crust. Years later I discovered grams secret. Canned pie filling! My dad was so disillusioned. Gram was a definite housewife of the 1950's, she didn't meet a canned good she didn't like. But seriously, her pies were still awesome.

I did not inherit her pie dough making gene. I'm a huge fan of the cookie crust. Or the those rolled up pie crusts from the grocery store. Don't judge, they're yummy. For our early thanksgiving dinner this week, I prepared a chocolate chocolate chocolate French silk pie. It's rich. It's creamy. It's got to get out of my house before I eat the entire thing!

If you're looking for a little something different at your dessert table this year, whip up this pie. It's sure easy.
Two Years Ago: Sausage & Gorgonzola Mac'n'Cheese
Three Years Ago: Lemon Poppy Seed Muffins
For the Crumb
2/3 all-purpose flour
1 teaspoon cornstarch
1/2 cup granulated sugar
2/3 cup cocoa powder
1 teaspoon kosher salt
6 tablespoons butter, melted
Preheat oven to 300 ºF and line a baking sheet with parchment or a silpat. Combine solid ingredients with a whisk. Add butter and stir until everything is moistened and you form small crumbs.
Spread mixture on baking sheet. Bake for 10 minutes, stir around. Bake for another 10 minutes. Remove from the oven and let cool completely before making cookie crust.
For the crust
3/4 crumb recipe (260 g, 1 3/4 cup)
2 teaspoons granulated sugar
2 tablespoons butter, melted
Pulse chocolate crumbs in the food processor until finely ground, sandy. Transfer to a bowl and add remaining ingredients. Knead with your hands until everything can be put together into a ball.
Press dough into a pie pan, using your fingers and palms to flatten the pie crust and push up onto the sides of the pan. Cover with plastic wrap and place in the fridge to harden.
1 cup whipping cream
1 cup semisweet chocolate chips
1/3 cup butter
1/3 cup granulated sugar
2 beaten egg yolks
3 tablespoons whipping cream
Combine whipping cream, chocolate chips, butter and sugar in a small saucepan. Heat over medium-low heat until chocolate is melted. In a small bowl, beat egg yolks lightly. Slowly pour half of the chocolate mixture into the egg yolks, beating the entire time. Pour egg mixture back into the saucepan and stir. Cook over medium-low heat, stirring continuously, until the mixture begins to bubble and thickens slightly.
Add remaining 3 tablespoons whipping cream and stir to combine. Place saucepan in a bowl of ice water. Let cool for 20 minutes, stirring every 5 minutes or so. Transfer chocolate mixture to a large bowl and whip on high speed for for 4-5 minutes, or until lightened in color and slightly fluffy. Pour into prepared chocolate crust and place in the fridge to chill.
1/2 teaspoon powdered gelatin
1 tablespoon water
1 cup cold whipping cream
2 tablespoons granulated sugar
Pour water over gelatin and allow to bloom for 2 minutes. Microwave, 5 seconds at a time, until gelatin is liquefied.
Beat whipping cream on high speed until frothy. Add granulated sugar and continue beating on high for another minute. Add gelatin and whip on high until you achieve stiff peaks. Transfer to a piping bag with a large star tip, pipe big loopy designs on your pie.
As gram got older, we moved thanksgiving dinner to my aunts house. The aunts and uncles took over the majority of cooking but my gram still made all the desserts. Cherry pie, pumpkin pie and apple pie all made appearances after dinner. Gram was the dessert queen and made a fierce pie crust. Years later I discovered grams secret. Canned pie filling! My dad was so disillusioned. Gram was a definite housewife of the 1950's, she didn't meet a canned good she didn't like. But seriously, her pies were still awesome.
I did not inherit her pie dough making gene. I'm a huge fan of the cookie crust. Or the those rolled up pie crusts from the grocery store. Don't judge, they're yummy. For our early thanksgiving dinner this week, I prepared a chocolate chocolate chocolate French silk pie. It's rich. It's creamy. It's got to get out of my house before I eat the entire thing!
If you're looking for a little something different at your dessert table this year, whip up this pie. It's sure easy.
Two Years Ago: Sausage & Gorgonzola Mac'n'Cheese
Three Years Ago: Lemon Poppy Seed Muffins
French Silk Pie
A Wilde Original
Chocolate Crust
From Momofuku Milk
For the Crumb
2/3 all-purpose flour
1 teaspoon cornstarch
1/2 cup granulated sugar
2/3 cup cocoa powder
1 teaspoon kosher salt
6 tablespoons butter, melted
Preheat oven to 300 ºF and line a baking sheet with parchment or a silpat. Combine solid ingredients with a whisk. Add butter and stir until everything is moistened and you form small crumbs.
Spread mixture on baking sheet. Bake for 10 minutes, stir around. Bake for another 10 minutes. Remove from the oven and let cool completely before making cookie crust.
For the crust
3/4 crumb recipe (260 g, 1 3/4 cup)
2 teaspoons granulated sugar
2 tablespoons butter, melted
Pulse chocolate crumbs in the food processor until finely ground, sandy. Transfer to a bowl and add remaining ingredients. Knead with your hands until everything can be put together into a ball.
Press dough into a pie pan, using your fingers and palms to flatten the pie crust and push up onto the sides of the pan. Cover with plastic wrap and place in the fridge to harden.
French Silk Pie
Adapted from The Better Homes & Gardens Cookbook
1 cup whipping cream
1 cup semisweet chocolate chips
1/3 cup butter
1/3 cup granulated sugar
2 beaten egg yolks
3 tablespoons whipping cream
Combine whipping cream, chocolate chips, butter and sugar in a small saucepan. Heat over medium-low heat until chocolate is melted. In a small bowl, beat egg yolks lightly. Slowly pour half of the chocolate mixture into the egg yolks, beating the entire time. Pour egg mixture back into the saucepan and stir. Cook over medium-low heat, stirring continuously, until the mixture begins to bubble and thickens slightly.
Add remaining 3 tablespoons whipping cream and stir to combine. Place saucepan in a bowl of ice water. Let cool for 20 minutes, stirring every 5 minutes or so. Transfer chocolate mixture to a large bowl and whip on high speed for for 4-5 minutes, or until lightened in color and slightly fluffy. Pour into prepared chocolate crust and place in the fridge to chill.
Stabilized Whipped Cream
from several sources
1/2 teaspoon powdered gelatin
1 tablespoon water
1 cup cold whipping cream
2 tablespoons granulated sugar
Pour water over gelatin and allow to bloom for 2 minutes. Microwave, 5 seconds at a time, until gelatin is liquefied.
Beat whipping cream on high speed until frothy. Add granulated sugar and continue beating on high for another minute. Add gelatin and whip on high until you achieve stiff peaks. Transfer to a piping bag with a large star tip, pipe big loopy designs on your pie.
Thursday, November 7, 2013
Cocomel Candy Bars
I have been going through a ton of sugar these past few weeks. I've decided now is a good time of year to get back into candy making since it is the biggest candy eating season of the year! I need to head to the grocery store and stock up on sugar when it goes on sale.

Today we have a combination of two of my favorite candies - caramel and coconut! These were not a good candy for my braces. Shh, don't tell my orthodontist! The coconut is crunchy and fluffy, while the caramel is smooth and sweet. Just look at those little vanilla seeds dotting the caramel! So adorable.
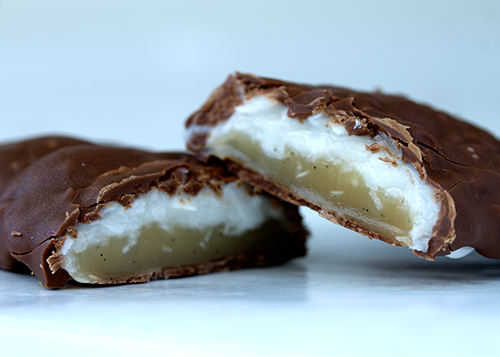
PS - these were delicious and totally worth the extra brushing.
One Year Ago: Visiting Montreal
Two Years Ago: Honey Roasted Peanut Butter Cookies
Three Years Ago: New England Cranberry Chutney
For the Coconut layer
1 ounce (2 tablespoons) water
3 ounces (1/4 cup plus 2 tablespoons) sugar
6 ounces (1/2 cup) corn syrup
8 ounces (2 cups) sweetened shredded coconut
1 ounce (1/4 cup) marshmallow creme
For the Caramel layer
1 ounce (2 tablespoons) water
4 ounces (1/2 cup) sugar
1/4 vanilla bean, split and scraped
3.5 ounces (1/3 cup) sweetened condensed milk
3 ounces (1/4 cup) corn syrup
1/5 ounces (3 tablespoons) butter, room temperature
1 pound chocolate
Coat an 8x8-inch pan with cooking spray and line with plastic wrap.
In a small 2-quart saucepan, combine water, sugar and corn syrup and clip on a candy thermometer. Bring to a boil over medium heat and cook until the temperature reaches 246 ºF. Remove from the heat and add coconut, stir until completely coated. Add marshmallow creme and stir with a rubber spatula. Pour candy mixture into the prepared pan and smooth out with an offset spatula.
Set a bowl of icey water next to the stove along with some spoons. In a 2-quart pot, combine water, sugar, vanilla bean, sweetened condensed milk, corn syrup and butter. Stir while cooking over medium heat. Clip on a candy thermometer and cook until temperature reaches 240 ºF. Dip a spoon in the caramel mixture and plunge into the icey water for 5 seconds. Test the caramel for hardness. If it's still very liquidy, continue to cook until temperature reaches 245 ºF. Pour caramel over the coconut layer. Let set for at least 2 hours.
Temper chocolate in a double boiler. Once slab of candy is set, remove from the pan by pulling up on the plastic wrap. Set on the counter, caramel side up. Pour some of the tempered chocolate on top of the caramel and smooth out with an offset spatula. Allow chocolate to set.
Flip candy slab over and peel off plastic wrap. Trim the edges so the slab is square. Cut slab into 12 bars. Place candy bars on a wire rack. Pour tempered chocolate over the bars. Garnish with extra shredded coconut if desired. Once coated, move to a piece of parchment paper to set.
Today we have a combination of two of my favorite candies - caramel and coconut! These were not a good candy for my braces. Shh, don't tell my orthodontist! The coconut is crunchy and fluffy, while the caramel is smooth and sweet. Just look at those little vanilla seeds dotting the caramel! So adorable.
PS - these were delicious and totally worth the extra brushing.
One Year Ago: Visiting Montreal
Two Years Ago: Honey Roasted Peanut Butter Cookies
Three Years Ago: New England Cranberry Chutney
Cocomels
Adapted from Chocolate & Confections
For the Coconut layer
1 ounce (2 tablespoons) water
3 ounces (1/4 cup plus 2 tablespoons) sugar
6 ounces (1/2 cup) corn syrup
8 ounces (2 cups) sweetened shredded coconut
1 ounce (1/4 cup) marshmallow creme
For the Caramel layer
1 ounce (2 tablespoons) water
4 ounces (1/2 cup) sugar
1/4 vanilla bean, split and scraped
3.5 ounces (1/3 cup) sweetened condensed milk
3 ounces (1/4 cup) corn syrup
1/5 ounces (3 tablespoons) butter, room temperature
1 pound chocolate
Coat an 8x8-inch pan with cooking spray and line with plastic wrap.
In a small 2-quart saucepan, combine water, sugar and corn syrup and clip on a candy thermometer. Bring to a boil over medium heat and cook until the temperature reaches 246 ºF. Remove from the heat and add coconut, stir until completely coated. Add marshmallow creme and stir with a rubber spatula. Pour candy mixture into the prepared pan and smooth out with an offset spatula.
Set a bowl of icey water next to the stove along with some spoons. In a 2-quart pot, combine water, sugar, vanilla bean, sweetened condensed milk, corn syrup and butter. Stir while cooking over medium heat. Clip on a candy thermometer and cook until temperature reaches 240 ºF. Dip a spoon in the caramel mixture and plunge into the icey water for 5 seconds. Test the caramel for hardness. If it's still very liquidy, continue to cook until temperature reaches 245 ºF. Pour caramel over the coconut layer. Let set for at least 2 hours.
Temper chocolate in a double boiler. Once slab of candy is set, remove from the pan by pulling up on the plastic wrap. Set on the counter, caramel side up. Pour some of the tempered chocolate on top of the caramel and smooth out with an offset spatula. Allow chocolate to set.
Flip candy slab over and peel off plastic wrap. Trim the edges so the slab is square. Cut slab into 12 bars. Place candy bars on a wire rack. Pour tempered chocolate over the bars. Garnish with extra shredded coconut if desired. Once coated, move to a piece of parchment paper to set.
Friday, September 20, 2013
Nutella Sandwich Cookies
First, don't forget to enter to win my Fall picnic giveaway! I'm raffling off a handmade picnic blanket made by my very talented mom!
I can't believe how long I've been holding onto this recipe. Especially since it has basically six ingredients and they are things that I always have in my pantry. ALWAYS.

I can't believe how long I've been holding onto this recipe. Especially since it has basically six ingredients and they are things that I always have in my pantry. ALWAYS.
Tuesday, September 10, 2013

Friday, September 6, 2013
Faux Fudge Rounds
This past weekend I was discussing the good old days of back to school with boyfriend and his parents (aka - the in laws). We all came to the conclusion that I'm a big huge nerd and nobody likes me. Why? Because I loved, LOVED, going back to school in September.

Tuesday, August 27, 2013

Thursday, August 22, 2013
Blueberry Chocolate Truffles
I haven't made you candy in such a long time! In order to make up for it, I made you the most decadent chocolate treat around - the truffle.

Made from chocolate, heavy cream and butter, these truffles are not diet friendly. In reality though, you won't want to eat more than one. They satisfy a chocolate craving in just two bites.

These aren't just chocolate truffles though, they are infused with blueberry flavor! You don't have to wait for blueberries to be in season to make these, you just have to find a box of blueberry tea at the store.

After making these truffles I realized that I've been missing the fun of candy making. Get set to see some more candies this fall! The holidays are going to be sweet around here.

These aren't just chocolate truffles though, they are infused with blueberry flavor! You don't have to wait for blueberries to be in season to make these, you just have to find a box of blueberry tea at the store.
After making these truffles I realized that I've been missing the fun of candy making. Get set to see some more candies this fall! The holidays are going to be sweet around here.
Tuesday, July 16, 2013
Nutella Thumbprints
I'm starving! Seriously. I'm only a few hours from my wisdom tooth extraction and I'm not allowed to have anything to eat within six hours of the surgery. Since my appointment is at 1:00, that means I either had to wake up at 5:00am and have breakfast, or I hold out until after I regain sanity tonight. I opted to sleep in until 7:00, so I'm going to be no fun to be around today.

These cookies are sitting on the counter in my kitchen, taunting me with their delicious combination of crumbly cookie and crunchy nut coating. Why didn't I eat more of these yesterday?

See you all on Thursday, when I will be four teeth shorter!
These cookies are sitting on the counter in my kitchen, taunting me with their delicious combination of crumbly cookie and crunchy nut coating. Why didn't I eat more of these yesterday?
See you all on Thursday, when I will be four teeth shorter!
Tuesday, July 9, 2013
Happy Birthday WITK!
That's right, it's my birthday!

Actually, to be precise, it's Wilde in the Kitchen's birthday! Or it was last week. I'm so terrible with dates.

It's been three whole years since I first put my fingers to the keyboard and typed up my very first post. It's amazing how many things have changed since June 2010.

In three years I have...
- had four different home addresses
- completed two natural product syntheses
- started and ended my first job in industry
- finally moved in with my long term love
- visited 14 different countries

My cooking and baking skills have improved dramatically since I first decided to join the ranks of the food blogger. Some things I thought I would never make, but have, include...
- sponge candy
- coconut milk
- Greek yogurt, from scratch
- potato gnocchi
- my own ketchup & mustard

There were so many side effects of starting WITK that I never expected. Of course I planned on trying my recipes and stretching my culinary skills. I had hoped my photography skills would improve (something I'm still working on!). I never thought I would come to know so many great people, make new friends and become part of a larger community.

Thanks so much to everyone out there in the world that has made WITK as fun as it is, for supporting me in my crazy kitchen endeavors and giving me a reason to keep on going.
Have a slice of cake to celebrate WITK turning 3. I wonder what the next few years will bring?
Actually, to be precise, it's Wilde in the Kitchen's birthday! Or it was last week. I'm so terrible with dates.
It's been three whole years since I first put my fingers to the keyboard and typed up my very first post. It's amazing how many things have changed since June 2010.
In three years I have...
- had four different home addresses
- completed two natural product syntheses
- started and ended my first job in industry
- finally moved in with my long term love
- visited 14 different countries
My cooking and baking skills have improved dramatically since I first decided to join the ranks of the food blogger. Some things I thought I would never make, but have, include...
- sponge candy
- coconut milk
- Greek yogurt, from scratch
- potato gnocchi
- my own ketchup & mustard
There were so many side effects of starting WITK that I never expected. Of course I planned on trying my recipes and stretching my culinary skills. I had hoped my photography skills would improve (something I'm still working on!). I never thought I would come to know so many great people, make new friends and become part of a larger community.
Thanks so much to everyone out there in the world that has made WITK as fun as it is, for supporting me in my crazy kitchen endeavors and giving me a reason to keep on going.
Have a slice of cake to celebrate WITK turning 3. I wonder what the next few years will bring?
Tuesday, May 7, 2013
Wilde day in Brooklyn
This weekend I spent my Saturday in Brooklyn with a whole bunch of NYC area food bloggers! It was the NYC bake sale for No Kid Hungry and the delicious treats were out in full effect. For some reason I only took one photo, I must have been distracted by all the sweets.

The crowds were great, thanks to the beautiful sunshine, and once people learned it was all for charity, they really opened up their pocketbooks. With a plethora of sweet options from over twenty local bloggers and bakeries, along with some fun raffles and tote bags to promote big purchases! I picked up a few treats for myself too!
 |
| Image via Tasty Pursuits Meet @sweetsillianah, @Takethetoyz, me, @TheRescueBaker, and @ChipChipHooray |

I took one of my classic dark chocolate cut out cookies and swapped out the traditional all-purpose wheat flour with Bob's Red Mill gluten-free flour and some xantham gum. Along with these cookies being gluten-free, they were made with the support of Divine Chocolate!

Divine Chocolates was one of the sponsors of the NYC bake sale and donated several baking kits to the bloggers to help make some seriously chocolatey treats. These mallomars wound up super chocolatey because they contained the Divine 70% dark chocolate bars and dark cocoa powder. The rich chocolate offset the sweet vanilla marshmallow perfectly.

In addition to being able to bake with the Divine Chocolate, the actual farmers (and owners) of Divine were in town this weekend. I got to meet with and share my mallomars with two of the Ghana farmers. I'm fairly certain they thought they were a bit too sweet, which means they were perfect for the American palate! Give them a try!
Disclaimer - I received a package of Divine chocolate for use in this post. All opinions are my own.
Tuesday, April 23, 2013
Cute, Colorful and French
I know, I know. Macarons are so 2012.

I should move on to whatever this years big dessert treat is! (actually, I have no idea what is supposed to be "IN" in 2013. The internet says it's fancy popcorn, figs and push-pops.) But you know what? I love macs. I think that they are cute and colorful and French, so I will go on making macarons until I run out of flavors to make! Especially now that I've found my method for macs that works consistently without all the fuss.


I received an egg separator - perfect for separating those whites from yolks. I also got a person powered hand mixer - just what my tired arms need for whisking sugar into egg whites over a simmering pot of water. Finally I got a fancy spatula. The tag said it was an omelet turner. I put mine to use in the oh so important macaronage step of macaron making. These tools should be remarketed to the macaron maker. They worked perfectly!

The other reason I decided to make macs? I found these freeze-dried raspberries at a gourmet grocery store in South Orange, NJ. I knew they would make an amazing ingredient to a macaron, since the best way to flavor the cookie itself is with dry ingredients. If you find freeze-dried mangos, let me know. I totally want a mango-flavored mac. How the French would sneer at a mango macaron!

With the tools and the cookies taken care of, there was just one thing left to deal with. The filling. Searching my cabinets I happened upon a block of Callebaut white chocolate. Raspberry macarons filled with white chocolate buttercream? That sounds just delicious enough to work. (Would I rather have filled them with white chocolate ganache? Yes, but I was out of heavy cream and I wanted to eat the cookies ASAP.)

So now we have raspberry and white chocolate macarons, OXO has a new marketing campaign for their egg tools and my pantry is cleared of two of the more eccentric items. All in all, a good day!

See, so cute. So colorful. Bonjour macarons.
Tuesday, April 16, 2013
A Wilde Half Marathon
This weekend, all of my weeks of training culminated in my first half marathon! It was six weeks ago that I decided to sign up for and seriously train for 13.1 miles through Central Park. I have always wanted to complete a half marathon. I realized that I would never train for it, unless I made the commitment and signed up for a race. It was paying that entry fee that made me stick to the training schedule.


You want to head into the city? There really isn't any traffic at 6:30 on a Sunday morning. You might be a bit early for brunch though. We parked our car around 72nd st (right near the finish line of the race) and walked into the park with hundreds of other ladies, already wearing their running bibs. By 8:00am BF was waiting at mile 1 for me and I was waiting at the starting line, nervous energy coursing through my body.
When my seed corral was finally at the start line, all 1,000 women were packed tightly together. After I crossed the starting line I was ready to go. The first mile I spent on the outer edge of the course, passing everyone in my corral. Apparently I underestimated my running pace at 9:40/mile, after my six weeks of training I was running closer to 8:20/mile. I spent the majority of the race passing everyone in front of me, it felt good.

BF met up with me at mile 1 and kept up until his shoes came untied around mile 4. I was on my own, with 10,000 women, running the Central Park loop. The loop is 6 miles around, which meant I would be making two full loops and one mile of a third. I knew that once I passed the 6-mile marker, I would be much happier the next time around.

And I certainly was. I was so thrilled that I reached up and tapped the mile marker, only 1.1 miles left to run. Gradually I increased my pace until I was at a full out sprint to cross the finish line at 1 hour 55 minutes, five minutes shy of my two hour goal. Do I think I could do better? Yes. Do I plan to run more half marathons? You bet.
Finally, my heart goes out to those that have been affected by the tragic events at the Boston marathon yesterday. It's unbelievable what occurred and so surreal that something like this could happen. I have several friends that were running in the marathon this year and thankfully have heard from all of them. Here's hoping for a swift recovery for those injured yesterday as well as the city of Boston.
Boyfriend and I woke up at 6:00 am, Sunday morning, and got dressed in our finest running gear. Boyfriend was not officially signed up for the race, as it was a ladies only half marathon, but he planned to run along with me as long as he could. I loaded up my running belt with Clif bloks and lip balm and tossed extra clothes and water in my tagged baggage. We headed off into the sunrise toward New York City.
You want to head into the city? There really isn't any traffic at 6:30 on a Sunday morning. You might be a bit early for brunch though. We parked our car around 72nd st (right near the finish line of the race) and walked into the park with hundreds of other ladies, already wearing their running bibs. By 8:00am BF was waiting at mile 1 for me and I was waiting at the starting line, nervous energy coursing through my body.
When my seed corral was finally at the start line, all 1,000 women were packed tightly together. After I crossed the starting line I was ready to go. The first mile I spent on the outer edge of the course, passing everyone in my corral. Apparently I underestimated my running pace at 9:40/mile, after my six weeks of training I was running closer to 8:20/mile. I spent the majority of the race passing everyone in front of me, it felt good.
BF met up with me at mile 1 and kept up until his shoes came untied around mile 4. I was on my own, with 10,000 women, running the Central Park loop. The loop is 6 miles around, which meant I would be making two full loops and one mile of a third. I knew that once I passed the 6-mile marker, I would be much happier the next time around.
And I certainly was. I was so thrilled that I reached up and tapped the mile marker, only 1.1 miles left to run. Gradually I increased my pace until I was at a full out sprint to cross the finish line at 1 hour 55 minutes, five minutes shy of my two hour goal. Do I think I could do better? Yes. Do I plan to run more half marathons? You bet.
Finally, my heart goes out to those that have been affected by the tragic events at the Boston marathon yesterday. It's unbelievable what occurred and so surreal that something like this could happen. I have several friends that were running in the marathon this year and thankfully have heard from all of them. Here's hoping for a swift recovery for those injured yesterday as well as the city of Boston.
Tuesday, March 19, 2013
Homemade Thin Mints
My marathon training continues as it seems to be getting easier to run these longer and longer distances. This weekend was my first "long run," with me logging six miles on a chilly Saturday morning. The training program that I am following gradually increases the weekday runs, from 2 miles to 5 miles, while the long Saturday runs increase by two miles each weekend.

During the week I like to use the treadmill. Especially since I run either very early in the morning (like my 5am, 4 miler yesterday) or late at night (I have a 5 mile run set for 9pm tonight). Right now it's dark outside at those times of day! Though the best thing about running on the treadmill are speed intervals.
My usual running pace is between 8:30 and 9:30 per mile. I can run at this pace very comfortably and breathe normally. On the treadmill, I tend to get bored about a mile before I hit my goal distance. What do I do? I increase the speed until I'm breathing heavily and have to work hard to keep up with the belt. Yesterday I maxed out at 7:00 per mile.

Speed intervals not only help me bust out those last quarter miles in no time, but they also train my legs for the faster speed. After a week of speed intervals on the treadmill, I find my overall pace when running outside has improved! Then I come back to the apartment and have a few post-run cookies!
During the week I like to use the treadmill. Especially since I run either very early in the morning (like my 5am, 4 miler yesterday) or late at night (I have a 5 mile run set for 9pm tonight). Right now it's dark outside at those times of day! Though the best thing about running on the treadmill are speed intervals.
My usual running pace is between 8:30 and 9:30 per mile. I can run at this pace very comfortably and breathe normally. On the treadmill, I tend to get bored about a mile before I hit my goal distance. What do I do? I increase the speed until I'm breathing heavily and have to work hard to keep up with the belt. Yesterday I maxed out at 7:00 per mile.
Speed intervals not only help me bust out those last quarter miles in no time, but they also train my legs for the faster speed. After a week of speed intervals on the treadmill, I find my overall pace when running outside has improved! Then I come back to the apartment and have a few post-run cookies!
Sunday, February 3, 2013
Chocolate Chip Cookie Dough Yogurt Popsicles
The warm temperatures this week have me yearning for springtime. I can't wait for long flowy dresses and wedge sandals. I want to head out to the countryside and pick berries. I'm ready for winter to release its grip from the Northeast so boyfriend and I can spend out weekends on our bikes, enjoying picnics under shady trees.


These yogurt pops bring our Chobani week to an end, because you can't finish your day without a tasty dessert! Boyfriend has taught us a little something about the grocery business and the secret world that is behind those swinging doors. And he's learned quite a bit about yogurt and all the great things you can do with it!

Are you ready for spring? Or maybe you live in one of those temperate regions of the world, where if it drops below fifty degrees people break out the winter coats. Seems like we will have a few more chilly weeks here in the tri-state region, doesn't mean I won't be eating these popsicles, just means I'll be curled up on the couch under a blanket when I do eat them!

While giving our kitchen a good, post-new years cleaning, I came across my popsicle molds. The day was cold and dark and I was sad to realize it would be months before I would be filling the molds with fresh berry purees and citrusy juices. The molds went back into the cupboard, waiting for their chance to shine again.
It was this warmer week that brought the popsicle molds back to the front of my mind. That, along with boyfriends Chobani week, gave me the inspiration to bring you these beauties - Chocolate chip cookie dough frozen yogurt pops. Maybe with the first set of popsicles, spring will follow soon after? Like the groundhog of the food world. Let's hope, because I'm ready for floaty chiffon tops and trips to the farmers market.
Tuesday, January 29, 2013
Fudgy Waffles
Normally my cooking is driven by a story or experience, this week I am letting my cooking create an experience. Here's the background...
For those of you who don't know, there exists a complex network of people whose job it is to get the right products on the shelf of your favorite grocery store. One of those people is Boyfriend. To explain to you what he does would probably take a whole post to itself. Simply put - He works with the brands to get their product on the store shelves and make sure they sell to people like us.

As we enter a new phase in our lives, buying a house and setting roots, Boyfriend is looking for a new job. He found a job at Chobani Greek Yogurt that he thinks would be the perfect fit (and seriously, I'm all for more CHO in the house!).
Never content to go the traditional route, he asked me to help out (with my cooking talents) to help get him an interview. Over the next few days, I will be posting some delicious meals we prepared (yes, we!) using Chobani. Let's all band together and help Boyfriend and Chobani get together!

Then make some waffles, they are delicious. I'd recommend eating them for breakfast AND dessert. Afraid of baking? You can totally do this, Boyfriend made these waffles! I just gave him the recipe and told him to excessively spray down the waffle iron with cooking oil.
If you feel so inclined, head over to twitter and help boyfriend out! Just copy and paste this tweet and hopefully he'll be on his way to his dream job and we'll be buying our dream co-op in Brooklyn!
If backing @PitCHObani for Category Mgr-SoHo means more @WildeKitchen @Chobani recipes - I'm In! #InterviewOverYogurt http://bit.ly/WdcW52

For those of you who don't know, there exists a complex network of people whose job it is to get the right products on the shelf of your favorite grocery store. One of those people is Boyfriend. To explain to you what he does would probably take a whole post to itself. Simply put - He works with the brands to get their product on the store shelves and make sure they sell to people like us.
As we enter a new phase in our lives, buying a house and setting roots, Boyfriend is looking for a new job. He found a job at Chobani Greek Yogurt that he thinks would be the perfect fit (and seriously, I'm all for more CHO in the house!).
Never content to go the traditional route, he asked me to help out (with my cooking talents) to help get him an interview. Over the next few days, I will be posting some delicious meals we prepared (yes, we!) using Chobani. Let's all band together and help Boyfriend and Chobani get together!
Then make some waffles, they are delicious. I'd recommend eating them for breakfast AND dessert. Afraid of baking? You can totally do this, Boyfriend made these waffles! I just gave him the recipe and told him to excessively spray down the waffle iron with cooking oil.
If you feel so inclined, head over to twitter and help boyfriend out! Just copy and paste this tweet and hopefully he'll be on his way to his dream job and we'll be buying our dream co-op in Brooklyn!
If backing @PitCHObani for Category Mgr-SoHo means more @WildeKitchen @Chobani recipes - I'm In! #InterviewOverYogurt http://bit.ly/WdcW52
Subscribe to:
Posts (Atom)